Poulan 1990-10 User Manual - Page 12
Poulan 1990-10 Manual
 |
View all Poulan 1990-10 manuals
Add to My Manuals
Save this manual to your list of manuals |
Page 12 highlights
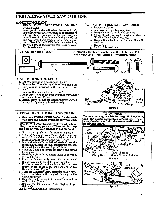
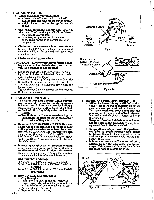
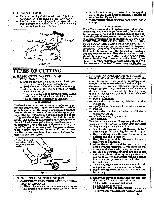
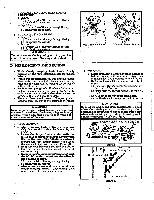
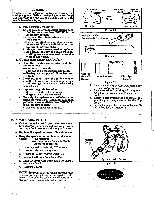
c. Look for decay and rot. If the trunk is rotted, it can snap and fall toward the operator. d. Check for broken or dead branches which can fall on you while cutting. e. Make sure there is enough room for the tree to fall. Maintain a distance of 2 1/2 tree lengths from the nearest person or other objects. Engine noise can drown out a warning call. I Remove dirt, stones, loose bark, nails, staples, and wire from the tree where cuts are to be made. g. Plan to stand on the up-hill side when cutting on a slope. Figure 17 . h. Plan a clear retreat path to the rear and diagonal to the line of fall. Figure 18 . 2. FELLING SMALL 'IltEES--LESS THAN 6" IN DIAMETER a. If you 'mow the direction of fall: 1.) Make a singlefellingcut on theside awayfrom the direction of fall. 2.) Cut all the way through. 3.) Stop the saw, put it down, and get away quickly on your planned retreat path. b. If you are not sure which way the tree will fall, use the notch method described forfellinglargetrees. Buttress f, Roots r. First Direction Of Fall Stay On Uphill Side Of Tree When Felling Figure 17 Figure 18 Direction -Ito L.Of Fall is, Notch ---- Felling Cut DO NOT CUT: A WARNING - -near electrical wires or buildings. - -if you do not know the direction of tree fall. --at night since you will not be able to see well. -during bad weather -- rain, snow, strong wind, etc. 3. FELLING LARGE TREES-6" Dia. Or More The notch method is used to cut large trees. A notch is cut on the side of the tree in the desired direction of fall. After a felling cut is made on the opposite side of the tree, the tree will tend to fall into the notch. NOTE: If the tree has large buttress roots, remove them before making the notch. Cut into the buttresses vertically, then horizontally. Figure 17 . a. Make the notch cut. Figure 19 . 1.) Cut the bottom of the notch first, through 1/3 of the diameter of the tree. 2.) Complete the notch by making the slant cut. 3.) Remove the notch of wood. b. Make felling cut on the opposite side of the notch about 2" higher than the bottom of the notch. c. Leave enough uncut wood between the felling cut and the notch to forma hinge. Figure 20 . A WARNING Stay on the uphill side of the terrain to avoid injury from the tree rolling or sliding downhill after it is felled. Figure 17 . NOTE: Before the felling cut is complete, use wedges to open the cut when necessaryto control the direction offall. Usewood or plasticwedges, but never steel or iron, to avoid kickback and chain damage. Figure 19 N%; Direction Of Fall \r \\\ rt \ Closing Of Notch ----- Opening Of Felling Cut Hinge Holds Tree On Stump And Controls Fall Figure 20 d. Be alert to signs that the tree is ready to fall: 1.) Cracking sounds. 2.) Widening of the Felling Cut. 3.) Movement in the upper branches. e. As treestarts to fall,stop thesaw,putit down,and get away quickly on yourplanned retreat path. £ Be extremely cautious with partially fallen trees that may be poorly supported. When a tree doesn't fall completely, set the sawaside and pull down the tree with a cable winch, block and tackle, or tractor. To avoid injury, do not cut down a partially fallen tree with your saw. NOTE: The hinge helps to keep the tree from twisting and falling in the wrong direction. g. Use a wedge if there is any chance that the tree will not fail in the desired direction. Ku/L5. 1 - • DON'T PUT YOURSELF IN THESE POSITIONS ... -,,, 4-t--11. i .., -12-. Check the wind- Don't cut down wind Check the lean-Don't cut on lean side Check the balance- Don't cut on weighted side
-
 1
1 -
2
-
3
-
4
-
5
-
6
-
 7
7 -
 8
8 -
 9
9 -
 10
10 -
 11
11 -
 12
12 -
 13
13 -
 14
14 -
 15
15 -
 16
16 -
 17
17 -
18
-
19
-
20
-
21
-
22
-
23
-
24
 |
 |
