Poulan 1990-10 User Manual - Page 15
require&
 |
View all Poulan 1990-10 manuals
Add to My Manuals
Save this manual to your list of manuals |
Page 15 highlights
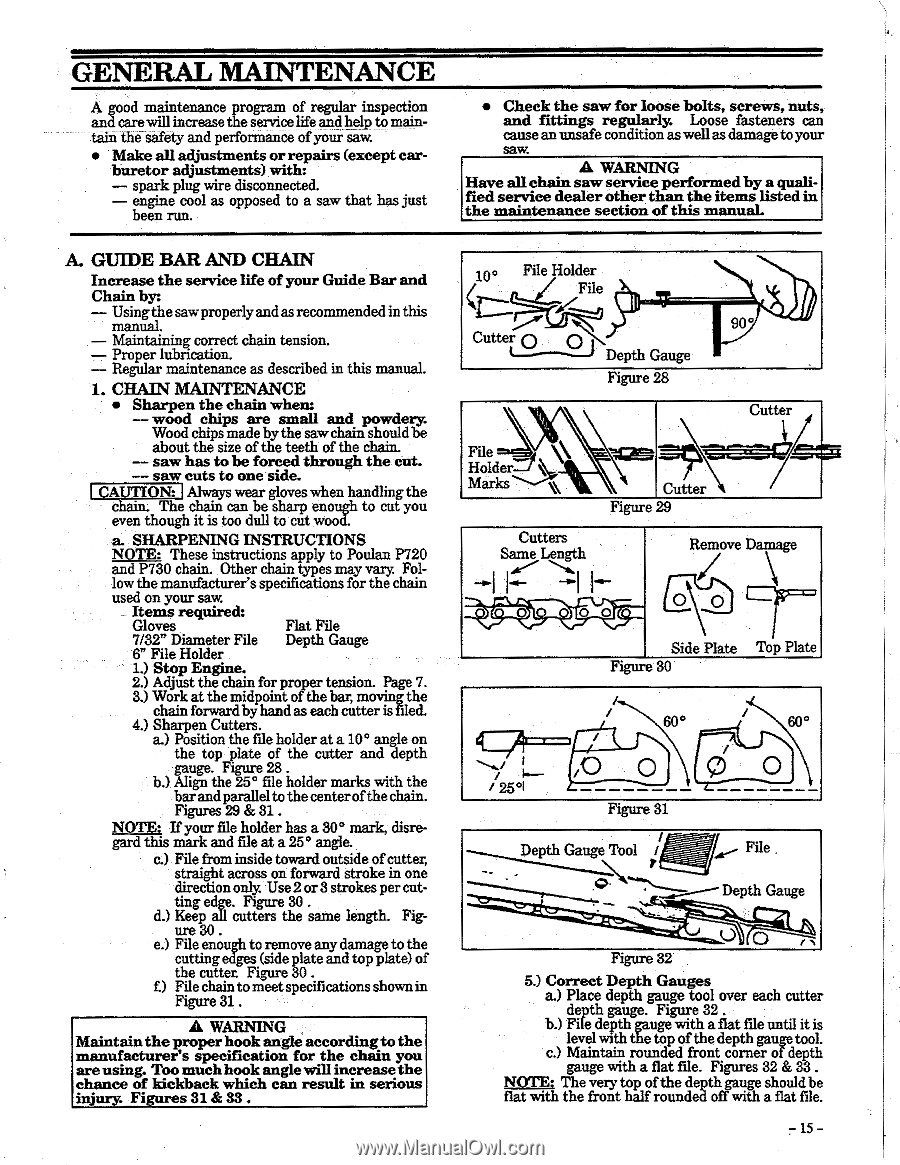
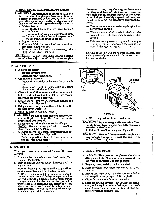
GENERAL MAINTENANCE A good maintenance program of regular inspection and carewill increase the service life and help to maintain the safety and performance of your saw. • Make all adjustments or repairs (except car- buretor adjustments) with: - spark plug wire disconnected. - engine cool as opposed to a saw that has just been run. • Check the saw for loose bolts, screws, nuts, and fittings regularly. Loose fasteners can cause an unsafe condition as well as damage to your saw. A WARNING Have all chain saw service performed by a qualified service dealer other than the items listed in the maintenance section of this manual. A. GUIDE BAR. AND CHAIN Increase the service life of your Guide Bar and Chain by: - Usingthe saw properly and as recommended in this manual. - Maintaining correct chain tension. - Proper lubncation. - Regular maintenance as described in this manual. 1. CHAIN MAINTENANCE • Sharpen the chain when: - - wood chips are small and powdery. Wood chips made bythe sawchain should be about the size of the teeth of the chain. - - saw has to be forced through the cut. - - saw cuts to one side. CAUTION: Always wear gloves when handlingthe chain. The chain can be sharp enough to cut you even though it is too dull to cut wood. a SHARPENING INSTRUCTIONS NOTE: These instructions apply to Poulan P720 and P730 chain. Other chain types may vary. Fol- low the manufacturer's specifications for the chain used on your saw. Items require& Gloves Flat File 7/32" Diameter File Depth Gauge 6" File Holder 1.) Stop Engine. 2.) Adjust the chain for proper tension. Page 7. 3.) Work at the midpoint of the bar moving the chain forward by hand as Pa eh cutter is filed. 4.) Sharpen Cutters. a.) Position the file holder at a 10° angle on the top plate of the cutter and depth gauge. Figure 28 . b.) Align the 25° file holder marks with the bar and parallel to the center of the chain Figures 29 & 31. NOTE: If your file holder bps a 30° mark, disregard this mark and file at a 25° angle. c.) File from inside toward outside of cutter, straight across on forward stroke in one direction only. Use 2 or 3 strokes per cutting edge. Figure 30 . d.) Keep all cutters the same length. Fig- ure 30 . e.) File enough to remove any damage to the cutting edges (side plate and top plate) of the cutter. Figure 30 . 1) File chain to meet specifications shown in Figure 31 . A WARNING Maintain the proper hook angle accordingto the manufacturer's specification for the chain you areusing. Too much hook anglewillincreasethe chance of kickback which can result in serious injury. Figures 31 & 33 . 10° File Holder / File Cutter O O a Depth Gauge Figure 28 90° Cutter File Holder- Marks Cutters Same Length 7.11 1771e.• in••••samma Cutter Figure 29 Remove Damage H La\ -.:O Side Plate Top Plate Figure 30 60° ti i I1-25OI ,O O Figure 31 Depth Gauge Tool / .o. 0 O File Depth Gauge Figure 32 5.) Correct Depth Gauges a.) Place depth gauge tool over each cutter depth gauge. Figure 32 b.) File depth gauge with a flat file until it is level with the top of the depth gauge tool. c.) Maintain rounded front corner of depth gauge with a flat file. Figures 32 & 33 . NOTE: The very top of the depth gauge should be flat with the front half rounded off with a flat file. -15-
-
 1
1 -
2
-
3
-
4
-
5
-
6
-
7
-
8
-
9
-
 10
10 -
 11
11 -
 12
12 -
 13
13 -
 14
14 -
 15
15 -
 16
16 -
 17
17 -
 18
18 -
 19
19 -
 20
20 -
21
-
22
-
23
-
24
 |
 |