ProForm 130 Elliptical English Manual - Page 11
See step 5. Tighten the M8 x 69mm Button Bolt
 |
View all ProForm 130 Elliptical manuals
Add to My Manuals
Save this manual to your list of manuals |
Page 11 highlights
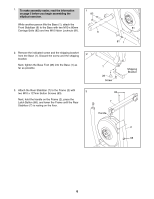
14. Lift the latch on the underside of the Left Pedal Leg (14), and set the Left Pedal Leg on the left Crank 14 Bushing Sleeve (43). Release the lever, and make sure that the Left Pedal Leg is securely connected to the Crank Bushing Sleeve. Connect the Right Pedal Leg (not shown) in the same way. See step 5. Tighten the M8 x 69mm Button Bolt (80) and the two M8 x 23mm Button Screws (84). 14 Latch 43 15. Make sure that all parts of the elliptical exerciser are properly tightened. Note: Some hardware may be left over after assembly is completed. To protect the floor or carpet from damage, place a mat under the elliptical exerciser. 11
-
 1
1 -
2
-
3
-
4
-
5
-
 6
6 -
 7
7 -
 8
8 -
 9
9 -
 10
10 -
 11
11 -
 12
12 -
 13
13 -
 14
14 -
 15
15 -
 16
16 -
17
-
18
-
19
-
20
-
21
-
22
-
23
-
24
-
25
-
26
-
27
-
28
-
29
-
30
-
31
-
32
 |
 |

11
14. Lift the latch on the underside of the Left Pedal Leg
(14), and set the Left Pedal Leg on the left Crank
Bushing Sleeve (43). Release the lever, and make
sure that the Left Pedal Leg is securely connected to
the Crank Bushing Sleeve.
Connect the Right Pedal Leg (not shown) in the
same way.
See step 5. Tighten the M8 x 69mm Button Bolt
(80) and the two M8 x 23mm Button Screws (84).
15.
Make sure that all parts of the elliptical exerciser are properly tightened.
Note: Some hardware may be
left over after assembly is completed. To protect the floor or carpet from damage, place a mat under the
elliptical exerciser.
Latch
14
43
14