ProForm 490 Spx Bike English Manual - Page 7
Attach the Front Stabilizer 8 to the Frame 1
 |
View all ProForm 490 Spx Bike manuals
Add to My Manuals
Save this manual to your list of manuals |
Page 7 highlights
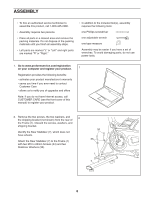
3. Remove the two screws, the two washers, and the shipping bracket (not shown) from the front 3 of the Frame (1). Discard the screws, washers, and shipping bracket. Attach the Front Stabilizer (8) to the Frame (1) with two M10 x 25mm Screws (34) and two Stabilizer Washers (33). 4. Identify the Right Pedal (35). 4 Using an adjustable wrench, firmly tighten the Right Pedal (35) clockwise into the Right Crank Arm (26). Tighten the Left Pedal (not shown) counterclockwise into the Left Crank Arm (not shown). 34 33 1 8 26 35 5. Orient the Handlebar Post (4) as shown. 5 Locate the Adjustment Knob (23) on the front of the Frame (1). Loosen the Adjustment Knob and pull it outward. Then, insert the Handlebar Post (4) into the Frame. Move the Handlebar Post (4) upward or downward to the desired position, release the Adjustment Knob (23) into an adjustment hole in the Handlebar Post, and then tighten the Adjustment Knob. Make sure that the Adjustment Knob is firmly engaged in an adjustment hole. 4 1 23 7
-
 1
1 -
 2
2 -
 3
3 -
 4
4 -
 5
5 -
 6
6 -
 7
7 -
 8
8 -
 9
9 -
 10
10 -
 11
11 -
 12
12 -
13
-
14
-
15
-
16
-
17
-
18
-
19
-
20
-
21
-
22
-
23
-
24
 |
 |
