ProForm 600 Treadmill Uk Manual - Page 20
Unplug The Power Cord
 |
View all ProForm 600 Treadmill manuals
Add to My Manuals
Save this manual to your list of manuals |
Page 20 highlights
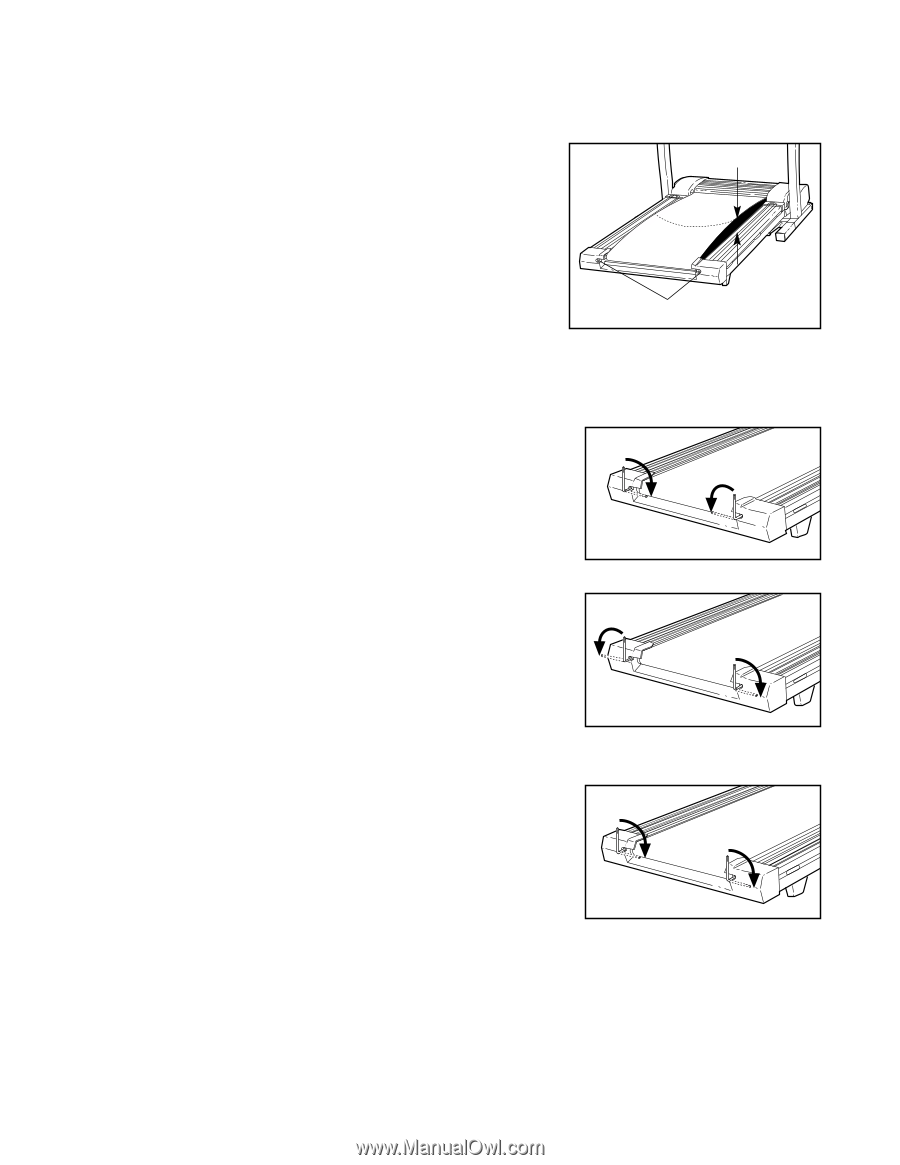
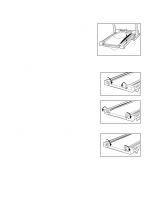
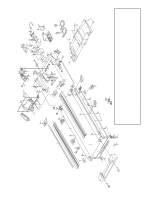
PROBLEM: The walking belt slows when walked on SOLUTION: a. If an extension cord is needed, use only a 3-conductor, 14-gauge (1mm2) cord that is no longer than 5 feet (1.5 meters). b. If the walking belt is overtightened, treadmill performance may decrease and the walking belt may become damaged. Remove the key and UNPLUG THE POWER CORD. Using the allen wrench, turn both rear roller adjustment bolts counterclockwise, 1/4 of a turn. When the walking belt is properly tightened, you should be able to lift each side of the walking belt 7 to 10 cm off the walking platform. Be careful to keep the walking belt centred. Plug in the power cord, insert the key and run the treadmill for a few minutes. Repeat until the walking belt is properly tightened. b 7-10 cm Rear Roller Adjustment Bolts c. If the walking belt still slows when walked on, please call our Customer Service Department. PROBLEM: The walking belt is off-centre SOLUTION: a. If the walking belt has shifted to the left, first remove the key and UNPLUG THE POWER CORD. Using the a allen wrench, turn the left rear roller adjustment bolt clockwise, and the right bolt counterclockwise, 1/4 of a turn each. Be careful not to overtighten the walking belt. Plug in the power cord, insert the key and run the tread- mill for a few minutes. Repeat until the walking belt is centred. b. If the walking belt has shifted to the right, first re- move the key and UNPLUG THE POWER CORD. b Using the allen wrench, turn the left rear roller adjust- ment bolt counterclockwise, and the right bolt clockwise, 1/4 of a turn each. Be careful not to overtighten the walking belt. Plug in the power cord, insert the key and run the treadmill for a few minutes. Repeat until the walking belt is centred. PROBLEM: The walking belt slips when walked on SOLUTION: a. If the walking belt slips when walked on, first remove the key and UNPLUG THE POWER CORD. Using the a allen wrench, turn both rear roller adjustment bolts clockwise, 1/4 of a turn. When the walking belt is cor- rectly tightened, you should be able to lift each side of the walking belt 7 to 10 cm off the walking platform. Be careful to keep the walking belt centred. Plug in the power cord, insert the key and carefully walk on the treadmill for a few minutes. Repeat until the walking belt is properly tightened. PROBLEM: The incline of the treadmill does not change correctly or does not change when i-Fit.com CD's and videos are played SOLUTION: a. With the key inserted in the console, press one of the incline buttons. While the incline is changing, remove the key. After a few seconds, re-insert the key. The treadmill will automati- cally rise to the maximum incline level and then return to the minimum level. This will recalibrate 20 the incline.
-
 1
1 -
2
-
3
-
4
-
5
-
6
-
7
-
8
-
9
-
10
-
11
-
12
-
13
-
14
-
 15
15 -
 16
16 -
 17
17 -
 18
18 -
 19
19 -
 20
20 -
 21
21 -
 22
22 -
 23
23 -
 24
24 -
 25
25 -
26
 |
 |