ProForm 870e Uk Manual - Page 9
Assembly
 |
View all ProForm 870e manuals
Add to My Manuals
Save this manual to your list of manuals |
Page 9 highlights
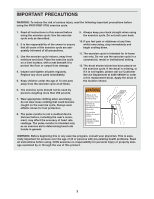
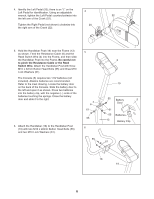
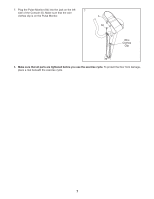
ASSEMBLY Place all parts of the exercise cycle in a cleared area and remove the packing materials. Do not dispose of the packing materials until assembly is completed. Assembly requires the included allen wrench , a phillips screwdriver spanners . and two adjustable 1. Make sure that there are Adjustable Endcaps (25) on the ends of the Front Stabiliser (27). Attach the Front Stabiliser (27) to the saddle on the front of the Frame (13) with two M10 x 75mm Carriage Bolts (54) and two M10 Nylon Locknuts (44). 1 54 25 25 27 2. Make sure that there are Round Endcaps (15) on the ends of the Rear Stabiliser (16). Hold the Rear Stabiliser (16) against the saddle on the rear of the Frame (13), with the square holes facing away from the saddle. Attach the Rear Stabiliser with two M10 x 75mm Carriage Bolts (54) and two M10 Nylon Locknuts (44). 3. Turn the Seat Knob (3) counterclockwise several turns to loosen it. Next, pull back the Seat Knob and insert the Seat Post (9) into the Frame (13). Slide the Seat Post to the desired height and release the Seat Knob. Move the Seat Post up or down slightly until it locks into place. Turn the Seat Knob clockwise to tighten it. Press the Seat Collar (10) into the Frame (13). Next, attach the Seat (8) to the Seat Post (9) with the three M8 Nylon Locknuts (56) and M8 Lock Washers (59). Note: The M8 Nylon Locknuts and M8 Lock Washers may be pre-attached to the bottom of the Seat. 56 2 44 13 15 16 3 8 13 44 15 Square Holes 54 59 56 9 13 59 56 10 3 5
-
 1
1 -
2
-
3
-
 4
4 -
 5
5 -
 6
6 -
 7
7 -
 8
8 -
 9
9 -
 10
10 -
 11
11 -
 12
12 -
 13
13 -
 14
14 -
15
-
16
 |
 |