ProForm Space Saver 695 Elliptical Uk Manual - Page 6
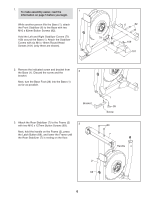
Attach the Rear Stabilizer 7 to the Frame 2
 |
View all ProForm Space Saver 695 Elliptical manuals
Add to My Manuals
Save this manual to your list of manuals |
Page 6 highlights
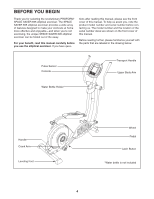
1. To make assembly easier, read the 1 information on page 5 before you begin. While another person lifts the Base (1), attach the Front Stabilizer (6) to the Base with two M10 x 82mm Button Screws (82). Hold the Left and Right Stabilizer Covers (79, 109) around the Base (1). Attach the Stabilizer Covers with six M4 x 16mm Round Head Screws (101) (only three are shown). 79 1 6 82 109 101 2. Remove the indicated screw and bracket from the Base (1). Discard the screw and the 2 bracket. Next, turn the Base Foot (26) into the Base (1) as far as possible. Bracket 3. Attach the Rear Stabilizer (7) to the Frame (2) with two M10 x 127mm Button Screws (83). 3 Next, hold the handle on the Frame (2), press the Latch Button (68), and lower the Frame until the Rear Stabilizer (7) is resting on the floor. 2 68 1 26 Screw 83 7 Handle 6
-
 1
1 -
 2
2 -
 3
3 -
 4
4 -
 5
5 -
 6
6 -
 7
7 -
 8
8 -
 9
9 -
 10
10 -
 11
11 -
 12
12 -
13
-
14
-
15
-
16
-
17
-
18
-
19
-
20
-
21
-
22
-
23
-
24
 |
 |
