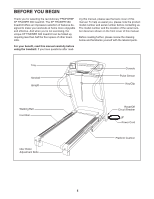
ProForm Xp Trainer 580 Treadmill User Manual - Page 10
Attach the Left Handrail 107 and the Right
 |
View all ProForm Xp Trainer 580 Treadmill manuals
Add to My Manuals
Save this manual to your list of manuals |
Page 10 highlights
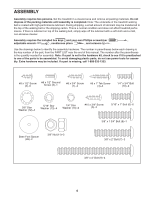
9. Attach the Left Handrail (107) and the Right Handrail (104) with six 5/16" x 1" Bolts (6) and four 5/16" Star Washers (13) as shown. Do not fully tighten the Bolts yet. Slide the Handrail Caps (105) away from the Uprights (75, 80). Attach the lower end of each Handrail (104, 107) to the Uprights with a #10 x 3/4" Screw (5). Orient the Handrail Caps (105) as shown. Secure a Handrail Cap to each Handrail (104, 107) with a #8 x 1/2" Screw (2). 9 107 105 2 5 6 13 6 75 6 13 6 104 80 105 2 5 10. Set the console assembly face down on a soft 10 surface to avoid scratching the console assem- bly. Remove the two #8 x 1/2" Screws (2) from the Crossbar (106), and then remove the Crossbar. Save the Crossbar and the two Screws for steps 11 and 14. 2 106 2 Console Assembly 10
-
 1
1 -
2
-
3
-
4
-
 5
5 -
 6
6 -
 7
7 -
 8
8 -
 9
9 -
 10
10 -
 11
11 -
 12
12 -
 13
13 -
 14
14 -
 15
15 -
16
-
17
-
18
-
19
-
20
-
21
-
22
-
23
-
24
-
25
-
26
-
27
-
28
-
29
-
30
-
31
-
32
 |
 |
