RCA 25210RE1 User Guide
RCA 25210RE1 - ViSYS Cordless Phone Manual
 |
UPC - 044319703559
View all RCA 25210RE1 manuals
Add to My Manuals
Save this manual to your list of manuals |
RCA 25210RE1 manual content summary:
- RCA 25210RE1 | User Guide - Page 1
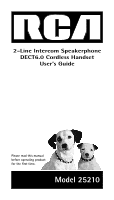
2-Line Intercom Speakerphone DECT6.0 Cordless Handset User's Guide Please read this manual before operating product for the first time. Model 25210 - RCA 25210RE1 | User Guide - Page 2
is designed to be connected to a compatible modular jack that is also compliant. See installation instructions for details. Notes • This equipment may not be used on coin service provided by the telephone company. • Party lines are subject to state tariffs, and therefore, you may not be able to use - RCA 25210RE1 | User Guide - Page 3
Telephone Company Should your equipment cause trouble on your line which may harm the telephone network, the telephone company shall, where practicable, notify you that temporary discontinuance of service the instructions, may off and on, the user is encouraged to try to Interference Problems." This - RCA 25210RE1 | User Guide - Page 4
user's authority to operate the equipment. Licensing Licensed under US Patent 6,427,009. Hearing Aid Compatibility This telephone system or transmitter." For body worn operation, this phone has been tested and meets the FCC RF for DECT Product This telephone is compliant with the DECT 6.0 standard - RCA 25210RE1 | User Guide - Page 5
Inserting a Pause in the Dialing Sequence Telephone Jack Requirements 7 23 Installation 8 Redial 23 Digital Security System 8 Reviewing the Redial Numbers 24 Important Installation Guidelines 8 Storing a Redial Record in Phone Book24 Handset Layout 9 Transferring a Call to Another - RCA 25210RE1 | User Guide - Page 6
mode.......... 33 Programming the Voice mail numbers34 Changing the Battery 35 Battery Safety Precautions 35 Display Messages 36 Handset Sound Signals 36 Troubleshooting Guide 37 Telephone Solutions 37 Caller ID Solutions 38 Battery 38 General Product Care 39 Causes of Poor Reception 39 - RCA 25210RE1 | User Guide - Page 7
Clip AC power adaptor Short Line Cord Telephone 2- Line cords Handset battery pack For Model 25210RE2 there will be ONE additional handset, belt clip, AC power adaptor, battery pack, cover and charge cradle than shown above. Telephone Jack Requirements To use this phone, you will need an RJ11C - RCA 25210RE1 | User Guide - Page 8
refer to the owner's manual for these devices on how to properly set channels to avoid interference. Typical devices that may use the 1.9 GHz frequency for communication include wireless audio/video senders, wireless computer networks, multi-handset cordless telephone systems, and some long-range - RCA 25210RE1 | User Guide - Page 9
Handset Layout display 3 Soft keys Exit (button) VOL +/(buttons) DIR (button) Talk (button) * Tone (button) Mute/Del (button) Int/Hold (button) Connections & Setup Visual Indicator DND/ - RCA 25210RE1 | User Guide - Page 10
(button) 3 Soft Keys Exit (button) VOL +/(buttons) CID (button) DIR (button) One Touch (1-10) buttons Charge LED Headset (button) Mute (button) Flash (button) #Pause (button) Line 1 & 2 (buttons) Speaker (button) Intercom (button) Hold (button) Page (button) Redial (button) 10 - RCA 25210RE1 | User Guide - Page 11
Connections & Setup Installing the Phone Installing the Handset Battery NOTE: You must connect the handset battery before use. CAUTION: To reduce the risk of fire or personal injury, use only the Thomson Inc. approved Nickel-metal Hydride (Ni-MH) battery model 5-2734, which is compatible with this - RCA 25210RE1 | User Guide - Page 12
, or damage use only the 5-2757 (base) power adaptor listed in the user's guide. This power adaptor is intended to be correctly orientated in a vertical or floor mount position. 3. Connect the telephone line cords: If you have 2 single-line wall jacks installed in your home or office, you can use - RCA 25210RE1 | User Guide - Page 13
Connections & Setup 4. If you want to mount the telephone on the wall, you can plug the 2 lines such as the below drawing; -OR- Line 2 Line 1 -OR- Line 2 Line 1 Line 1 + 2 13 - RCA 25210RE1 | User Guide - Page 14
Programming the Telephone 5. Place the handset in the base cradle. The charge indicator illuminates, verifying the battery is charging. 6. Allow the phone to charge for 14 hours prior to first use. If you don't properly charge the phone, battery performance is compromised. NOTE: If the model you - RCA 25210RE1 | User Guide - Page 15
"Saved". NOTE: If you subscribe to Caller ID service, the current Date/Time is set automatically when you receive your first CID record and will override manually set Date/Time. NOTE: The Date/Time setting item only exists in base menu, handset Date/ Time should update automatically after it is set - RCA 25210RE1 | User Guide - Page 16
Telephone Auto Answer (only applicable for handset) This option allows you to pick up the handset from base to answer an incoming call without pressing the Talk/Spk/L1/L2 button. When it is set to off, this function is disabled in this handset. From the Phone Dialback feature. From the Phone setting - RCA 25210RE1 | User Guide - Page 17
near the base. WARNING: It is not recommended that a handset be deregistered unless absolutely necessary because once a handset is deregistered, that handset's telephone features cannot be used until the handset is re-registered. From the Phone Setting Menu: 1. Press the VOL (+ or -) button to - RCA 25210RE1 | User Guide - Page 18
" and then displays "Press "REG" to initiate registration" in the handset. Second Call Alert If it is set to On, you will hear the alert tone when you are in conversation and there is an incoming call from another line. From the Phone Setting Menu: 1. Press the VOL (+ or -) button to scroll to - RCA 25210RE1 | User Guide - Page 19
Programming the Telephone From the Phone Setting Menu: 1. Press the VOL (+ or -) button to scroll to the Update HS List. 2. Press SELECT soft key. 3. The latest handset name list stored in the base will be sent to all registered handsets. Display Setting 1. Make sure your phone is OFF (not in Talk - RCA 25210RE1 | User Guide - Page 20
the screen displays "Saved". Telephone Operation Making Calls with the Cordless Handset 1. Press the Talk button, the unit will pick the first available line for you. -OR- Press Line 1 or Line 2 soft key to select a line you wanted. 2. Wait for a dial tone then dial the phone number. 3. Press the - RCA 25210RE1 | User Guide - Page 21
first available, if both lines are available, Line 1 will be used. 5. For the cordless handset, press the Talk button. 6. Wait for a dial tone, and then dial the phone number. 7. Press Headset button (on base) or End button (on handset) when finished. CAUTION: Use only Thomson Inc. 5-2425 headset - RCA 25210RE1 | User Guide - Page 22
phone idle, manually enter the telephone number. The screen displays the telephone number. 2. Press the DIAL soft key (on base only), Speaker button, Talk button (handset only), or Line 1 or Line 2 button to take a line, and then the telephone number will be dialed out. Answering a Call For cordless - RCA 25210RE1 | User Guide - Page 23
Telephone Operation Mute To have a private, off-line conversation, use the Mute feature. The party on the other end of the line cannot hear you, but you can still hear them. 1. Press Mute button to activate the mute feature. NOTE: When using the mute feature on the base, the indicator will - RCA 25210RE1 | User Guide - Page 24
on the screen. 6. You can edit the telephone number. 7. Press SAVE soft key to enter the VIP Tone Melody selection. Transferring a Call to Another Extension 1. Press XFER soft key when the phone is in Talk mode. 2. Use VOL (+ or -) to select the desired handset or base you want to transfer to, and - RCA 25210RE1 | User Guide - Page 25
the call again. Conference Calls This system can support 3-way and 4-way conference calls. Join a call in progress: 1. While a call is in progress, another user can join that call by pressing the corresponding Line button on the base unit or soft key in the handset. Both parties on the original call - RCA 25210RE1 | User Guide - Page 26
Telephone Operation Four-way conference call (Line 1 + Line 2 + 2 extension): 1. Once the base unit or handset has both Line 1 and 2 on hold, press the Intercom button and then select the desired handset or base to intercom. 2. The selected handset or base will emit a page tone. The user and Phone - RCA 25210RE1 | User Guide - Page 27
In order to use this unit's Caller ID features, you must subscribe to either the standard Name/Number Caller ID Service or Call Waiting Caller ID Service. To know who is calling while you are on the phone, you must subscribe to Call Waiting Caller ID Service. When the unit receives an incoming call - RCA 25210RE1 | User Guide - Page 28
seconds. Deleting All Call Records This feature allows you to clear all CID for 3 seconds. Dialing Back When reviewing CID records, you can dial or the Spk button or the Line 1 or Line 2 button. If You Programmed Your from your area code. 3. To adjust the phone number format, use the FORMAT soft key. - RCA 25210RE1 | User Guide - Page 29
+3-digit area code +7-digit telephone number 4. To dial the displayed number, select a Line or press Talk, Spk, features of this unit, you must subscribe to either the standard Name/Number Caller ID Service or Caller ID with Call Waiting Service. To know who is calling while you are on the phone - RCA 25210RE1 | User Guide - Page 30
"Handset Name" for name editing method. 5. Press SAVE soft key. The screen displays "Enter Number". 6. Use the touch-tone pad to input a telephone number. TIP: Press the #Pause button twice to insert a pause in a number if necessary. 7. Press the SAVE soft key to save. Reviewing Phone Book - RCA 25210RE1 | User Guide - Page 31
Memory/Phone Book Editing a Phone Book Record 1. When reviewing the phone book records, use the VOL (+ or -) button or the number keys to scroll to the desired record. 2. Press EDIT soft key to enter edit mode. You may now change the name, if desired. Please refer to section "Handset Name" for name - RCA 25210RE1 | User Guide - Page 32
record while reviewing it: 1. Make sure the phone is OFF (not in Talk mode). 2. Press the Phonebook button to access the phone book. 3. Use the VOL (+ or -) button or the number keys to scroll to the desired record. 4. Press the Talk or Spk button on the handset or press the Speaker or Line 1/2 on - RCA 25210RE1 | User Guide - Page 33
Mail System Provided your phone company offers voice messaging service and you subscribe to it, the NEW MSG indicator on the base and the Visual Indicator on the top of the handset flashes to indicate a message is waiting. The screen displays "VOICE MAIL L1" or "VOICE MAIL L2" to indicate which line - RCA 25210RE1 | User Guide - Page 34
Voice Mail System Programming the Voice mail numbers 1. Make sure your phone is OFF (not in talk mode). 2. enter the phone number. 6. Press the SAVE soft key to save the number. 7. The screen displays "VOICE MAIL X" and the number for 5 seconds and then returns to the idle mode. Note: - User can - RCA 25210RE1 | User Guide - Page 35
battery model 5-2734, which is compatible with this unit. 1. Make sure the telephone is OFF (not in Talk mode) before you replace battery. 2. Remove the battery compartment door. 3. Disconnect the battery plug from the jack inside the battery compartment and remove the battery pack from the handset - RCA 25210RE1 | User Guide - Page 36
telling you to enter a name. ENTER NUMBER Prompt telling you to enter a telephone number. NEW CALLS Indicates call or calls which have not been reviewed. HANDSET NAME Prompt telling you to enter a user name for the hand set. UNAVAILABLE Indicates that the function you want to - RCA 25210RE1 | User Guide - Page 37
. Make sure the telephone line cord is connected to the base and the wall jack. • Connect another phone to the same jack. If it doesn't work, the problem might be your wiring or local service. • The handset may be out of range of the base. Move closer to the base. • Make sure the battery is properly - RCA 25210RE1 | User Guide - Page 38
Troubleshooting Guide "Out of Range..." is displayed on the screen • Move the handset closer to the service from your local telephone company to receive CID information. Battery If you experience any of the following problems, even after recharging the battery, you may need to replace the battery - RCA 25210RE1 | User Guide - Page 39
Troubleshooting Guide General Product Care To keep your unit working and looking good, follow these guidelines: • Avoid dropping the handset, as well as other rough treatment to the phone. • Clean the phone is using the same frequency. • Handset battery is low. • You're out of range of the base. 39 - RCA 25210RE1 | User Guide - Page 40
the problem is resolved. Any unauthorized repairs, changes or modifications not expressly approved by Thomson Inc. could void the user's authority to operate this product. For instructions on how to obtain a replacement unit, refer to the warranty included in this guide or call customer service at - RCA 25210RE1 | User Guide - Page 41
does not cover: • Customer instruction. (Your Owner's Manual provides information regarding operating instructions and user controls. Any additional information, should be obtained from your dealer.) • Installation and setup service adjustments. • Batteries. • Damage from misuse or neglect - RCA 25210RE1 | User Guide - Page 42
provided under this warranty is the exclusive remedy of the consumer. Thomson Inc. shall not be liable for incidental or consequential damages resulting from or exclusions may not apply to you. • This warranty gives you specific legal rights, and you also may have other rights that vary from - RCA 25210RE1 | User Guide - Page 43
Accessory Information Accessory Information DESCRIPTION MODEL NO. Handset Replacement Battery 5-2734 AC Power Adaptor 5-2757 (base)/5-2828 (charger) To place order, have your Visa, MasterCard, or Discover Card ready and call toll-free 1-800-338- - RCA 25210RE1 | User Guide - Page 44
Caller ID Solutions 38 Causes of Poor Reception 39 Changing the Battery 35 Conference Calls 25 Contrast 19 Copying a Phone Book Record 31 Cordless Handset 22 D Date/Time 15 Deleting a CID Record 28 Deleting a Phone Book Record 32 Deleting All Call Records 28 De-Register (Only - RCA 25210RE1 | User Guide - Page 45
to handset) 17 Remove Handset 17 Reviewing CID Records 27 Reviewing Phone Book Records 30 Reviewing the Redial handset in idle mode. 33 Transferring a Call to Another Extension 24 Troubleshooting Guide 37 U Update Handset List (only applicable for base) 18 V Voice Mail System - RCA 25210RE1 | User Guide - Page 46
rca.com Please do not send any products to the Indianapolis address listed in this manual or on the carton. This will only add delays in service for your product. Thomson Inc. 101 West 103rd Street Indianapolis, IN 46290-1102 © 2008 Thomson Inc. Trademark(s) ® Registered Marca(s) Registrada(s) Model - RCA 25210RE1 | User Guide - Page 47
Teléfono con Altavoz de Dos Líneas DECT 6.0 Sistema de Auricular Inalámbrico Guía del Usuario Por favor lea este manual antes de operar este producto por primera vez. Modelo 25210 - RCA 25210RE1 | User Guide - Page 48
ón sobre la Aprobación de Equipo El equipo de su teléfono esta aprobado para la conexión con la red Telefónica Pública (Public Switched Telephone Network) y cumple con los requisitos establecidos en las secciones 15 y 68 de las Reglas y Regulaciones de la FCC y con los Requerimientos Técnicos para - RCA 25210RE1 | User Guide - Page 49
la Comisión Federal de Comunicaciones (FCC) ha preparado un folleto muy útil, "How To Identify and Resolve Radio/ TV Interference Problems" ("Como Identificar y Resolver Problemas de Interferencia de Radio/ Televisión"). Este folleto se puede obtener del U.S. Goverment Printing Office, Washington - RCA 25210RE1 | User Guide - Page 50
lineamientos de exposición RF de la FCC. Información para el Producto DECT (Teléfono Inalámbrico Digitalmente Expandido) Este teléfono cumple con la norma DECT 6.0 que opera en el rango de frecuencia 1.92 GHz a 1.93 GHz. La instalación de este tipo está sujeta a notificación y coordinación con UTAM - RCA 25210RE1 | User Guide - Page 51
con Audífonos (CCA).......3 Licensing 3 Declaración de la FCC sobre Exposición a la Radiación RF 4 Información para el Producto DECT (Telé- fono Inalámbrico Digitalmente Expandido).... 4 Introducción 7 Lista de Partes 7 Requerimientos de Enchufe Telefónico........ 7 Instalación 8 Sistema - RCA 25210RE1 | User Guide - Page 52
Tabla de Contenido Para Almacenar un Registro de Remar- Para Almacenar un Registro en Marcación cación en el Directorio Telefónico......25 de un Toque (sólo aplica a la base).. 32 Transferencia de una Llamada a otra Para Revisar Registros del Directorio Extensión 25 Telefónico 32 Para - RCA 25210RE1 | User Guide - Page 53
Introducción CUIDADO: Cuando use equipo telefónico, hay instrucciones básicas de seguridad que siempre deben seguirse. Refiérase a la sección INSTRUCCIONES IMPORTANTES DE SEGURIDAD provistas con este producto y guárdelas para referencia en el futuro. IMPORTANTE: Como los teléfonos inalámbricos - RCA 25210RE1 | User Guide - Page 54
. Algunos otros accesorios para la comunicación pueden utilizar frecuencias de 5.8 GHz / 900 MHz para comunicarse, y si no están adecuadamente instalados, Si usted teme tener problemas con esta interferencia, refiérase al manual de instrucciones de dichos accesorios para ver cómo puede programar los - RCA 25210RE1 | User Guide - Page 55
Formato del Auricular Conexión y Programación Indicador de Visual pantalla 3 Soft keys (Tres teclas de función programables) Exit (botón salir) VOL +/(botón de volumen) DIR (botón directorio) Talk (botón llamar) * Tone (botón tono) Mute/Del (botón mudo/ bocina) Int/Hold (botón intercomunicación/ - RCA 25210RE1 | User Guide - Page 56
) VOL +/(botón de volumen) One Touch (1-10) buttons (botónes de un toque) Charge LED (LED carga) #Pause (botón pausa) Line 1 & 2 (botón linea 1 y 2) Headset (botón audífono) Speaker Mute (botón bocina) (botón mudo) Flash Intercom (botón intercomunicación) (botón para Page servicios - RCA 25210RE1 | User Guide - Page 57
: Para reducir el riesgo de fuego o lastimaduras personales, use solamente la batería de Níquel- Hidruro Metálico (Ni-MH) modelo 5-2734 aprobado por Thomson Inc. eso es compatible con esta unidad. 1. Localice la puerta de la batería y la batería que vienen empacadas juntos dentro de una bolsa de - RCA 25210RE1 | User Guide - Page 58
Conexión y Programación Estación Base El teléfono puede ser conectado a dos receptáculos de pared para dos líneas (RJ14C) para acomodar las dos líneas. 1. Elija un área cerca de una toma eléctrica y de un receptáculo de pared para teléfono (RJ11C), y coloque su teléfono inalámbrico en una superficie - RCA 25210RE1 | User Guide - Page 59
Conexión y Programación 4. Si usted quiere montar el teléfono en la pared, puede conectar las 2 líneas tal como se indica en el siguiente diagrama; -O- Linea 2 Linea 1 -O- Linea 2 Linea 1 Lineas 1 + 2 13 - RCA 25210RE1 | User Guide - Page 60
Programación del Teléfono 5. Coloque el auricular en la base. El indicador de carga se ilumina, comprobando que la batería está cargando. 6. Permita que el teléfono cargue por 14 horas antes del primer uso. Si usted no carga apropiadamente el teléfono, el desempeño de la batería puede verse - RCA 25210RE1 | User Guide - Page 61
Programación del Teléfono 4. Presione la tecla de función programable SELECT (derecha) para confirmar y usted puede programar los elementos siguientes: Fecha/Hora (solamente la base), Respuesta Automática (solamente el auricular), Intercomunicación Respuesta Automática (tanto en la base como en el - RCA 25210RE1 | User Guide - Page 62
Programación del Teléfono Respuesta Automática (solamente el auricular) Esta opción le permite levantar el auricular de la base para responder una llamada entrante sin presionar el botón Talk/Spk/L1/L2. Cuando está apagada, esta función está inhabilitada en el auricular. Desde el Menú de Configuraci - RCA 25210RE1 | User Guide - Page 63
Programación del Teléfono Código de Area (solamente la base) El teléfono usa un código de área preprogramado para determinar el formato del número a visualizar cuando un registro de Identificador de Llamada válido se recibe. El Código de Area preprogramado es usado también para la modalidad de - RCA 25210RE1 | User Guide - Page 64
Programación del Teléfono Para Remover el Registro de un Auricular La remoción del registro cancela el registro. Durante el proceso de remoción de registro, mantenga el auricular cerca de la base. ADVERTENCIA: No se recomienda la remoción de registro de un auricular a menos que sea absolutamente - RCA 25210RE1 | User Guide - Page 65
Programación del Teléfono Nombre de Auricular (solamente el auricular) Desde el Menú de Configuración de Teléfono: 1. Presione el botón VOL (+ ó -) para desplazarse a Nombre de Auricular. 2. Presione la tecla de función programable SELECT. El nombre predeterminado es Auricular. 3. Use el teclado de - RCA 25210RE1 | User Guide - Page 66
Programación del Teléfono Idioma Desde el Menú de Configuración de Pantalla: 1. Presione el botón VOL (+ ó -) para desplazarse a Idioma. 2. Presione la tecla de función programable SELECT. 3. Use el botón VOL (+ ó -) para seleccionar Inglés, Francés, Español. La configuración predeterminada es Ingl - RCA 25210RE1 | User Guide - Page 67
el Auricular Inalámbrico 1. Presione el botón Talk, la unidad tomará la primera línea disponible para usted. -OPresione la tecla de función programable Line 1 ó Line 2 para seleccionar una línea que usted desee. 2. Espere el tono de marcación y luego marque el número telefónico. 3. Presione el bot - RCA 25210RE1 | User Guide - Page 68
están disponibles, la Línea 1 será usada primero. -O- Presione el botón Line 1 o Line 2 en la base para seleccionar la línea, y el altavoz de la base ón End (en el auricular) al terminar. CUIDADO: Use únicamente el auricular Thomson Inc. 5-2425 que son compatibles con este aparato. NOTA: Si el audí - RCA 25210RE1 | User Guide - Page 69
Speaker, y el botón Talk (solamente en el auricular), o el botón Line 1 ó Line 2 para tomar una línea, y luego el número telefónico será llamada en modo altavoz, -O- 3. Presione la tecla de función programable LINE correspondiente para contestar la llamada en modo recepción. 4. Al terminar, - RCA 25210RE1 | User Guide - Page 70
), o presione el botón Headset (modo audífono) y la primera línea disponible será descolgada. Si ambas líneas están disponibles, la Línea 1 será usada. -OPresione un botón Line para seleccionar una línea. 24 - RCA 25210RE1 | User Guide - Page 71
marcados previamente. 3. Mientras el número preferido se visualiza, presione el botón Spk, Talk, o un botón Line para marcar el número de teléfono. NOTA: Si usted no selecciona un botón Line , la línea es automáticamente tomada y el número es marcado según corresponda. Para Almacenar un Registro de - RCA 25210RE1 | User Guide - Page 72
ón Hold para retener la línea. "Línea X en retención" se muestra en la pantalla, y el ícono de línea parpadeará. En la base, el indicador de botón Line parpadeará también. Cuando la línea esté en retención, el tono de alerta de retención será emitido. Presione la tecla de función programable - RCA 25210RE1 | User Guide - Page 73
se muestra en la pantalla para iniciar una conferencia. Puesto que la Línea 1 y 2 están ambas en retención, se solicitará al usuario que seleccione Line 1, Line 2 o Both para conferenciar. El usuario puede luego usar la tecla de función programable para seleccionar la opción deseada. Si la tecla de - RCA 25210RE1 | User Guide - Page 74
Operación del Teléfono Llamadas de Intercomunicación Intercomunicación de un Toque 1. En la base, en modo inactivo, presione algún botón OneTouch Intercom (1-10) para la estación con la cual usted quiere intercomunicarse. El botón One-Touch #1 representa el auricular 01, #2 representa el auricular - RCA 25210RE1 | User Guide - Page 75
Identificador de Llamada Identificador de Llamada (CID) IMPORTANTE: Para usar esta característica de Identificador de Llamada de la unidad, usted debe suscribirse ya sea al servicio de Identificador de Llamada Nombre/Número estándar o al servicio de Identificador de Llamada Llamada en Espera. Para - RCA 25210RE1 | User Guide - Page 76
para regresar la llamada usando los números que se muestran en la pantalla presionando el botón Headset, o el botón Talk, o el botón Spk o el botón Line 1 ó Line 2. Si usted Programó su Código de Área Local 1. Use el botón CID para mostrar el número que usted quiere marcar. 2. Si usted ve un número - RCA 25210RE1 | User Guide - Page 77
1-425-555-5555) distancia 1 + código de área de 3 dígitos + número de teléfono de 7 dígitos 4. Para marcar el número mostrado, seleccione una línea Line o presione el botón Talk, Spk, o Headset. Si usted No Programó su Código de Área Local 1. Use el botón CID para mostrar el número - RCA 25210RE1 | User Guide - Page 78
Memoria/Directorio Telefónico Para Añadir Registros del Directorio Telefónico 1. Asegúrese de que su teléfono esté en OFF (no en modo Hablar). 2. Presione el botón DIR. 3. Presione la tecla de función programable NEW. "Ingresar nombre" se muestra en la pantalla. Favor de referirse a la sección " - RCA 25210RE1 | User Guide - Page 79
Memoria/Directorio Telefónico 3. Presione el botón VOL (+ ó -) para desplazarse a través de los registros, -O- Presione las teclas numéricas para ir al nombre de los registros que inicien con el caracter correspondiente. Para Editar un Registro del Directorio Telefónico 1. Al revisar los registros - RCA 25210RE1 | User Guide - Page 80
Use el botón VOL (+ ó -) o las teclas numéricas para desplazarse al registro deseado. 4. Presione el botón Talk o Spk en el auricular o presione el botón Speaker o Line 1/2 en la base. El número es marcado en forma automática. Sistema de Correo de Voz Provisto que su compañía telefónica ofrezca el - RCA 25210RE1 | User Guide - Page 81
correo de voz almacenado en la compañía telefónica. Nota: si la línea directa está ocupada, un tono de error es emitido y la pantalla muestra "Line x en uso" por 2 segundos, luego regresa al modo inactivo. 3. Una vez que el sistema de correo de voz de la compañía telefónica responde la - RCA 25210RE1 | User Guide - Page 82
: Para reducir el riesgo de fuego o lastimaduras personales, use solamente la batería de Níquel- Hidruro Metálico (Ni-MH) modelo 5-2734 aprobado por Thomson Inc. eso es compatible con esta unidad. 1. Asegúrese que el teléfono esté desactivado (OFF) (no en modalidad para hablar) antes de cambiar - RCA 25210RE1 | User Guide - Page 83
30 días. NOTA: El sello RBRC en la batería utilizada en su producto Thomson Inc. indica que estamos participando en un programa para recolectar y reciclar batería(s) recargable web de RBRC en www.rbrc.org o llame al 1-800-8-BATTERY o contacte a su centro de reciclado local. Indicadores de Mensajes - RCA 25210RE1 | User Guide - Page 84
Solución de Problemas LINEA NO LINEA OCUPADA VACIO FUERA DE RANGO LLAMADA PRIVADA DESCONOCIDO Indicación que el cable telefónico esté no conectado. Aparece en la pantalla del auricular mientras la línea está en uso. Indica que la localización de - RCA 25210RE1 | User Guide - Page 85
Solución de Problemas El Auricular no Timbra • Asegúrese de que el selector del timbre esté en la posición de activado (On). • El auricular puede estar fuera del rango de la base. Acérquese a la base. • Usted puede tener demasiados aparatos o extensiones en su línea. Intente desconectar algunos telé - RCA 25210RE1 | User Guide - Page 86
Solución de Problemas Cuidado General del Producto Para mantener su teléfono funcionando bien y con buena apariencia, observe las siguientes pautas: • Evite poner el teléfono cerca de calentadores (calefactores) de ambiente y dispositivos que generen interferencia eléctrica ejemplo, motores o lá - RCA 25210RE1 | User Guide - Page 87
reemplazo, refiera a la garantía incluida en este servicio de cliente de la guía o de la llamada en 1-800-511-3180. O envíe sus preguntas a: Thomson Inc. Gerente, Servicio al Consumidor P.O. Box 1976 Indianápolis, IN 46206 Adjunte su recibo al folleto, para futura referencia, o anote la fecha en la - RCA 25210RE1 | User Guide - Page 88
• Asegure su empaque para prevenir pérdida o daño. Thomson Inc. no acepta responsabilidad en caso de pérdida o daño. • Un aparato nuevo se le enviará con los cargos pagados. Lo que no cubre la garantía: • Instrucciones al cliente. (Su manual de propietario le proporciona la información con respecto - RCA 25210RE1 | User Guide - Page 89
de esta garantía. • La reparación o reemplazo de un producto como se especifica bajo esta garantía es el remedio exlusivo del consumidor. Thomson Inc. no se hace responsible por daños incidentales, daños derivados como consecuencia del uso este producto, o como resultado del incumplimeinto de - RCA 25210RE1 | User Guide - Page 90
ón 8 Indicadores de Mensajes del Identificador de Llamadas 37 Información de Accesorios 46 Información de Interferencias 3 Información para el Producto DECT (Teléfono Inalámbrico Digitalmente Expandido) 4 Información sobre la Aprobación de Equipo 2 Inserción de una Pausa en la Secuencia - RCA 25210RE1 | User Guide - Page 91
Indice N No Molestar 24 Nombre de Auricular (solamente el auricular) 19 O Operación del Teléfono 21 P Pantalla en Espera 14 Para Almacenar un Registro de Remarcación en el Directorio Telefónico 25 Para Almacenar un Registro en Marcación de un Toque (sólo aplica a la base) 32 Para - RCA 25210RE1 | User Guide - Page 92
án sujetos a disponibilidad. Visite el sitio de RCA en www.rca.com Por favor no envíe ningún producto a la dirección de Indianápolis enlistada en este manual o en la caja. Esto únicamente resultará en un retraso para dar servicio a su producto. Thomson Inc. 101 West 103rd Street Indianapolis, IN
-
 1
1 -
 2
2 -
 3
3 -
 4
4 -
 5
5 -
 6
6 -
 7
7 -
8
-
9
-
10
-
11
-
12
-
13
-
14
-
15
-
16
-
17
-
18
-
19
-
20
-
21
-
22
-
23
-
24
-
25
-
26
-
27
-
28
-
29
-
30
-
31
-
32
-
33
-
34
-
35
-
36
-
37
-
38
-
39
-
40
-
41
-
42
-
43
-
44
-
45
-
46
-
47
-
48
-
49
-
50
-
51
-
52
-
53
-
54
-
55
-
56
-
57
-
58
-
59
-
60
-
61
-
62
-
63
-
64
-
65
-
66
-
67
-
68
-
69
-
70
-
71
-
72
-
73
-
74
-
75
-
76
-
77
-
78
-
79
-
80
-
81
-
82
-
83
-
84
-
85
-
86
-
87
-
88
-
89
-
90
-
91
-
92
 |
 |

2-Line Intercom Speakerphone
DECT6.0 Cordless Handset
User’s Guide
Please read this manual
before operating product
for the first time.
Model 25210