RCA Ri383 Ri383 Product Manual - Page 6
Listening to the Radio, LINE IN Connection, Specifications
 |
View all RCA Ri383 manuals
Add to My Manuals
Save this manual to your list of manuals |
Page 6 highlights
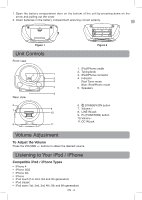
Note: • If your iPhone is called while it is docked, playback will be paused. • When AC-powered (except when in Tuner mode), the iPod / iPhone will charge automatically (until fully charged) once it is docked in the cradle. • When the Line-in cable is connected, you cannot play iPod / iPhone. Installing an iPod / iPhone 1. Press the Fn (FUNCTION) button to switch to iPod / iPhone mode (blue indicator will be on when iPod / iPhone mode is selected). 2. Insert your iPod / iPhone into the dock until it sits firmly in place. Rotating Your iPod / iPhone horizontally 1. Make sure your iPod / iPhone is firmly positioned into the connector. 2. Hold the lower part (under the iPod) of the dock, then slowly rotate the cabinet to 90o direction anticlockwise. Note: You can also rotate the dock first, and then install your iPod / iPhone into the iPod / iPhone cradle. Rotating your iPod / iPhone by holding its dock is not recommended. Listening to the Radio In tuner mode, only FM band is available on this unit. 1. Press the button to turn the unit on. 2. Press the Fn (FUNCTION) button to switch to TUNER mode (red indicator will be on when Radio mode is selected). 3. Press the TUNING knob to tune in to a station. 4. Adjust the volume level. LINE IN Connection Connecting to LINE IN for Other Sound Sources In iPod / iPhone mode, you can connect audio devices such as your CD player or MP3 player to the unit through the 3.5mm LINE IN jack. Use a line-in cable (not supplied) to connect the LINE IN jack on the back cabinet to the line out or earphone jack of the other audio devices. Note: • When the Line-in cable is connected, you cannot play iPod / iPhone. Listening to the Connected Device 1. Press the Fn (FUNCTION) button to switch to iPod / iPhone mode. 2. Turn on the audio device you have attached to the LINE IN jack. Specifications DC: 9V 1.5A external DC supply or 6 x AA size batteries Design and specifications are subject to change without notice. EN - 5
-
 1
1 -
 2
2 -
 3
3 -
 4
4 -
 5
5 -
 6
6 -
 7
7 -
 8
8 -
 9
9 -
 10
10 -
 11
11 -
 12
12 -
13
-
14
-
15
-
16
-
17
-
18
-
19
-
20
-
21
-
22
-
23
-
24
 |
 |
