Reebok 825 English Manual - Page 7
Flat Washers 55, two Pulley Bushings 42 and
 |
View all Reebok 825 manuals
Add to My Manuals
Save this manual to your list of manuals |
Page 7 highlights
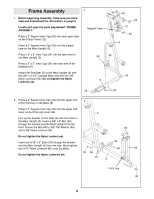
3. Attach the Leg Lever Lock (11) to the front leg with a 5/16Ó x 3Ó Bolt (78), three 5/16Ó Flat Washers (80) and a 5/16Ó Nylon Jamnut (79). Do not overtighten the Nylon Jamnut; it must be easy to turn the Leg Lever Lock. Attach the Leg Lever Bumper (6) to the front leg with a #10 x 1Ó Tap Screw (7). 3 Front Leg 80 79 4. Attach the Foot Plate (4) to the Base (8) with a 3/8Ó x 4 5 1/2Ó Bolt (57) and a 3/8Ó Nylon Locknut (50). 8 80 78 11 6 7 57 50 4 5. Place two Weight Bumpers (19) over the indicated 5 holes in the Stabilizer (5). Insert the two Weight Guides (23) through the Weight 23 23 Bumpers (19) and the holes in the Stabilizer (5). Attach the indicated Weight Guide (23) to the Stabilizer (5) with a 3/8Ó x 2 1/2Ó Bolt (54), two 3/8Ó Flat Washers (55), two Pulley Bushings (42) and a 3/8Ó Nylon Jamnut (63). 5 Hole 63 19 55 42 19 55 42 54 7
-
 1
1 -
 2
2 -
 3
3 -
 4
4 -
 5
5 -
 6
6 -
 7
7 -
 8
8 -
 9
9 -
 10
10 -
 11
11 -
 12
12 -
13
-
14
-
15
-
16
-
17
-
18
-
19
-
20
-
21
-
22
-
23
-
24
-
25
 |
 |
