Ricoh 2051 Quick Start Guide - Page 6
Installation of Technesis Java Applications - manual
 |
View all Ricoh 2051 manuals
Add to My Manuals
Save this manual to your list of manuals |
Page 6 highlights
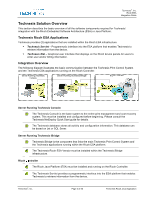
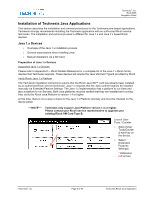
Technesis®, Inc. Ricoh ESA Integration Guide Installation of Technesis Java Applications This section describes the installation and removal procedures for the Technesis java based applications. Technesis strongly recommends installing the Technesis application with an authorized Ricoh service technician. The installation and removal process is different for Java 1.x and Java 2.x based Ricoh devices. Java 1.x Devices o Overview of the Java 1.x installation process. o General expectations when installing Java. o Manual installation via a SD Card. Preparation of Java 1.x Devices Supported Java 1.x Devices Please refer to Appendix D - Ricoh Models Reference for a complete list of the Java 1.x Ricoh family devices that Technesis supports. These devices will require the Java VM Card Type B provided by Ricoh. Verify Ricoh Java 1.x Platform The Technesis installation instructions require that the Ricoh Java SD™ card has already been installed by an authorized Ricoh service technician. Java 1.x requires that the Java runtime engines be installed manually via Extended Feature Settings. The Java 1.x implementation has a platform to run Xlets and also a platform to run Servlets. Both Java platforms must be verified that they are installed and running. Also verify the Ricoh Java Platform is version 1.4 or higher. At this time, there is not a way to check for the Java 1.x Platform remotely and must be checked on the device panel. ***NOTE*** Technesis only support Java Platform version 1.4 or higher. Please contact your Ricoh service representative to upgrade your existing Ricoh VM Card Type B. Launch User Tools / Counter o Select [User Tools/Counte r] hard key on the device. o Select [Extended Features Settings]. * Reference red arrows Technesis®, Inc. Page 6 of 50 Technesis Ricoh Java Application
-
 1
1 -
 2
2 -
 3
3 -
 4
4 -
 5
5 -
 6
6 -
 7
7 -
 8
8 -
 9
9 -
 10
10 -
 11
11 -
 12
12 -
13
-
14
-
15
-
16
-
17
-
18
-
19
-
20
-
21
-
22
-
23
-
24
-
25
-
26
-
27
-
28
-
29
-
30
-
31
-
32
-
33
-
34
-
35
-
36
-
37
-
38
-
39
-
40
-
41
-
42
-
43
-
44
-
45
-
46
-
47
-
48
-
49
-
50
 |
 |
