Ricoh Aficio MP 2000 Printer Reference - Page 57
If Bidirectional Communication Is Disabled, Printers, Printers and Faxes, Start, Settings, Properties
 |
View all Ricoh Aficio MP 2000 manuals
Add to My Manuals
Save this manual to your list of manuals |
Page 57 highlights
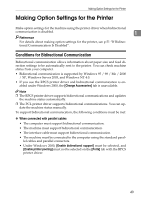
Making Option Settings for the Printer If Bidirectional Communication Is Disabled Set up option settings when bidirectional communications are disabled. Important 1 ❒ Under Windows 2000 / XP and Windows Server 2003, Manage Printers permission is required to change the printer properties in the [Printers] folder. Log on as an Administrators or Power Users group member. ❒ Under Windows NT 4.0, Full Control permission is required to change the printer properties in the [Printers] (Windows 2000) or [Printers and Faxes] (Windows XP / Windows Server 2003) folder. Log on as an Administrators or Power Users group member. A On the [Start] menu, point to [Settings], and then click [Printers]. The [Printers] window appears. When using Windows XP or Windows Server 2003, point to [Settings] on the [Start] menu, and then click [Printers and Faxes]. The [Printers and Faxes] window appears. B Click the icon of the printer you want to use. C On the [File] menu, click [Properties]. D Click the [Change Accessories] tab. If options in the [Change Accessories] tab are disabled, bidirectional connection is enabled. In this case, no change is necessary for option settings. If you are using the RPCS printer driver, click the [Change Accessories] tab. E Select options installed from the [Options] area, and then make the neces- sary settings. F Select the total amount of the memory in [Total memory:] when the optional SDRAM module is added. G Under [Paper source tray settings:], click and highlight the tray to be used, and then select the appropriate size, position, and type for the tray. Select the [Do not use Auto Tray Select] check box to exclude the tray from the targets of automatic tray selection. H Click [OK] to close the printer properties dialog box. 51
-
 1
1 -
2
-
3
-
4
-
5
-
6
-
7
-
8
-
9
-
10
-
11
-
12
-
13
-
14
-
15
-
16
-
17
-
18
-
19
-
20
-
21
-
22
-
23
-
24
-
25
-
26
-
27
-
28
-
29
-
30
-
31
-
32
-
33
-
34
-
35
-
36
-
37
-
38
-
39
-
40
-
41
-
42
-
43
-
44
-
45
-
46
-
47
-
48
-
49
-
50
-
51
-
 52
52 -
 53
53 -
 54
54 -
 55
55 -
 56
56 -
 57
57 -
 58
58 -
 59
59 -
 60
60 -
 61
61 -
 62
62 -
63
-
64
-
65
-
66
-
67
-
68
-
69
-
70
-
71
-
72
-
73
-
74
-
75
-
76
-
77
-
78
-
79
-
80
-
81
-
82
-
83
-
84
-
85
-
86
-
87
-
88
-
89
-
90
-
91
-
92
-
93
-
94
-
95
-
96
-
97
-
98
-
99
-
100
-
101
-
102
-
103
-
104
-
105
-
106
-
107
-
108
 |
 |