Samsung DVD-V8500 User Manual (user Manual) (ver.1.0) (English) - Page 9
Rear Panel, Audio Out, Component Video Out, Line In 1 Video/audio, Rf In From Ant., S-video Out - support
 |
View all Samsung DVD-V8500 manuals
Add to My Manuals
Save this manual to your list of manuals |
Page 9 highlights
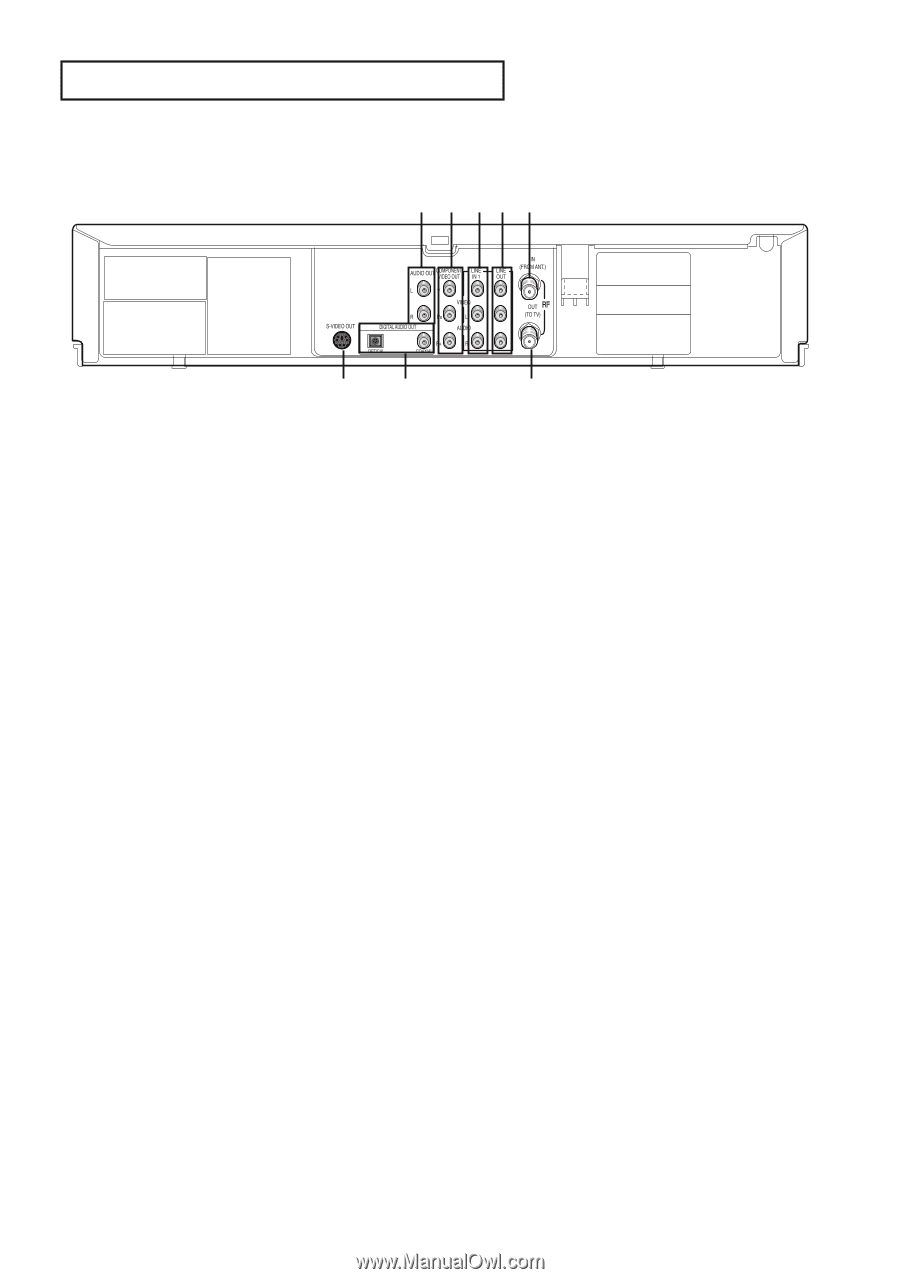
SETUP Rear Panel Ø ∏ " 1 AUDIO OUT Connect to the Audio input jacks of your television. 2 COMPONENT VIDEO OUT - Use these jacks if you have a TV with Component Video in jacks. These jacks provide PR, PB and Y video. - If Component (Progressive Scan) Video Output is selected in the Alt Video Out menu or by using the P.SCAN button on the front panel, progressive scan mode will be enabled. - If Component (Interlace Scan) Video Output is selected in the Alt Video Out menu or by using the P.SCAN button on the front panel, interlaced scan mode will be enabled. 3 LINE IN 1 (VIDEO/AUDIO) Connect to the Video/Audio output jack of your external device. 5 RF IN (FROM ANT.) Connect the RF Antenna cable to your DVD-VCR 6 S-VIDEO OUT Use the S-Video cable to connect this jack to the S-Video input jack on your television for higher picture quality. 7 DIGITAL AUDIO OUT (OPTICAL/COAXIAL) - Use either an optical or coaxial digital audio cable to connect to a compatible Dolby Digital receiver. - Use either an optical or coaxial digital audio cable to connect to an A/V Amplifier that contains a Dolby Digital, MPEG2 or DTS decoder. 8 RF OUT (TO TV) Connect your DVD-VCR to a TV 4 LINE OUT (VIDEO/AUDIO) Use a Video/Audio cables to connect to the Video/Audio input jacks on your television. Notes ■ Consult your TV User's Manual to find out if your TV supports Progressive Scan. If Progressive Scan is supported, follow the TV User's Manual regarding Progressive Scan settings in the TV's menu system. ■ If Component (Progressive Scan) Output is selected in Alt Video Out menu, S-Video will not work. ■ See pages 58 ~ 59 to get more information on how to use the Alt Video Out menu. ENG-9
-
 1
1 -
2
-
3
-
 4
4 -
 5
5 -
 6
6 -
 7
7 -
 8
8 -
 9
9 -
 10
10 -
 11
11 -
 12
12 -
 13
13 -
 14
14 -
15
-
16
-
17
-
18
-
19
-
20
-
21
-
22
-
23
-
24
-
25
-
26
-
27
-
28
-
29
-
30
-
31
-
32
-
33
-
34
-
35
-
36
-
37
-
38
-
39
-
40
-
41
-
42
-
43
-
44
-
45
-
46
-
47
-
48
-
49
-
50
-
51
-
52
-
53
-
54
-
55
-
56
-
57
-
58
-
59
-
60
-
61
-
62
-
63
-
64
-
65
-
66
-
67
-
68
-
69
-
70
-
71
-
72
-
73
-
74
-
75
-
76
-
77
-
78
-
79
-
80
-
81
-
82
-
83
-
84
-
85
-
86
-
87
 |
 |