Samsung FE-R300SW User Manual (user Manual) (ver.1.0) (English) - Page 21
SETTING THE CLOCK, SETTING THE KITCHEN TIMER, How to set the clock
 |
View all Samsung FE-R300SW manuals
Add to My Manuals
Save this manual to your list of manuals |
Page 21 highlights
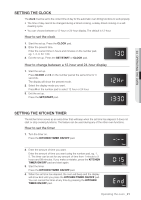
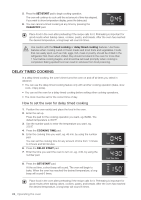
04 OPERATING THE OVEN Setting the clock The clock must be set to the correct time of day for the automatic oven timing functions to work properly. • The time of day cannot be changed during a timed cooking, a delay-timed cooking or a self- cleaning cycle. • You can choose between a 12-hour or 24-hour display. The default is 12-hour. How to set the clock 1. Start the set up. Press the CLOCK pad. 2. Enter the present time. Enter the current time in hours and minutes on the number pad, eg. 1, 3, 0, for 1:30. 3. Exit the set up. Press the SET/START or CLOCK pad. How to change between a 12-hour and 24-hour display 1. Start the set up. Press CLOCK and 0 on the number pad at the same time for 3 seconds. The display will show the present mode. 2. Select the display mode you want. Press 0 on the number pad to select 12 hour or 24 hour. 3. Exit the set up. Press the SET/START pad. Setting the kitchen timer The kitchen timer serves as an extra timer that will beep when the set time has elapsed. It does not start or stop cooking functions. The feature can be used during any of the other oven functions. How to set the timer 1. Turn the timer on. Press the KITCHEN TIMER ON/OFF pad. 2. Enter the amount of time you want. Enter the amount of time you want using the number pad, eg. 1, 5. The timer can be set for any amount of time from 1 minute to 9 hours and 99 minutes. If you make a mistake, press the KITCHEN TIMER ON/OFF pad and start again. 3. Start the timer. Press the KITCHEN TIMER ON/OFF pad. 4. When the set time has elapsed, the oven will beep and the display will show End until you press the KITCHEN TIMER ON/OFF pad. You can cancel the timer at any time by pressing the KITCHEN TIMER ON/OFF pad. Operating the oven _21
-
 1
1 -
2
-
3
-
4
-
5
-
6
-
7
-
8
-
9
-
10
-
11
-
12
-
13
-
14
-
15
-
 16
16 -
 17
17 -
 18
18 -
 19
19 -
 20
20 -
 21
21 -
 22
22 -
 23
23 -
 24
24 -
 25
25 -
 26
26 -
27
-
28
-
29
-
30
-
31
-
32
-
33
-
34
-
35
-
36
-
37
-
38
-
39
-
40
-
41
-
42
-
43
-
44
 |
 |
