Samsung HW-K550 User Manual - Page 14
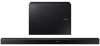
Rear of Soundbar, Right end of Soundbar, Holder-Screw
 |
View all Samsung HW-K550 manuals
Add to My Manuals
Save this manual to your list of manuals |
Page 14 highlights
INSTALLATION 5. Push a screw (not supplied) through each Holder-Screw, and then screw each screw firmly into a support screw hole. 6. Use the two Screws (M4 x L12) to attach both Bracket-Wall Mount L and R to the Soundbar's bottom. For a proper fit, make sure to align the bumps on the Soundbar to the holes on the brackets. Rear of Soundbar Right end of Soundbar ●● When assembling, make sure the hanger part of the Bracket-Wall Mounts are located behind the rear of the Soundbar. See the illustration above. Wall Mount R Wall Mount L ●● The left and right mounts are different shapes. Make sure to position them correctly. 14
-
 1
1 -
2
-
3
-
4
-
5
-
6
-
7
-
8
-
 9
9 -
 10
10 -
 11
11 -
 12
12 -
 13
13 -
 14
14 -
 15
15 -
 16
16 -
 17
17 -
 18
18 -
 19
19 -
20
-
21
-
22
-
23
-
24
-
25
-
26
-
27
-
28
-
29
-
30
-
31
-
32
-
33
-
34
 |
 |

14
INSTALLATION
5.
Push a screw (not supplied) through each
Holder-Screw
, and then screw each screw firmly into a support
screw hole.
6.
Use the two
Screws
(M4 x L12) to attach both
Bracket-Wall Mount L
and
R
to the Soundbar's bottom.
For a proper fit, make sure to align the bumps on the Soundbar to the holes on the brackets.
Rear of Soundbar
Right end of Soundbar
●
When assembling, make sure the hanger part of the
Bracket-Wall Mounts
are located behind the rear of
the Soundbar. See the illustration above.
Wall Mount L
Wall Mount R
●
The left and right mounts are different shapes. Make sure to position them correctly.