Samsung L210 User Manual - Page 59
E Effect button : Rotating an image, E Effect button : Colour
 |
UPC - 044701008989
View all Samsung L210 manuals
Add to My Manuals
Save this manual to your list of manuals |
Page 59 highlights
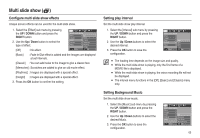
Setting up the play back function using the camera buttons E (Effect) button : Rotating an image You can rotate the stored images by various degrees. 1. Press the play mode button and press the E button. ROTATE 2. Press the LEFT / RIGHT button and select the [ROTATE] () menu tab. 3. Select a desired sub menu by pressing the UP / DOWN button. Move Exit Right 90˚ Left 90˚ 180˚ Set Back [ : Right 90˚] : Rotate picture in a clock-wise direction Horizontal Set Back [ : Left 90˚] : Rotate picture in a counter- clock-wise direction Set Back [ : 180˚] : Rotate picture 180 degrees Vertical Set Back [ : Horizontal] : Rotate picture horizontally Set Back [ :Vertical] : Rotate picture vertically E (Effect) button : Colour It is possible to add colour effects to your images by using this button. 1. Press the play mode button and press the E button. COLOR 2. Select () menu tab by pressing the Left / Right button . 3. Select a desired sub menu by pressing the Up / Down button and press the OK button. Move Exit Colour Description Captured images will be stored in black and white. Captured images will be stored in a sepia tone (a gradient of yellowish brown colours). Captured images will be stored in a red tone. Captured images will be stored in a green tone. Captured images will be stored in a blue tone. Saves the image in negative mode. Captured images will be stored in set RGB tone. 4. The changed image is saved as a new file name. K If you display the rotated image on the LCD monitor, empty spaces may appear to the left and right of the image. 58
-
 1
1 -
2
-
3
-
4
-
5
-
6
-
7
-
8
-
9
-
10
-
11
-
12
-
13
-
14
-
15
-
16
-
17
-
18
-
19
-
20
-
21
-
22
-
23
-
24
-
25
-
26
-
27
-
28
-
29
-
30
-
31
-
32
-
33
-
34
-
35
-
36
-
37
-
38
-
39
-
40
-
41
-
42
-
43
-
44
-
45
-
46
-
47
-
48
-
49
-
50
-
51
-
52
-
53
-
 54
54 -
 55
55 -
 56
56 -
 57
57 -
 58
58 -
 59
59 -
 60
60 -
 61
61 -
 62
62 -
 63
63 -
 64
64 -
65
-
66
-
67
-
68
-
69
-
70
-
71
-
72
-
73
-
74
-
75
-
76
-
77
-
78
-
79
-
80
-
81
-
82
-
83
-
84
-
85
-
86
-
87
-
88
-
89
-
90
-
91
-
92
-
93
-
94
-
95
-
96
-
97
-
98
-
99
-
100
-
101
-
102
-
103
-
104
 |
 |
