Samsung MW1150WA Service Manual - Page 9
Reassembly Test - fuse
 |
View all Samsung MW1150WA manuals
Add to My Manuals
Save this manual to your list of manuals |
Page 9 highlights
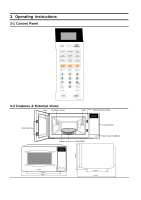
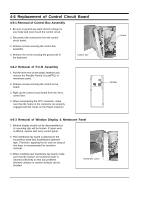
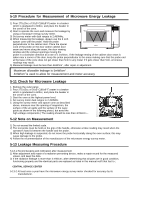
4-3-4 Reassembly Test After replacement of the defective component parts of the door, reassemble it and follow the instructions below for proper installation and adjustment so as to prevent an excessive microwave leakage. 1. When mounting the door to the oven, be sure to adjust the door parallel to the bottom line of the oven face plate by moving the upper hinge and lower hinge in the direction necessary for proper alignment. 2. Adjust so that the door has no play between the inner door surface and oven front surface. If the door assembly is not mounted properly, microwave energy may leak from the space between the door and oven. 3. Do the microwave leakage test. 4-4 Replacement of Fuse 1. Disconnect the oven from the power source. 2. When 20A fuse blows out by the operation of interlock monitor switch failure, replace the primary interlock switch, door sensing switch, monitor switch and power relay. 3. When the above three switches operate properly, check if any other part such as the control circuit board, blower motor or high voltage transformer is defective. 4-5 Replacement of Drive Motor 1. Take out the glass tray, guide roller from cavity. 2. Turn the oven upside down to replace the drive motor. 3. Remove a screw securing the drive motor cover or disconnect the drive motor cover from base plate by nipper. 4. Disconnect all the lead wires from the drive motor. 5. Remove screws securing the drive motor to the cavity. 6. Remove the drive motor and the coupler. 7. When replacing the drive motor, be sure to remount it in the correct position with the coupler. 8. Connect all the leads to the drive motor. 9. Screw the drive motor cover to the base plate with a screw driver. Drive Motor Cover Drive Motor Base Plate
-
 1
1 -
2
-
3
-
 4
4 -
 5
5 -
 6
6 -
 7
7 -
 8
8 -
 9
9 -
 10
10 -
 11
11 -
 12
12 -
 13
13 -
 14
14 -
15
-
16
-
17
-
18
-
19
-
20
-
21
-
22
-
23
 |
 |