Samsung NE63T8111SS/AA Installation Guide
Samsung NE63T8111SS/AA Manual
 |
View all Samsung NE63T8111SS/AA manuals
Add to My Manuals
Save this manual to your list of manuals |
Samsung NE63T8111SS/AA manual content summary:
- Samsung NE63T8111SS/AA | Installation Guide - Page 1
Electric Range Installation manual NE63*8***** Install_NE63T8911_AA_DG68-01257A-00_EN.indd 1 2020-03-26 6:27:49 - Samsung NE63T8111SS/AA | Installation Guide - Page 2
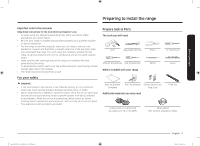
burns to 9 children or adults. 11 13 About this manual 13 READ THESE INSTRUCTIONS COMPLETELY AND CAREFULLY. 13 Important note to the installer 15 • Read all instructions contained in these installation instructions before installing the range. • Remove all packing materials from the oven - Samsung NE63T8111SS/AA | Installation Guide - Page 3
to the consumer Keep these instructions for the local electrical inspector's use. • As when using any appliance generating heat, there are certain safety precautions you should follow. • Be sure your range is installed and grounded properly by a qualified installer or service technician. • For the - Samsung NE63T8111SS/AA | Installation Guide - Page 4
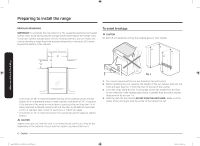
" 491⁄4" A : Cabinet opening min 30" (76.2 cm) B : Acceptable electrical outlet area IMPORTANT: If your cabinets are over 363⁄4" high, you must install this range on a hard, heat resistant support that raises the surface of the range so that it is about even with the countertop. 2020-03-26 6:27:50 - Samsung NE63T8111SS/AA | Installation Guide - Page 5
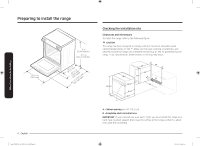
the range in a freestanding cutout cabinet. For more information, see "Optional rear filler kit" as shown below. NOTE If you install the product in a kitchen island, you must maintain minimum 2-1/2" from cutout to back edge of the countertop and minimum 3" from cutout to side edges of - Samsung NE63T8111SS/AA | Installation Guide - Page 6
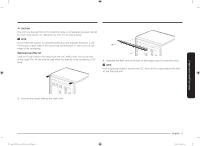
space over the heating elements, you can reduce the risk by installing a range hood that projects horizontally a minimum of 5 inches beyond The counter top around the cut-out should be flat and leveled. 2. Before installing the unit, measure the heights of the two cabinet sides (C1-C4), front - Samsung NE63T8111SS/AA | Installation Guide - Page 7
or 4-wire, single-phase A.C. 208Y/120 Volt or 240/120 Volt, 60 hertz electrical system. If the electrical service provided does not meet the above specifications, have a licensed electrician install an approved outlet. Use only a 3-conductor or a 4-conductor UL-listed range cord. These cords may be - Samsung NE63T8111SS/AA | Installation Guide - Page 8
dedicated, properly grounded branch circuit protected by a 40 amp or larger circuit breaker. NOTE For power cord installations, go to Step 3. For conduit installations, go to Step 4 on page 11. Connecting the poCwoenrnecting the power 8 English Install_NE63T8911_AA_DG68-01257A-00_EN.indd 8 2020 - Samsung NE63T8111SS/AA | Installation Guide - Page 9
to the terminal block. DO NOT remove the ground strap connection. 4. Go to Step 5 on page 13 to continue with the installation. White Ground strap Neutral terminal Black Red Live 1 Live 2 Black White Red Connecting the power Install_NE63T8911_AA_DG68-01257A-00_EN.indd 9 English 9 2020 - Samsung NE63T8111SS/AA | Installation Guide - Page 10
lower position of the terminal block. Tighten screws securely to the terminal black. 5. Go to Step 5 on page 13 to continue with the installation. Live 1 White Black Red Ground strap Neutral terminal Ground plate White Live 2 Black Ground screw Red Ground wire (Green) CAUTION You must - Samsung NE63T8111SS/AA | Installation Guide - Page 11
) into the conduit hole (11⁄8"). Then thread the conduit cord through the body of the strain relief and fasten the ring. Reinstall the bracket. Installing a 3-wire conduit • Aluminum building wire may be used but it must be rated for the correct amperage and voltage. Connect the wires as described - Samsung NE63T8111SS/AA | Installation Guide - Page 12
inch-lbs.). Do not over-tighten the screws since it could damage the wires. 7. Go to Step 5 on page 13 to continue with the installation. Ground strap Live 1 White Black Red Neutral terminal Ground plate Wire tips Live 2 Black White Ground Red wire (Green) CAUTION You must check voltage - Samsung NE63T8111SS/AA | Installation Guide - Page 13
the risk of tipping, you must secure the appliance by properly installing the Anti-Tip device packed with the appliance. • Refer to the installation instructions supplied with the bracket. • If the anti-tip device is not installed properly, an adult or child stepping on or sitting on the range - Samsung NE63T8111SS/AA | Installation Guide - Page 14
using the template The Anti-Tip bracket is packaged with a template. The instructions include information necessary to complete the installation. Read and follow the instructions on the sheet (template) for range installation. 2. Level the range Level the range by adjusting the leveling legs with - Samsung NE63T8111SS/AA | Installation Guide - Page 15
Memo Finalizing the installation • Move range close enough to the opening to plug into the Check the range for proper operation as described in the user manual. Anti-Tip bracket Leveling leg Installing the range Install_NE63T8911_AA_DG68-01257A-00_EN.indd 15 English 15 2020-03-26 6:27:52 - Samsung NE63T8111SS/AA | Installation Guide - Page 16
on your smartphone Please be advised that the Samsung warranty does NOT cover service calls to explain product operation, correct improper installation, or perform normal cleaning or maintenance. QUESTIONS OR COMMENTS? COUNTRY U.S.A Consumer Electronics CANADA CALL 1-800-SAMSUNG (726-7864 - Samsung NE63T8111SS/AA | Installation Guide - Page 17
Estufa eléctrica Manual de instalación NE63*8***** Install_NE63T8911_AA_DG68-01257A-00_MES.indd 1 2020-03-26 6:27:38 - Samsung NE63T8111SS/AA | Installation Guide - Page 18
A. Un niño o un adulto podrían inclinar la estufa y morir. 3 B. Instale el dispositivo anti inclinación en la estructura y/o en la 4 parte posterior derecha (o posterior para el instalador • Lea todas las instrucciones contenidas en este manual antes de instalar la estufa. • Retire de la estufa - Samsung NE63T8111SS/AA | Installation Guide - Page 19
gabinetes de almacenamiento sobre la cubierta. • La estufa no debe colocarse sobre una base. Para su seguridad ADVERTENCIA • Si la información de este manual no es seguida con exactitud, se podrían producir incendios o descargas eléctricas que causen daños a la propiedad, lesiones personales o la - Samsung NE63T8111SS/AA | Installation Guide - Page 20
Preparación paPrareipnastralcaiór nlapeasrtaufinastalar la estufa Preparación para instalar la estufa 2915/16 pulgadas (761.0 mm) 36 pulgadas (914.4 mm) mín. 363/4 pulgadas (933.45 mm) máx. 267 /(16672p1u81.l71g/(am17d62m4CaPp89os)u1u.n6e(l/1g4rmm2atpad5aumanc0logs)i.3jmaaadmbpailmesert)taamente - Samsung NE63T8111SS/AA | Installation Guide - Page 21
Preparación para instalar la estufa PRECAUCIÓN Debe usar el kit de relleno trasero para instalar la estufa en un gabinete de recorte independiente. Para más información, consulte "Kit de relleno trasero opcional" como se muestra a continuación. NOTA Si instala el producto en una isla de cocina, - Samsung NE63T8111SS/AA | Installation Guide - Page 22
Preparación paPrareipnastralcaiór nlapeasrtaufinastalar la estufa Preparación para instalar la estufa Dimensiones mínimas IMPORTANTE: Para eliminar el riesgo de quemaduras o de incendio causado por alcanzar elementos por encima de las unidades de superficie calientes, evite colocar gabinetes de - Samsung NE63T8111SS/AA | Installation Guide - Page 23
Nacional) exige que en las construcciones nuevas (no existentes en ese momento) para estufas de cocina se utilicen conexiones de cuatro conductores. Cuando instale una estufa eléctrica en una construcción nueva, siga los Pasos 2 y 3 para una conexión de 4 conductores. Debe usar un sistema eléctrico - Samsung NE63T8111SS/AA | Installation Guide - Page 24
Cómo conectar la corriente eléctrica Paso 2. Acceso a la conexión del cable de alimentación Afloje y luego retire el tornillo de la cubierta de acceso posterior con un destornillador. Retire la cubierta de acceso posterior jalando hacia la derecha y luego hacia afuera. Habrá quedado abierto el - Samsung NE63T8111SS/AA | Installation Guide - Page 25
Paso 3. Instalación del cable de alimentación Cuando se realicen instalaciones de cables de alimentación, enganche el sujetador de cables con amortiguador de esfuerzo sobre el orificio del cable de alimentación (13⁄8") ubicado debajo de la parte trasera del cuerpo del cajón. Inserte el cable de - Samsung NE63T8111SS/AA | Installation Guide - Page 26
Cómo conectar la corriente eléctrica PRECAUCIÓN Debe verificar el voltaje después de conectar el cable de alimentación. Fase 1 - Neutro Fase 2 - Neutro Fase 1 - Fase 2 120 V 120 V 208 V / 240 V Instalación de un cable de alimentación de 4 conductores ADVERTENCIA ADVERTENCIA El conductor neutral - Samsung NE63T8111SS/AA | Installation Guide - Page 27
el orificio de conducto (11⁄8"). 11⁄8" 13⁄8" 13⁄8" 11⁄8" 1. Prepare el cable de conducto como se muestra en la Figura 1. 2. Instale el cable de conducto como se muestra en la Figura 2. Figura 1 1" 3⁄8" 1" 3⁄8" Figura 2 Aro 31⁄2" 3 conductores 31⁄2" 4 conductores Cuerpo Sujetador de - Samsung NE63T8111SS/AA | Installation Guide - Page 28
Cómo conectar la corriente eléctrica PRECAUCIÓN Debe verificar el voltaje después de conectar el cable de alimentación. Fase 1 - Neutro Fase 2 - Neutro Fase 1 - Fase 2 120 V 120 V 208 V / 240 V Instalación de un conducto de 4 conductores • Se puede utilizar alambre de construcción de aluminio - Samsung NE63T8111SS/AA | Installation Guide - Page 29
Instalación de la estufa Paso 5. Colocación de la cubierta de acceso Para volver a colocar la cubierta de acceso en la parte trasera de la estufa, inserte las dos pestañas de la parte trasera de la cubierta en las cavidades ubicadas debajo de la abertura y luego inserte y ajuste el tornillo de la - Samsung NE63T8111SS/AA | Installation Guide - Page 30
Instalación de la estufa 1. Instale la ménsula utilizando la plantilla. La ménsula anti inclinación se encuentra empacada junto con una plantilla. Las instrucciones incluyen la información necesaria para completar la - Samsung NE63T8111SS/AA | Installation Guide - Page 31
e imposibilita el vuelco. • Encienda la corriente eléctrica. Controle el funcionamiento correcto de la estufa tal como se describe en el manual del usuario. Ménsula anti inclinación Pata niveladora Instalación de la estufa Install_NE63T8911_AA_DG68-01257A-00_MES.indd 15 Español 15 2020-03-26 - Samsung NE63T8111SS/AA | Installation Guide - Page 32
Consumer Electronics CANADA LLAME AL 1-800-SAMSUNG (726-7864) 1-800-SAMSUNG (726-7864) O VISÍTENOS EN LÍNEA EN www.samsung.com/us/support www.samsung.com/ca/support (English) www.samsung.com/ca_fr/support (French) DG68-01257A-00 Install_NE63T8911_AA_DG68-01257A-00_MES.indd 16 2020-03-26 6:27:42 - Samsung NE63T8111SS/AA | Installation Guide - Page 33
Cuisinière électrique Manuel d'installation NE63*8***** Install_NE63T8911_AA_DG68-01257A-00_CFR.indd 1 2020-03-26 6:27:28 - Samsung NE63T8111SS/AA | Installation Guide - Page 34
et l'adulte. 13 15 A propos de ce manuel LISEZ ENTIÈREMENT ET ATTENTIVEMENT CES INSTRUCTIONS. Remarque importante destinée à l'installateur • Lisez l'intégralité des consignes d'installation avant d'installer la cuisinière. • Retirez tous les éléments d'emballage des compartiments du four avant - Samsung NE63T8111SS/AA | Installation Guide - Page 35
Préparation avant l'installation de la cuisinière Remarque importante destinée à l'utilisateur Conservez précieusement ces instructions afin que la personne tête plate Accessoires fournis Crayon Niveau Modèle de support antibasculement Support antibasculement Vis (courtes : x2, longues : x2) - Samsung NE63T8111SS/AA | Installation Guide - Page 36
30" (76,2 cm) B : emplacement autorisé pour la prise électrique IMPORTANT : si vos meubles mesurent plus de 363/4" de hauteur, vous devez installer cette cuisinière sur un support solide et résistant à la chaleur, qui permet de relever la surface de la cuisinière de sorte qu'elle arrive à peu pr - Samsung NE63T8111SS/AA | Installation Guide - Page 37
de la cuisinière ATTENTION Vous devez utiliser le kit de fileur arrière pour installer la cuisinière dans un meuble avec découpage pour encastrement. Pour en savoir plus, reportez-vous à la section « Kit de fileur arrière en option » - Samsung NE63T8111SS/AA | Installation Guide - Page 38
riau de votre mur, la vapeur chaude peut laisser des taches dessus. 1. Le plan de travail autour des découpes doit être plat et ajusté. 2. Avant d'installer l'appareil, mesurez les hauteurs des deux côtés du meuble (C1 à C4), à l'avant et à l'arrière (voir Fig. 1) entre le sol et la face supérieure - Samsung NE63T8111SS/AA | Installation Guide - Page 39
le câble. • Étant donné que les prises de la cuisinière sont inaccessibles une fois la cuisinière installée, il est nécessaire d'utiliser une gaine ou un cordon de service flexible. REMARQUE Si les fils d'alimentation sont mal branchés, le message suivant apparaît à l'écran. • LCD, PMOLED : Wire - Samsung NE63T8111SS/AA | Installation Guide - Page 40
de dérivation dédié correctement mis à la terre et protégé par un disjoncteur d'au moins 40 A. REMARQUE Pour l'installation du cordon d'alimentation, reportez-vous à l'étape 3. Pour l'installation de la gaine, reportez-vous à l'étape 4 en page 11. Mise sous tension Mise sous tension 8 Français - Samsung NE63T8111SS/AA | Installation Guide - Page 41
ducteur de tension et serrez ce dernier. Plaque de raccordement de la gaine Cordon d'alimentation Réducteur de tension • Le cordon d'alimentation doit être installé au moyen d'un réducteur de tension. • Fixez le réducteur de tension sur l'ouverture de 13/8" dans la plaque de raccordement de la gaine - Samsung NE63T8111SS/AA | Installation Guide - Page 42
l'emplacement central inférieur du bornier. Serrez fermement les vis sur le bornier. 5. Reportez-vous à l'étape 5 en page 13 pour poursuivre l'installation. Phase 1 Blanc Noir Rouge Conducteur de terre Borne neutre Plaque de terre Blanc Phase 2 Noir Vis de terre Rouge Conducteur de terre - Samsung NE63T8111SS/AA | Installation Guide - Page 43
trou de la gaine (11/8"). Faites ensuite passer le cordon de la gaine dans le réducteur de tension, puis serrez l'anneau de serrage. Réinstallez le support. Installation d'une gaine à 3 fils • Un fil de bâtiment en aluminium peut être utilisé mais il devra être doté de l'intensité et de la tension - Samsung NE63T8111SS/AA | Installation Guide - Page 44
Vous devez vérifier la tension après avoir branché le cordon d'alimentation. Phase 1 - Neutre Phase 2 - Neutre Phase 1 - Phase 2 120 V 120 V 208 V / 240 V Installation d'une gaine à 4 fils • Un fil de bâtiment en aluminium peut être utilisé mais il devra être doté de l'intensité et de la tension - Samsung NE63T8111SS/AA | Installation Guide - Page 45
chauds ou de la cuisinière elle-même. *approximativement 21/32" (16,5 mm) Support antibasculement La vis doit pénétrer dans le bois ou le béton REMARQUE Desserrez le pied de mise à niveau pour installer le support anti-basculement. Un dégagement d'au moins 21/32" (16,5 mm) est nécessaire entre - Samsung NE63T8111SS/AA | Installation Guide - Page 46
la cuisinière 1. Installation du support à l'aide du modèle Le support anti-basculement s'accompagne d'un modèle. Les consignes comportent les informations nécessaires à l'exécution de l'installation. Lisez et suivez les consignes figurant sur la fiche (modèle) pour l'installation de la cuisinière - Samsung NE63T8111SS/AA | Installation Guide - Page 47
Notes Finalisation de l'installation • Placez la cuisinière suffisamment près de l'ouverture pour permettre le branchement de la prise. • Positionnez la cuisinière en vous assurant que le pied arrière gauche (ou arrière droit) se glisse sous le support anti-basculement. • Inclinez avec précaution la - Samsung NE63T8111SS/AA | Installation Guide - Page 48
pas les déplacements du service après-vente pour expliquer le fonctionnement de l'appareil, corriger une installation non correcte ou exé SITE INTERNET www.samsung.com/us/support www.samsung.com/ca/support (English) www.samsung.com/ca_fr/support (French) DG68-01257A-00 Install_NE63T8911_AA_DG68-
-
 1
1 -
 2
2 -
 3
3 -
 4
4 -
 5
5 -
 6
6 -
 7
7 -
8
-
9
-
10
-
11
-
12
-
13
-
14
-
15
-
16
-
17
-
18
-
19
-
20
-
21
-
22
-
23
-
24
-
25
-
26
-
27
-
28
-
29
-
30
-
31
-
32
-
33
-
34
-
35
-
36
-
37
-
38
-
39
-
40
-
41
-
42
-
43
-
44
-
45
-
46
-
47
-
48
 |
 |

Electric Range
Installation manual
NE63*8*****
Install_NE63T8911_AA_DG68-01257A-00_EN.indd
1
2020-03-26
°° 6:27:49