Samsung NE63T8111SS/AA Installation Guide - Page 2
Before you begin, Anti-tip device, About this manual
 |
View all Samsung NE63T8111SS/AA manuals
Add to My Manuals
Save this manual to your list of manuals |
Page 2 highlights
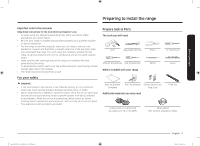
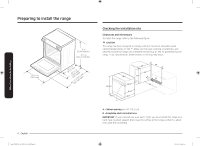
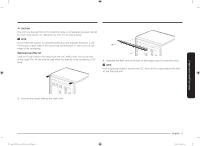
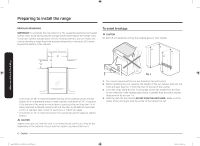
Contents Contents Before you begin Anti-tip device About this manual For your safety Preparing to install the range Prepare tools & Parts Checking the installation site To avoid breakage Connecting the power Step 1. Meeting electrical connection requirements Step 2. Accessing the power cord connection Step 3. Installing the power cord Step 4. Installing the conduit Step 5. Replacing the access cover Installing the range Installing the anti-tip device Finalizing the installation Before you begin 2 Anti-tip device 2 2 WARNING 3 To reduce the risk of tipping the appliance, the appliance must be secured by properly installed anti-tip devices packed with the appliance. 3 A. A child or adult can tip the range and be killed. 3 B. Install the anti-tip device to the structure and/or the 4 range at rear right (or rear left) of the range bottom. 6 C. Engage the range to the anti-tip device by leveling leg at rear right (or rear left) of the range bottom. 7 D. Re-engage the anti-tip device if the range is moved. 7 E. See installation instructions for details. 8 F. Failure to do so can result in death or serious burns to 9 children or adults. 11 13 About this manual 13 READ THESE INSTRUCTIONS COMPLETELY AND CAREFULLY. 13 Important note to the installer 15 • Read all instructions contained in these installation instructions before installing the range. • Remove all packing materials from the oven compartments before connecting the electrical supply to the range. • Observe all governing codes and ordinances. • Be sure to leave these instructions with the consumer. 2 English Install_NE63T8911_AA_DG68-01257A-00_EN.indd 2 2020-03-26 6:27:49
-
 1
1 -
 2
2 -
 3
3 -
 4
4 -
 5
5 -
 6
6 -
 7
7 -
 8
8 -
9
-
10
-
11
-
12
-
13
-
14
-
15
-
16
-
17
-
18
-
19
-
20
-
21
-
22
-
23
-
24
-
25
-
26
-
27
-
28
-
29
-
30
-
31
-
32
-
33
-
34
-
35
-
36
-
37
-
38
-
39
-
40
-
41
-
42
-
43
-
44
-
45
-
46
-
47
-
48
 |
 |
