Samsung RF25HMEDBSG User Manual - Page 10
Required Tools
 |
View all Samsung RF25HMEDBSG manuals
Add to My Manuals
Save this manual to your list of manuals |
Page 10 highlights
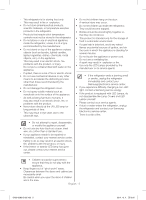
2" (50 mm) 125° 125° 56 1/4 " (1430 mm) 11 3/4" (300 mm) 32 3/4" (830 mm) 4 1/4" (106 mm) 1 3/4" (45 mm) FLOORING For proper installation, you must place this refrigerator on a level, hard surface that is the same height as the rest of the floor. This surface should be strong enough to support a fully loaded refrigerator. To protect the finish of the flooring, cut a large section of the cardboard carton and place it under the refrigerator where you are working. When moving a refrigerator, you need to pull and push it straight forwards or back. Do not wiggle it from side to side. 29 5/8" (753 mm) 47 1/4" (1200 mm) 52 5/8" (1335 mm) Each measurement based on the design dimension, so it may differ depending on the measuring method. CAUTION When moving your refrigerator To prevent floor damage, be sure the front adjusting legs are in the up position (above the floor). Refer to 'Adjusting the doors' on page 14. REQUIRED TOOLS Required Tools (Not provided) You need the following tools to complete the installation of your refrigerator: Philips screwdriver(+) Flat-blade Socket wrench screwdriver(-) (13/32") (10 mm) Flat-blade screw driver(-) Control Lever Allen wrench (3/16") (5 mm) DA68-02601G-00.indb 10 English - 10 2014. 12. 4. �� 3:05
-
 1
1 -
2
-
3
-
4
-
 5
5 -
 6
6 -
 7
7 -
 8
8 -
 9
9 -
 10
10 -
 11
11 -
 12
12 -
 13
13 -
 14
14 -
 15
15 -
16
-
17
-
18
-
19
-
20
-
21
-
22
-
23
-
24
-
25
-
26
-
27
-
28
-
29
-
30
-
31
-
32
-
33
-
34
-
35
-
36
-
37
-
38
-
39
-
40
-
41
-
42
-
43
-
44
-
45
-
46
-
47
-
48
-
49
-
50
-
51
-
52
-
53
-
54
-
55
-
56
-
57
-
58
-
59
-
60
-
61
-
62
-
63
-
64
-
65
-
66
-
67
-
68
-
69
-
70
-
71
-
72
-
73
-
74
-
75
-
76
-
77
-
78
-
79
-
80
-
81
-
82
-
83
-
84
-
85
-
86
-
87
-
88
-
89
-
90
-
91
-
92
-
93
-
94
-
95
-
96
-
97
-
98
-
99
-
100
-
101
-
102
-
103
-
104
-
105
-
106
-
107
-
108
-
109
-
110
-
111
-
112
-
113
-
114
-
115
-
116
 |
 |
