Samsung SC-X105L User Manual (ENGLISH) - Page 106
Raccordement du CAM à une imprimante, Connecting the CAM to a Printer
 |
UPC - 036725301054
View all Samsung SC-X105L manuals
Add to My Manuals
Save this manual to your list of manuals |
Page 106 highlights
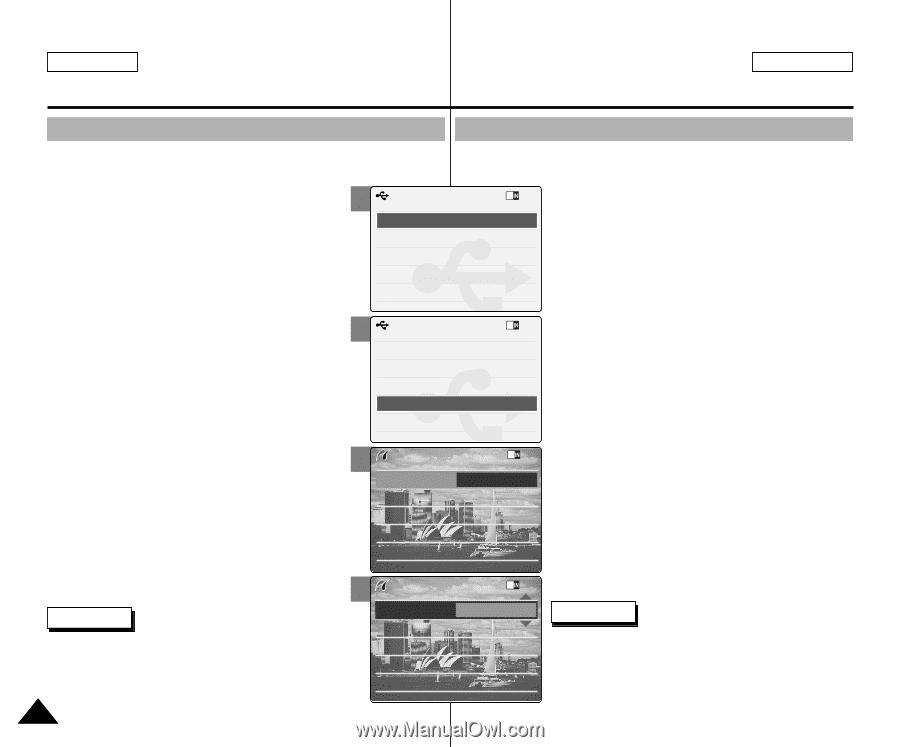
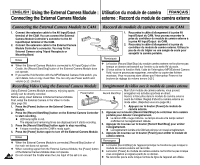
ENGLISH Setting the CAM : Using USB Mode FRANÇAIS Réglages du CAM - Mode USB Connecting the CAM to a Printer Raccordement du CAM à une imprimante By connecting the CAM to printers with PictBridge support (sold En raccordant le CAM à une imprimante compatible Pictbridge (vendue separately), you can send images from the internal memory or séparément), vous pouvez directement envoyer des images de la mémoire external memory (Memory Stick or Memory Stick Pro) directly to the printer with a few simple operations. 2 USB Mode interne ou d'une mémoire externe (carte Memory Stick ou Memory Stick Pro ) vers l'imprimante par quelques opérations 1. Connect the CAM to the printer with USB 1.1 MassStorage simples. PictBridge support with the USB cable. 2. Slide [Mode Selector] down to turn on the CAM. N USB mode screen appears automatically. 3. Slide the [ L /M ] switch to select and press the [OK] button. 4. Slide the [ L /M ] switch to select and press the [OK] button. 5. Slide the [ L /M ] switch to select or and press the [OK] button. 6. Slide the [ L /M ] switch to select and press the [OK] button. PC-Cam BPiacctkBridge 3 USB Mode USB 2.0 MassStorage USB 1.1 MassStorage PC-Cam BPiacctkBridge 4 PictBridge 100-0056 1. Raccordez le CAM à l'imprimante compatible Pictbridge par le câble USB. 2. Glissez le (Sélecteur de mode) vers le bas pour démarrer le CAM. N L'écran du USB mode s'affiche automatiquement. 3. Glissez l'interrupteur [ L /M ] afin de sélectionner et appuyez sur le bouton [OK]. 4. Glissez l'interrupteur [ L /M ] afin de sélectionner et appuyez sur le bouton [OK]. 5. Déplacez l'interrupteur [ L /M ] pour sélectionner (Activé) ou (Désactivé) puis appuyez sur le bouton [OK]. 7. Slide the [ L /M ] switch to select desired number and press the [OK] button. N You can select the number of copy from 1 to 99. Date Off Copies 1 Print 6. Glissez l'interrupteur [ L /M ] afin de sélectionner et appuyez sur le bouton [OK]. 7. Déplacez l'interrupteur [ L /M ] pour sélectionner le nombre souhaité puis appuyez sur le bouton [OK]. 8. Slide the [ L /M ] switch to select and press the [OK] button. Next Photo Previous Photo N Vous pouvez choisir un nombre de copies allant de 1 à 99 . 8. Glissez l'interrupteur [ L /M ] afin de sélectionner 5 PictBridge 100-0056 (Imprimer) et appuyez sur le bouton [OK]. Notes ✤ If you select in the menu, the previous menu appears. ✤ If you want to select the next or previous photo, select or using [ L /M ] 11066 switch. Date On Copies 1 Print Next Photo Previous Photo Remarques ✤ Si vous sélectionnez (Retour) dans le menu, le menu précédent s'affiche. ✤ Pour passer à la photo suivante ou précédente, sélectionnez (Suivante) ou (Précédente) à l'aide de l'interrupteur [ L /M ].
-
 1
1 -
2
-
3
-
4
-
5
-
6
-
7
-
8
-
9
-
10
-
11
-
12
-
13
-
14
-
15
-
16
-
17
-
18
-
19
-
20
-
21
-
22
-
23
-
24
-
25
-
26
-
27
-
28
-
29
-
30
-
31
-
32
-
33
-
34
-
35
-
36
-
37
-
38
-
39
-
40
-
41
-
42
-
43
-
44
-
45
-
46
-
47
-
48
-
49
-
50
-
51
-
52
-
53
-
54
-
55
-
56
-
57
-
58
-
59
-
60
-
61
-
62
-
63
-
64
-
65
-
66
-
67
-
68
-
69
-
70
-
71
-
72
-
73
-
74
-
75
-
76
-
77
-
78
-
79
-
80
-
81
-
82
-
83
-
84
-
85
-
86
-
87
-
88
-
89
-
90
-
91
-
92
-
93
-
94
-
95
-
96
-
97
-
98
-
99
-
100
-
 101
101 -
 102
102 -
 103
103 -
 104
104 -
 105
105 -
 106
106 -
 107
107 -
 108
108 -
 109
109 -
 110
110 -
 111
111 -
112
-
113
-
114
-
115
-
116
-
117
-
118
-
119
-
120
-
121
-
122
-
123
-
124
-
125
-
126
-
127
-
128
-
129
-
130
-
131
-
132
-
133
-
134
-
135
-
136
-
137
 |
 |