Samsung SCD6040 User Manual (user Manual) (English, Spanish) - Page 104
Selecting Images To Delete, Deleting All Images At Once, Deleting Recorded Pictures Using DELETE
 |
View all Samsung SCD6040 manuals
Add to My Manuals
Save this manual to your list of manuals |
Page 104 highlights
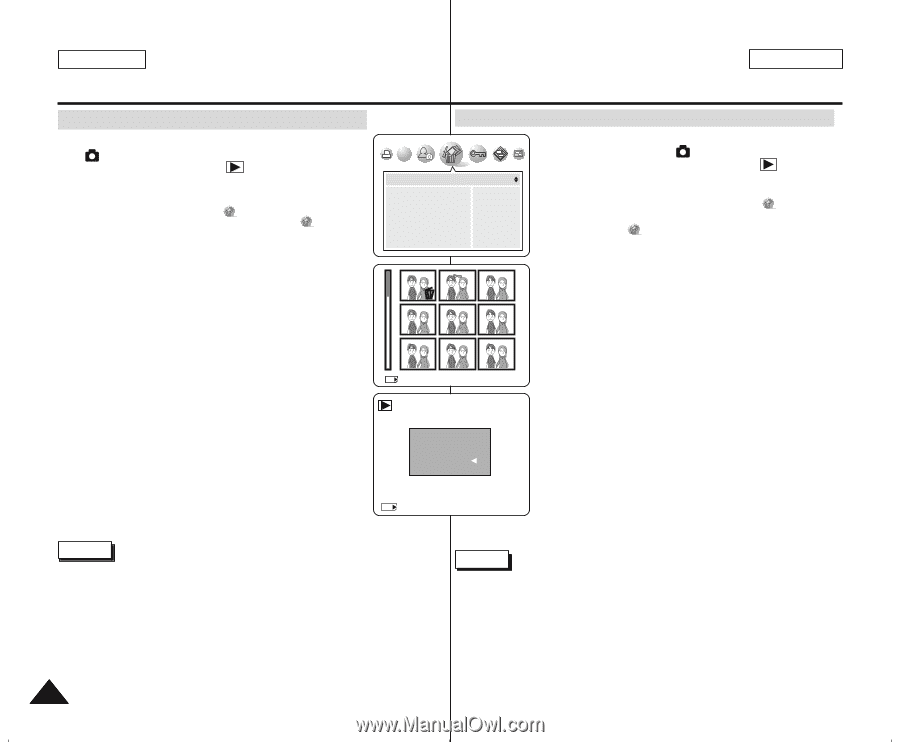
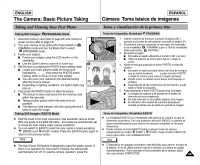
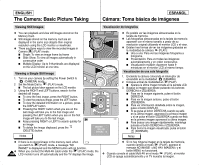
ENGLISH The Camera: Basic Picture Taking ESPAÑOL Cámara: Toma básica de imágenes Deleting Recorded Pictures Using DELETE Menu Supresión de imágenes grabadas utilizando el menú DELETE 1. Turn your camera on by setting the Power Switch to (CAMERA) mode. 2. Turn the Mode Dial to set to (PLAY) mode. I A stored picture is displayed on the LCD monitor. 3. Press the MENU button. I The top menu including (DELETE) is displayed. 4. Press the LEFT or RIGHT button to select (DELETE), then press the DOWN button. I The available options are listed: SELECT and ALL. ✤ Selecting Images To Delete SET DELETE SELECT ALL EXIT:OK MOVE: NO NO 1. Encienda la cámara colocando el interruptor de encendido en el modo (CÁMARA). 2. Gire el Dial de modo hasta fijar el modo (PLAY). I Una imagen almacenada aparece en el monitor LCD. 3. Pulse el botón MENU. I Aparece el menú superior que incluye (ELIMINAR). 4. Pulse los botones IZQUIERDA o DERECHA para seleccionar (ELIMINAR) y, a continuación, pulse el botón ABAJO. I Aparece una lista con las opciones disponibles: SELECT y ALL . 1. Press the DOWN or UP button to select "SELECT", ✤ Selección de imágenes para borrarlas then press the RIGHT button. 1. Pulse el botón ARRIBA o ABAJO hasta seleccionar I Select "YES" to display multiple pictures screen. SELECT y pulse el botón DERECHA. 2. Press the DOWN or UP button to select an image to I Seleccione YES para ver una pantalla con delete, then press the MENU button. I To cancel the selection, press the MENU button again on a selected image. 3. When you are done with selection, press the OK button. I A message "PLEASE WAIT" appears and deletes selected images. The previous picture or motion clip is displayed. ✤ Deleting All Images At Once 1. Press the DOWN or UP button to select "ALL", then press the RIGHT button. SELECT:MENU SET:OK DELETE ? DEL : OK CANCEL : varias imágenes. 2. Pulse el botón ABAJO o ARRIBA para seleccionar una imagen para borrarla y pulse el botón MENU. I Para cancelar la selección, pulse de nuevo el botón MENU en una imagen seleccionada. 2/33 3. Cuando haya terminado con la selección, pulse el botón OK. I Aparece el mensaje PLEASE WAIT _ borra las imágenes seleccionadas. Aparece la imagen o la secuencia anterior. ✤ Supresión de todas las imágenes de una vez 1. Pulse el botón ARRIBA o ABAJO hasta seleccionar ALL I Select "YES" if you are sure to delete. y pulse el botón DERECHA. 2. If "YES" is selected, message "DELETE ?" appears on I Seleccione YES si está seguro que desea the LCD monitor. borrarlas. I Press the OK button to delete. Press the LEFT 2. Si se selecciona "YES" , aparece el mensaje button to cancel. DELETE ? en el monitor LCD. Notes I Pulse el botón OK para borrar. Pulse el botón IZQUIERDA para cancelar. Notas ✤ When there is no stored picture on the memory card, the message "NO IMAGE!" will be displayed. ✤ If an erroneous memory card format is found on the memory card, the message "CARD ERROR!" will be displayed. ✤ If an erroneous image file is found on the memory card, the message "FILE ERROR" will be displayed. It may be caused by copying images from different digital devices. ✤ Formatting the memory card will delete all the stored images. ✤ To protect important picture from accidental deletion, activate the image ✤ Si no hay ninguna imagen almacenada en la tarjeta de memoria, aparecerá NO IMAGE! . ✤ Si se detecta un formato de tarjeta de memoria erróneo, aparecerá el mensaje CARD ERROR! . ✤ Si se detecta un formato de archivo erróneo, aparecerá el mensaje FILE ERROR . Puede haber sucedido al copiar imágenes desde diferentes dispositivos digitales. ✤ El formato de la tarjeta de memoria borrará todas las imágenes almacenadas. ✤ Para proteger una imagen importante frente a borrado accidental, active la 104 protection (refer to page 135). protección de imágenes (consulte la página 135).
-
 1
1 -
2
-
3
-
4
-
5
-
6
-
7
-
8
-
9
-
10
-
11
-
12
-
13
-
14
-
15
-
16
-
17
-
18
-
19
-
20
-
21
-
22
-
23
-
24
-
25
-
26
-
27
-
28
-
29
-
30
-
31
-
32
-
33
-
34
-
35
-
36
-
37
-
38
-
39
-
40
-
41
-
42
-
43
-
44
-
45
-
46
-
47
-
48
-
49
-
50
-
51
-
52
-
53
-
54
-
55
-
56
-
57
-
58
-
59
-
60
-
61
-
62
-
63
-
64
-
65
-
66
-
67
-
68
-
69
-
70
-
71
-
72
-
73
-
74
-
75
-
76
-
77
-
78
-
79
-
80
-
81
-
82
-
83
-
84
-
85
-
86
-
87
-
88
-
89
-
90
-
91
-
92
-
93
-
94
-
95
-
96
-
97
-
98
-
 99
99 -
 100
100 -
 101
101 -
 102
102 -
 103
103 -
 104
104 -
 105
105 -
 106
106 -
 107
107 -
 108
108 -
 109
109 -
110
-
111
-
112
-
113
-
114
-
115
-
116
-
117
-
118
-
119
-
120
-
121
-
122
-
123
-
124
-
125
-
126
-
127
-
128
-
129
-
130
-
131
-
132
-
133
-
134
-
135
-
136
-
137
-
138
-
139
-
140
-
141
-
142
-
143
-
144
-
145
-
146
-
147
-
148
-
149
-
150
-
151
-
152
-
153
-
154
-
155
-
156
-
157
-
158
-
159
-
160
-
161
-
162
-
163
-
164
-
165
-
166
 |
 |