Samsung SCD6040 User Manual (user Manual) (English, Spanish) - Page 138
disponibles: ONE PIC <UNA IMAG.> y ALL
 |
View all Samsung SCD6040 manuals
Add to My Manuals
Save this manual to your list of manuals |
Page 138 highlights
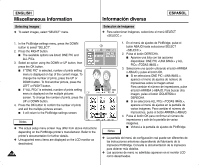
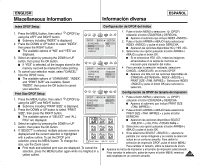
ENGLISH Miscellaneous Information Información diversa ESPAÑOL Selecting Images ✤ To select images, select "SELECT" menu. Selección de imágenes ✤ Para seleccionar imágenes, seleccione el menú SELECT . 1. In the PictBridge settings menu, press the DOWN button to select "SELECT". 2. Press the RIGHT button. I The available options are listed: ONE PIC and ALL PICs. 3. Select an option using the DOWN or UP button, then press the OK button. I If "ONE PIC" is selected, number of prints setting menu is displayed on top of the current image. To change the number of prints, press the UP or DOWN button. To find another picture, press the LEFT or RIGHT button. I If "ALL PICs" is selected, number of prints setting menu is displayed on the multiple pictures screen. To change the number of prints, press the UP or DOWN button. 4. Press the OK button to confirm the number of prints and exit the multiple pictures screen. I It will return to the PictBridge settings screen. Notes ✤ The actual setup menu screen may differ from above instructions depending on the PictBridge printer's manufacturer. Refer to the printer's documentation for further details. ✤ Unsupported menu items are displayed on the LCD monitor as deactivated. 138 Notas 1. En el menú de ajustes de PictBridge, pulse el botón ABAJO hasta seleccionar SELECT . 2. Pulse el botón DERECHA. I Aparece una lista con las opciones disponibles: ONE PIC y ALL PICs 3. Seleccione una opción utilizando el botón ARRIBA o ABAJO y pulse el botón OK. I Si se selecciona ONE PIC , aparece el menú de ajustes de número de impresiones sobre la imagen actual. Para cambiar el número de impresiones, pulse el botón ARRIBA o ABAJO. Para buscar otra imagen, pulse el botón IZQUIERDA o DERECHA. I Si se selecciona ALL PICs , aparece el menú de ajustes en la pantalla de varias imágenes. Para cambiar el número de impresiones, pulse el botón ARRIBA o ABAJO. 4. Pulse el botón OK para confirmar el número de impresiones y salir de la pantalla de varias imágenes. I Volverá a la pantalla de ajustes de PictBridge. ✤ La pantalla del menú de configuración real puede ser diferentes de las instrucciones anteriores dependiendo del fabricante de la impresora PictBridge. Consulte la documentación de la impresora para obtener más detalles. ✤ Las opciones de menú no admitidas aparecen en el monitor LCD como desactivadas.
-
 1
1 -
2
-
3
-
4
-
5
-
6
-
7
-
8
-
9
-
10
-
11
-
12
-
13
-
14
-
15
-
16
-
17
-
18
-
19
-
20
-
21
-
22
-
23
-
24
-
25
-
26
-
27
-
28
-
29
-
30
-
31
-
32
-
33
-
34
-
35
-
36
-
37
-
38
-
39
-
40
-
41
-
42
-
43
-
44
-
45
-
46
-
47
-
48
-
49
-
50
-
51
-
52
-
53
-
54
-
55
-
56
-
57
-
58
-
59
-
60
-
61
-
62
-
63
-
64
-
65
-
66
-
67
-
68
-
69
-
70
-
71
-
72
-
73
-
74
-
75
-
76
-
77
-
78
-
79
-
80
-
81
-
82
-
83
-
84
-
85
-
86
-
87
-
88
-
89
-
90
-
91
-
92
-
93
-
94
-
95
-
96
-
97
-
98
-
99
-
100
-
101
-
102
-
103
-
104
-
105
-
106
-
107
-
108
-
109
-
110
-
111
-
112
-
113
-
114
-
115
-
116
-
117
-
118
-
119
-
120
-
121
-
122
-
123
-
124
-
125
-
126
-
127
-
128
-
129
-
130
-
131
-
132
-
 133
133 -
 134
134 -
 135
135 -
 136
136 -
 137
137 -
 138
138 -
 139
139 -
 140
140 -
 141
141 -
 142
142 -
 143
143 -
144
-
145
-
146
-
147
-
148
-
149
-
150
-
151
-
152
-
153
-
154
-
155
-
156
-
157
-
158
-
159
-
160
-
161
-
162
-
163
-
164
-
165
-
166
 |
 |
