Samsung SDP-950STA Software Guide
Samsung SDP-950STA Manual
 |
View all Samsung SDP-950STA manuals
Add to My Manuals
Save this manual to your list of manuals |
Samsung SDP-950STA manual content summary:
- Samsung SDP-950STA | Software Guide - Page 1
English French Samsung Digital Presenter Software User's Guide German Italian Spanish - Samsung SDP-950STA | Software Guide - Page 2
- Samsung SDP-950STA | Software Guide - Page 3
([F2] key 23 Applying DIP(Digital Image Effect Processing) Functions 24 Digital Image Effect Processing Description 25 Using Samsung Digital Presenter TWAIN Driver...27 Scanning Images 28 Keyboard Map 29 Using Samsung Digital Presenter AVI Capture 30 Troubleshooting 35 1 Italian Spanish - Samsung SDP-950STA | Software Guide - Page 4
the Samsung Digital Presenter 38 Program Installation 39 Running the SDP Viewer 43 Samsung Digital Presenter Viewer Screen 43 Samsung Digital Presenter Viewer Control Buttons 46 Image Capture/Save/Output 49 Quick Saving and Configuration 52 Image Rotation 52 Troubleshooting(Macintosh - Samsung SDP-950STA | Software Guide - Page 5
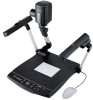
Samsung Digital Presenter Software The supplied Samsung Digital Presenter program CD contains : • USB driver • Samsung Digital Presenter program To control your Samsung Digital Presenter on the PC, save the images into the computer HDD, or print the images, you must connect Samsung Digital Presenter - Samsung SDP-950STA | Software Guide - Page 6
the software 1. Connect your Samsung Digital Presenter to the PC with USB cable. See the current page. 2. Install the USB driver. See page 5. 3. Install the Samsung Digital Presenter control program. See page 7. Follow the instructions below to complete the installation: Connecting Samsung Digital - Samsung SDP-950STA | Software Guide - Page 7
English French German Installing USB driver 1. The Add New Hardware Wizard dialog box appears. ( Case of Windows XP ) 2. Put a checkmark on the Install from a list or specific location (Advanced) box and - Samsung SDP-950STA | Software Guide - Page 8
3. Insert the SAMSUNG program CD into your CD-ROM drive, then put a checkmark on the CD-ROM drives box and Include this location in the search box then type x:\ (where x is the drive letter for the CD-ROM drive). Click Next. 4. Click Finish. The USB driver will be inserted. 6 - Samsung SDP-950STA | Software Guide - Page 9
English French German Installing Samsung Digital Presenter program 1. Insert the Samsung Digital Presenter Program CD in a CD-ROM drive and the install program will be auto-run. And then select ENGLISH.Click Next. 2. The InstallShield Wizard window opens. 3. - Samsung SDP-950STA | Software Guide - Page 10
setup. AVI Capture program shortcut and the software manual appears in the [Start] Menu. 6. After the Samsung Digital Presenter software is properly installed, you can see the Samsung Digital Presenter icon in the [Start] Menu and the desktop and Software manual shortcut in the [Start] Menu. 8 - Samsung SDP-950STA | Software Guide - Page 11
English French German Installation tips How can I determine if my computer's USB port is enabled ? 1. We will explain by Windows XP. Please find the Device Manager in other Windows version for yourself. 2. Select Start System Device Manager 3. If you see USB host controllers and a USB root hub - Samsung SDP-950STA | Software Guide - Page 12
Presenter program ? USB Driver : 1. We will explain by Windows XP. Please find the Device Manager in other Windows version for yourself. 2. Select Start System Device Manager 3. Click the plus (+) icon before the Imaging Device. 4. From the Imaging devices items select Samsung Digital Presenter SDP - Samsung SDP-950STA | Software Guide - Page 13
x 768) resolution. • If the whole view of the Samsung Digital Presenter View Panel does not appear, check if the graphic card on your PC supports 1024 x 768(65536 colors) or higher. ✔ Caution : • While viewing, capturing or printing images on the program or TWAIN Driver, do not turn off power of the - Samsung SDP-950STA | Software Guide - Page 14
Samsung Digital Presenter View Panel overview 4 1 2 3 1 View area You can see the images presented from the presenter in this view area. When you adjust the image using the Samsung Digital Presenter Control Panel or remote controller,you can see the applied result in this area. 12 - Samsung SDP-950STA | Software Guide - Page 15
English French German 2 • View Panel button description (It is invisible in FULL mode). Allows you to select the input image size. QUAR : 256 x 192 size of image, normal View Panel window HALF : 512 x 384 size of image, normal View Panel window. Press [Esc] key if you want to return HALF mode in - Samsung SDP-950STA | Software Guide - Page 16
size (1024 x 768) when you press SAVE/Q-SAVE/PRINT buttons. 4) Safe Mode Making use of some Low-end PC(include DVMT type graphic card) makes trouble with displaying images in 20 frame/sec(USB2.0). The program can operate slower, less than 10 frame/sec. ✔ Note : • Just make sure to restart the - Samsung SDP-950STA | Software Guide - Page 17
1. You can control capture, save and print images on the Control Panel. 5 6 2. The buttons on the Control Panel are the same as buttons on Samsung Digital Presenter or those of a remote controller. (For details, refer to Samsung Digital Presenter User's Manual.) 7 8 9 10 Italian Spanish 15 - Samsung SDP-950STA | Software Guide - Page 18
ControlPanel Mini Control Panel switch button 1 In FULL mode you can change Control Panel to Mini Control Panel. 2 HALF button (It is invisible in usual Control Panel.) This button appears when you call Control Panel in the FULL mode. It makes program to return normal window. (Hotkey : [Esc] - Samsung SDP-950STA | Software Guide - Page 19
. (External): Use this to select internal or external image. The images on the View Panel do not change. 9 Displays the status of CONTROL FUNCTION and DIGITAL FUNCTION, PRESET. Shows the current status of the presenter and also shows the number selected at - Samsung SDP-950STA | Software Guide - Page 20
FUNCTION/PRESET button inter-operates with the number button (1~8). (Refer to Samsung Digital Presenter User's Manual) I-sav(Image Save) / I-rcl(Image Recall) : • Saves the projected image into the memory of this unit. • Recalls the image from the memory. •To save/recall - Samsung SDP-950STA | Software Guide - Page 21
displayed in the View Panel as a BMP or JPEG format graphic file. Do as follows: 1. Samsung Digital Presenter View Panel 10 displays image currently presented from Samsung Digital Presenter. When the desired image is displayed in the View Panel, click Capture button. 2. When capturing is - Samsung SDP-950STA | Software Guide - Page 22
Printing images 1. When capturing is complete, the Print button is activated. Click Print button,then the Print page Setup dialog box prompts. 2. Select Paper Size/Print Position/Print Size/Orientation etc. I Fit to page : The image is fit to the page size you selected. I Specified : You can specify - Samsung SDP-950STA | Software Guide - Page 23
Standard TCP/IP port. • When you print the image through the network-shared printer, the printing performance can be dropped on your network and the SDP Viewer can process more slowly. 21 Italian Spanish - Samsung SDP-950STA | Software Guide - Page 24
Samsung Digital Presenter Mini Control Panel overview Mini Control Panel : See page 24. 4 Half : See page 16. 5 Opens Control Panel on which you can control all functions of presenter. ✔ Note : • Mini Control Panel disappears within several seconds, you can set this moment in the option dialog box. - Samsung SDP-950STA | Software Guide - Page 25
be set in Option dialog box. (The default path is located where the Samsung Digital Presenter program is installed + QuickCap.) How to Q-SAVE 1. When the closed image captured image is saved as JPEG format. (ex> c:\program files\SDP USB Viewer\Quick Cap or specified directory which you have set in - Samsung SDP-950STA | Software Guide - Page 26
doesn't change. The DIP image is transformed just in the PC. DIP is available only in USB 2.0 mode. Using DIP for Digital Image Effect 1. While the image from presenter is displayed, if you click DIP button on (Mini) Control panel, DIP Panel opens. This button is not available while capturing - Samsung SDP-950STA | Software Guide - Page 27
shows the histogram on the left-up side. This effect is available on Default, Grayscale, Binarization mode. [Uses : Lets you adjust the Digital Presenter's bright value or turn the lamp On/Off efficiently.] ✔ Note : A histogram illustrates how pixels in an image are distributed by graphing the - Samsung SDP-950STA | Software Guide - Page 28
is 8 and you can adjust the value by mouse or [ ], [ ] keys. [Uses : Mosaics the original image from the Digital Presenter.] Digital Image Effects Default Grayscale Negative Binarization Edge Detection Image Rotation Emboss Mosaic Save O O O O O O O O Print O O O O X X X X Processing time Quick - Samsung SDP-950STA | Software Guide - Page 29
], then select [Custom Insert]. 4) In the other TWAIN supported application software refer to application manual. 4 Scan images through SDP TWAIN driver Samsung Digital Presenter TWAIN driver operates almost same as Samsung Digital Presenter USB program. Refer to that program description (page 15 - Samsung SDP-950STA | Software Guide - Page 30
Scanning Images 1 The images from a presenter are displayed on the View Panel. Select the captured image is transferred to the application program. 4 For more information about TWAIN Driver, refer to the graphic application software manual. ✔ Note : • In FULL / SCREEN FULL mode, you can scan FULL - Samsung SDP-950STA | Software Guide - Page 31
English French Keyboard Map Keys [Alt + Enter] [ESC] [F2] [Alt + F4] Description Set the window SCREEN FULL mode. Remark [While displaying] Return to HALF size mode [While capturing] Release captured image You can specify the path your Q-SAVE images are saved. (See page 23.) For operating Q- - Samsung SDP-950STA | Software Guide - Page 32
(512x384 pixels, 20 frame/sec) to AVI file (USB 2.0 only) 1. Make sure that your Samsung Digital Presenter is connected to the PC and both are turned on. 2. Select and Click [Start] [Program] [SDP USB Viewer] [SDP AVI Capture] 3. AVI Capture program is available in USB2.0 mode (Windows 2000/XP or - Samsung SDP-950STA | Software Guide - Page 33
format or convert your file system to capture more than 4 GB on single file. We recommend to use MPEG-4 video Codec. (Ask the technical support to use Format, Convert command) Maximum File Size No Compression MPEG-4 High Quality MPEG-4 Low Quality FAT32 4 GB Approx. 6 Min Approx. 12 Hours Approx - Samsung SDP-950STA | Software Guide - Page 34
4. Using SDP AVI Capture Program (1) Capture Time Limits You can set capture time limits to capture AVI file for a fixed period by minute. Program will show required - Samsung SDP-950STA | Software Guide - Page 35
displays below status lamp. (4) Flip image vertical According to digital presenter lens position, preview images can be reversed. So, using Flip top-left of AVI playback file by this option. (7) Display user caption in AVI file You can display user caption (up to 50 characters) in top-left of AVI - Samsung SDP-950STA | Software Guide - Page 36
Exits AVI capture program. ✔ Notice : 1. While capture processes, Do not turn off power of the presenter or remove the USB cable off the PC. It may cause the presenter or the PC to make trouble. 2. While capture processes, [Exit] button would not finalize AVI file. For saving AVI file safely, Push - Samsung SDP-950STA | Software Guide - Page 37
English French German Troubleshooting Symptom Fails to run Samsung Digital Presenter program Solution There is a communication error between Samsung Digital Presenter and the computer. Exit Samsung Digital Presenter program and do as follows: • Unplug the USB cable and then plug in it again. • - Samsung SDP-950STA | Software Guide - Page 38
Symptom The following error message (Windows XP message): "HI-SPEED USB device is plugged in non-HISPEED USB hub. " When the file you captured cannot be played Solution The system operates USB 1.1 mode like this case. • Make sure that the USB 2.0 function is ON in CMOS. • Download and install - Samsung SDP-950STA | Software Guide - Page 39
English French German Installing the SDP Viewer(Macintosh Program) System Requirements • Power PC G3 400MHz or above ROM Drive ✔ Notice : • USB 2.0 PCI Cards or USB 2.0 PCMCIA Cards are not formally supported. • USB 2.0 PCMCIA Cards may not demonstrate full USB 2.0 capability. 37 Italian Spanish - Samsung SDP-950STA | Software Guide - Page 40
Connecting the SDP 1. Make sure that both the Samsung Digital Presenter and a computer are turned on. 2. Plug one end of the USB cable into the USB port on the Samsung Digital Presenter. 3. Plug the other end into the USB port on the computer. ✔ Caution : For a Macintosh installed with USB 2.0, the - Samsung SDP-950STA | Software Guide - Page 41
English French German Program Installation After inserting the CD, double-click the following program icon to run it. When the above screen appears, click the "Continue" button. The installation will not proceed if the current OS version is older than 10.2. 39 Italian Spanish - Samsung SDP-950STA | Software Guide - Page 42
After reviewing the information, click the "Continue" button. After reviewing the copyright information, click the "Agree" button (if you agree). 40 - Samsung SDP-950STA | Software Guide - Page 43
English French German Italian Spanish Select the hard disk where the software will be installed. When multiple hard disks are available in the system, the one where the software can be installed is displayed. Select it by clicking on it and press the "Continue" button. 41 - Samsung SDP-950STA | Software Guide - Page 44
When the software installation is complete, click "Close" to exit the installation program. The SDP Viewer software is installed in the "Applications" folder on the selected hard disk. 42 - Samsung SDP-950STA | Software Guide - Page 45
English French German Running the SDP Viewer SDP Viewer Screen 1. Adjusting image size Adjusts the size of an input image. According to user selection, the size of the image is changed to 1024x768, 512x384, or 256x192. Displays 1024x768 image. Displays 512x384 image. Displays 256x192 image. 43 - Samsung SDP-950STA | Software Guide - Page 46
fitted to the display area. If pressed again, the image is displayed in its original size, but a part of it may be hidden. If the user enlarges the size of the window, the entire image is displayed regardless of the current display mode. 2. Function Status Display Displays the function status of - Samsung SDP-950STA | Software Guide - Page 47
user can click this button to display it again. 5. Control Button The control button area provides a collection of functions to control a set. For more detailed information, please refer to "SDP-Viewer Control Buttons". 6. Display Area An image taken through the lens of the digital visual presenter - Samsung SDP-950STA | Software Guide - Page 48
SDP Viewer Control Buttons By using the Samsung Digital Visual Presenter program, the user can change an input image by controlling the visual presenter. 1. Image Control Slider With the control slider, the user can control zooming, focusing screen brightness & color. Press a function selection - Samsung SDP-950STA | Software Guide - Page 49
Performs automatic color adjustment. When pressed, toggles between image mode and text mode. Performs automatic focusing. When pressed, the image in the digital visual presenter is rotated by 90 , 180 , 270 or 0 . Images in the display area are not affected by this change. 3. Lamp Power Button Turns - Samsung SDP-950STA | Software Guide - Page 50
Divides the current image and an image saved in the memory of the digital visual presenter into two images, and displays them at the same time. After pressing (1-4) in the dialogue box. Executes the values changed by the user, including zoom/shrink, focus, brightness and color controls. After - Samsung SDP-950STA | Software Guide - Page 51
and saved in JPG, TIFF or PNG format on a Macintosh hard disk and output to a printer. 1. Capturing Images When images from the digital visual presenter are transmitted to the display area, press the capture button ( ). Select a capture size in the dialogue box. The entire image is captured - Samsung SDP-950STA | Software Guide - Page 52
2. Saving Images To save a captured image, press the "Save image..." button. After specifying a filename and a saving format, press the "Save" button to save the image. 50 - Samsung SDP-950STA | Software Guide - Page 53
paper type and printing method are set according to the printer driver. Please refer to the manual of the printer currently being used. Pressing the "Preview" button converts the current image to PDF format, allowing the user to check its condition before printing. 4. Copying Images Press the "Copy - Samsung SDP-950STA | Software Guide - Page 54
When an image is being displayed on the digital visual presenter, the user can quickly save it by pressing the shortcut key be reduced. The filename in which an image will be saved cannot be specified by the user, but consists of the current date and time. ✔ Notice : The Quick Saving function works - Samsung SDP-950STA | Software Guide - Page 55
French Troubleshooting(Macintosh Program) Symptom If the SDP Viewer does not run Solution To run the SDP Viewer, the digital visual presenter must be connected to a Macintosh. The digital visual presenter power must also be turned on. Check the USB connection and the digital visual presenter - Samsung SDP-950STA | Software Guide - Page 56
Memo 54 - Samsung SDP-950STA | Software Guide - Page 57
English French Guide de l'utilisateur du logiciel du rétro-projecteur numérique Samsung German Italian Spanish - Samsung SDP-950STA | Software Guide - Page 58
- Samsung SDP-950STA | Software Guide - Page 59
)...........24 Description du traitement d'effet de l'image numarique 25 Utilisation du pilote TWAIN du rétro-projecteur numérique Samsung .....27 Balayage d'Images 28 Carte du Clavier 29 Utilisation du programme d'acquisition AVI du Digital Presenter Samsung 30 Pannes...35 1 Italian Spanish - Samsung SDP-950STA | Software Guide - Page 60
37 Configuration minimum du système 37 Connexion du SDP 38 Installation du programme 39 Fonctionnement du Visualiseur SDP 43 Écran du visualiseur SDP 43 Boutons de commande du visualiseur SDP 46 Capturer/Enregistrer/Produire une image 49 Enregistrement rapide et configuration 52 Rotation - Samsung SDP-950STA | Software Guide - Page 61
ème Pour installer le logiciel du rétro-projecteur numérique Samsung, votre ordinateur doit disposer au minimum de la configuration suivante • Lecteur de CD-ROM ✔ Remarque : Le mode USB 2.0 n'est pas officiellement supporté par les systèmes d'exploitation Windows 98/98SE/ME. Il ne fonctionne pas à - Samsung SDP-950STA | Software Guide - Page 62
Installez le pilote USB. Voir page 5. 3. Installez le programme de contrôle du rétro-projecteur numérique Samsung. Voir page 7. Suivez les instructions ci-dessous pour terminer l'installation. Branchement du rétro-projecteur numérique Samsung à un PC 1. Assurez-vous que le rétro-projecteur numérique - Samsung SDP-950STA | Software Guide - Page 63
English French German Installation du pilote USB 1. La boîte de dialogue Assistant d'ajout de nouveau matériel apparaît. (Cas de Windows XP ) 2. Cochez Installer à partir d'une liste ou d'un emplacement spécifique (Avancé) et cliquez sur Suivant. (Cas de Windows XP ) ✔ Remarque : Sous Windows 98, - Samsung SDP-950STA | Software Guide - Page 64
3. Insérez le CD du programme SAMSUNG dans votre lecteur de CD-ROM, cochez ensuite la case lecteurs de CD-ROM et Inclure cet emplacement dans la recherche puis tapez x:\ (où x représente la lettre du lecteur de CD-ROM). Cliquez sur Suivant. 4. Cliquez sur Terminer. Le pilote USB est inséré. 6 - Samsung SDP-950STA | Software Guide - Page 65
English French German Installation du programme du rétro-projecteur numérique Samsung 1. Insérez le CD du programme du rétro-projecteur numérique Samsung dans le lecteur de CD-ROM et le programme d'installation se lance automatiquement. Sélectionnez ensuite ANGLAIS. Cliquez sur Suivant. 2. La fen - Samsung SDP-950STA | Software Guide - Page 66
pour la compression de fichiers AVI avec le programme d'acquisition AVI SDP. Si vous n'installez pas le Codec MPEG-4, il sera impossible de logiciel du rétro-projecteur numérique Samsung correctement installé, vous pouvez voir l'icône du rétro-projecteur numérique Samsung dans le menu [Démarrer] et - Samsung SDP-950STA | Software Guide - Page 67
English French German Conseils d'installation Comment puis-je savoir si le port USB de mon ordinateur est activé ? 1. Nous expliquerons sous Windows XP. Trouvez le Gestionnaire de périphérique dans d'autres versions de Windows par vous-même. 2. Sélectionnez Démarrer Système Gestionnaire de périph - Samsung SDP-950STA | Software Guide - Page 68
rique 3. Cliquez sur l'icône plus (+) avant le système imageur. 4. A partir des éléments du système imageur, sélectionnez Rétro-projecteur numérique Samsung SDP et cliquez ensuite sur Supprimer. Dans la boîte de dialogue Confirmation de suppression de périphérique, cliquez sur OK. Programme du rétro - Samsung SDP-950STA | Software Guide - Page 69
USB (placée automatiquement sur le bureau de Windows lors de l'installation). Vous pouvez également sélectionner le programme du rétro-projecteur numérique Samsung en cliquant sur Démarre Programmes SDP USB Viewer 3. Le panneau de visualisation et le panneau de contrôle du rétro-projecteur numérique - Samsung SDP-950STA | Software Guide - Page 70
images présentées par le rétro-projecteur dans cette zone. Lorsque vous réglez l'image en utilisant le panneau de commande du rétroprojecteur numérique Samsung ou la commande à distance, vous pouvez voir le résultat appliqué dans cette zone. 12 - Samsung SDP-950STA | Software Guide - Page 71
English French German 2 • Description de la touche panneau de visualisation (invisible en mode FULL). Vous permet de sélectionner la taille de l'image d'entrée. QUAR : taille de l'image 256 x 192, fenêtre du panneau de visualisation normal HALF : taille de l'image 512 x 384, fenêtre du panneau de - Samsung SDP-950STA | Software Guide - Page 72
4 Option Dialog 1) Current Q-SAVE folder path (USB 2.0 only) Vous pouvez modifier le dossier Q-SAVE pour enregistrer les images lorsque vous appuyez sur la touche Q-SAVE ou [F2]. (Voir page 23 pour des détails relatifs à Q-SAVE.) 2) Auto-Hide Mini Control Delay Vous pouvez régler la durée d' - Samsung SDP-950STA | Software Guide - Page 73
tant que fichier graphique et imprimer les images sur l'imprimante branchée au PC. Utilisation du panneau de 1 2 contrôle du rétro-projecteur 3 4 Samsung 5 6 7 1. Vous pouvez contrôler la capture, enregistrer et imprimer les images à partir du panneau de contrôle. 2. Les touches du panneau - Samsung SDP-950STA | Software Guide - Page 74
1. Panneau de contrôle ÆInterrupteur du petit panneau de contrôle 1 En mode FULL vous pouvez changer le panneau de contrôle en petit panneau de contrôle. 2 2. Touche HALF (Invisible dans le panneau de contrôle habituel.) Cette touche apparaît lorsque vous choisissez le panneau de contrôle en - Samsung SDP-950STA | Software Guide - Page 75
English 6 LAMP : Permet d'allumer ou d'éteindre la lampe French German Italian 7 NEGA/POSI: Permet de passer d'un film positif à un film négatif, et vice-versa. 8 Rot. (Tourner) : Pour tourner l'image de 90° / 180° / 270° / 0° Les images du panneau de visualisation ne changent pas. ( - Samsung SDP-950STA | Software Guide - Page 76
9 La touche DIGITAL FUNCTION/PRESET a une inter action avec la touche numérique (1~8). (Reportez-vous au manuel de l'utilisateur du rétro-projecteur numérique Samsung) I-sav(Image Save) /I-rcl(Image Recall): • Enregistre l'image projetée dans la mémoire de cette unité • Rappel l'image de la mémoire. - Samsung SDP-950STA | Software Guide - Page 77
graphique au format BMP ou JPEG. Faites comme indiqué ci-après : 1. Le panneau de visualisation du rétro- 10 projecteur numérique Samsung affiche l'image actuellement présentée par le rétro- projecteur. Lorsqu l'image que vous souhaitez est affichée dans le panneau de visualisation, cliquez - Samsung SDP-950STA | Software Guide - Page 78
Impression d'images 1. Lorsque la capture est terminée, la touche Print est activée. Cliquez sur la touche Click et la boîte de dialogue Page Setup apparaît. 2. Sélectionnez Paper size/Print position/Print size/Orientation etc. I Fit to page : L'image doit correspondre à la taille de papier que vous - Samsung SDP-950STA | Software Guide - Page 79
/IP standard. • Lorsque vous imprimez l'image au moyen d'une imprimante réseau partagée, les performances d'impression peuvent être diminuées sur votre réseau et la visionneuse SDP risque de fonctionner plus lentement. 21 Italian Spanish - Samsung SDP-950STA | Software Guide - Page 80
Aperçu du petit panneau de contrôle du rétro-projecteur numérique Samsung Le petit panneau de contrôle est utilisé pour ne pas cacher l'image en mode FULL et il contient les fonctions clé de panneau de - Samsung SDP-950STA | Software Guide - Page 81
à l'endroit d'installatin du programme du rétro-projecteur numérique Samsung + QuickCap.) Comment faire un enregistrement rapide 1. Lorsque l'image ferm dans le répertoire où le programme est installé. (ex> c:\program files\SDP USB Viewer\Quick Cap ou un répertoire indiqu que vous avez paramétré - Samsung SDP-950STA | Software Guide - Page 82
Application des Fonctions DIP (Digital Image Effect Processing) DIP produit un effet impressionant sur une sélection en affichant des pixels et en trouvant et mettant en surbrillance le contraste sur - Samsung SDP-950STA | Software Guide - Page 83
English French German Description du traitement d'effet de l'image numarique 1) Default : L'image originale (couelurs RVB) [Utilise : Affiche l'image originale du retro-projecteur.] 2) Grayscale : L'image (couleurs RVB) est changée en échelle de gris. [Utilise : Vous pouvez améliorer la lisibilit - Samsung SDP-950STA | Software Guide - Page 84
7) Image Rotation : Cet effet vous permet de tourner une image entière. Vous pouvez la tourner facilement (-180∞_~180∞) par la souris ou les touches [ ], [ ]. Il se peut que vous ne puissiez pas voir l'image dans sa totalité étant donné qu'elle est tourné au centre. [Utilise : Tourne une image de - - Samsung SDP-950STA | Software Guide - Page 85
Scanner or Digital Camera ...] Sélectionnez [SDP TWAIN Data Source], puis [Custom Insert]. 4) Pour d'autres logiciels d'application supportés par TWAIN, reportez-vous au manuel d'application. 4 Balayez les images par le pilote SDP TWAIN Le pilote TWAIN du réto-projecteur numérique Samsung fonctionne - Samsung SDP-950STA | Software Guide - Page 86
Balayage d'images 1 Les images d'un rétro-projecteur sont affichées sur le panneau de visualisation. Sélectionnez la taille que vous souhaitez balayer par TWAIN. (La taille par défaut : mode HALF sur le panneau de visualisation) 2 Appuyez sur la touche Capture pour balayer dans le programme d' - Samsung SDP-950STA | Software Guide - Page 87
English French Carte du clavier Touches [Art+Enter] [ESC] [F2] [Alt + F4] Description Paramètre la fenêtre du mode SCREEN FULL [Lors de l'affichage] Revient au mode HALF size [Lors de la capture] Arrête la capture de l'image Vous pouvez indiquer le chemin où vos images à enregistrement rapide se - Samsung SDP-950STA | Software Guide - Page 88
) vers un fichier AVI. (USB 2.0 uniquement) 1. Assurez-vous que votre Digital Presenter Samsung est connecté au PC et que tout deux sont allumés. 2. Sélectionnez et cliquez sur [Démarrer] [Programmes] [SDP USB Viewer] [SDP AVI Capture] 3. Le programme d'acquisition AVI est disponible en mode USB2 - Samsung SDP-950STA | Software Guide - Page 89
faire de l'acquisition nécessitant plus de 4 Go pour un seul fichier. Nous recommandons l'utilisation du Codec video MPEG-4. (Consulter le service d'assistance technique pour les fonctions de formatage et de conversion). Taille Maximum par Fichier Sans Compression MPEG-4 Haute Qualité MPEG-4 Basse - Samsung SDP-950STA | Software Guide - Page 90
4. Utilisation du Programme d'acquisition AVI SDP (1) Limite du Temps d'Acquisition Vous pouvez définir un temps d'acquisition maximum du fichier AVI d'une durée fixe définie en minutes. Le programme affichera l'espace Disque - Samsung SDP-950STA | Software Guide - Page 91
acquisition et le temps d'acquisition s'affiche en dessous de ce voyant. (4) Basculement vertical de l'image Selon la position de l'objectif du Digital Presenter, la prévisualisation des images peut être inversée. Ainsi, en utilisant l'option de basculement d'image vertical, vous pouvez réaliser une - Samsung SDP-950STA | Software Guide - Page 92
[Exit] le programme d'acquisition AVI. ✔ Noter : 1. Lors de l'acquisition, il ne faut ni éteindre le Digital Presenter ni déconnecter le câble USB du PC. Ceci pourrait occasionner une défaillance du Presenter ou du PC. 2. Lors de l'acquisition, le bouton [Exit] ne permet pas de finaliser le - Samsung SDP-950STA | Software Guide - Page 93
Samsung Solution Il y a une erreur de communication entre le rétro-projecteur numérique Samsung et l'ordinateur. Quittez le programme du rétro-projecteur numérique Samsung : "There is a problem in communication of USB. Please suivant : "Fail to find USB device driver. Check the USB plug or the power - Samsung SDP-950STA | Software Guide - Page 94
Symptôme Le message d'erreur suivant (message Windows XP) : "HI-SPEED USB device is plugged in non-HI-SPEED USB hub. " Solution Le système fonctionne en mode USB 1.1 mode comme dans ce cas. • Assurez-vous que la fonction USB 2.0 est sur ON dans CMOS. • Téléchargez et installez les patchs USB - Samsung SDP-950STA | Software Guide - Page 95
English French German Installation du Visualiseur SDP(Macintosh Program) Configuration minimum du système • Power PC G3 400MHz ou supérieur (USB 2.0 : PowerPC G4 800MHz ou supérieur recommandé) • MacOS 10.2 ou - Samsung SDP-950STA | Software Guide - Page 96
Connexion du SDP 1. Assurez-vous que le rétro-projecteur numérique Samsung et l'ordinateur soient allumés. 2. Branchez une extrémité du câble USB sur le port USB du rétro-projecteur numérique Samsung. 3. Branchez l'autre extrémité sur le port USB de l'ordinateur. ✔ PRÉCAUTIONS D'UTILISATION : Pour - Samsung SDP-950STA | Software Guide - Page 97
English French German Installation du programme Après avoir inséré le CD, double-cliquez sur l'icône de programme suivante pour lancer le programme d'installation. Lorsque l'écran ci-dessus apparaît, cliquez sur le bouton « Continuer ». L'installation ne pourra pas être effectuée si la version OS - Samsung SDP-950STA | Software Guide - Page 98
Après avoir vérifié les informations, cliquez sur le bouton « Continuer ». Après avoir lu les informations relatives au copyright, cliquez sur le bouton « J'accepte » (si vous les acceptez). 40 - Samsung SDP-950STA | Software Guide - Page 99
English French German Italian Spanish Sélectionnez le disque dur sur lequel le logiciel va être installé. Lorsque le système comporte plusieurs disques durs, celui sur lequel le logiciel peut être installé s'affiche. Sélectionnez-le en cliquant dessus et appuyez sur le bouton « Continuer ». 41 - Samsung SDP-950STA | Software Guide - Page 100
Lorsque l'installation du logiciel est terminée, cliquez sur « Terminer » pour quitter le programme d'installation. Le logciel du Visualiseur SDP est installé dans le dossier « Applications » du disque dur sélectionné. 42 - Samsung SDP-950STA | Software Guide - Page 101
English French German Fonctionnement du Visualiseur SDP Écran du visualiseur SDP 1. Ajuster la taille de l'image Permet d'ajuster la taille d'une image d'entrée. La taille de l'image est modifiée en 1024x768, 512x384 ou 256x192, en fonction - Samsung SDP-950STA | Software Guide - Page 102
Lorsque la taille d'une image est supérieure à la taille de la zone d'affichage de la fenêtre, l'image est ajustée à la zone d'affichage. En appuyant de nouveau sur ce bouton, l'image est affichée à sa taille d'origine, mais une partie de celle-ci risque d'être masquée. Si l'utilisateur agrandit la - Samsung SDP-950STA | Software Guide - Page 103
English French German 4. Capturer Enregistre une image contenue dans un ensemble sous la forme d'un fichier image. Enregistrement d'image rapide : lorsque ce bouton est enfoncé, l'image actuellement affichée sur l'écran est enregistrée dans le dossier spécifié dans le menu Configuration. Si la - Samsung SDP-950STA | Software Guide - Page 104
Boutons de commande du visualiseur SDP Grâce au programme du Visualiseur numérique Samsung, l'utilisateur peut modifier une image d'entrée en contrôlant le visualiseur. 1. Barre de contrôle des images Grâce à la barre de contrôle des - Samsung SDP-950STA | Software Guide - Page 105
English French German Luminosité : permet d'activer les commandes de luminosité de l'image. Rouge : permet d'ajuster la couleur de l'écran (rouge). Bleu : permet d'ajuster la couleur de l'écran (bleu). 2. Ajustement de l'image Permet de procéder à un ajustement automatique des couleurs. Lorsqu'il - Samsung SDP-950STA | Software Guide - Page 106
Lorsque ce bouton est enfoncé, la fréquence d'affichage du visualiseur numérique bascule entre 60 Hz et 75 Hz. Les images transmises via le port USB ne sont pas affectées par ce changement. Grâce à ce bouton, l'utilisateur peut activer ou désactiver la fonction Freeze. Les images transmises via le - Samsung SDP-950STA | Software Guide - Page 107
English French German Capturer/Enregistrer/Produire une image Les images, quel que soit leur format d'origine, peuvent être capturées et enregistrées au format JPG, TIFF ou PNG sur le disque dur d'un ordinateur Macintosh et imprimées. 1. Capturer des images Lorsque les images du visualiseur numé - Samsung SDP-950STA | Software Guide - Page 108
2. Enregistrer des images Pour enregistrer une image capturée, appuyez sur le bouton « Enregistrer l'image... ». Après avoir spécifié un nom de fichier et un format d'enregistrement, appuyez sur le bouton « Enregistrer » pour enregistrer l'image. 50 - Samsung SDP-950STA | Software Guide - Page 109
du pilote de l'imprimante. Veuillez consulter le manuel de votre imprimante. Appuyez sur le bouton "Aperçu" pour convertir l'image actuellement à l'écran au format PDF afin de pouvoir vérifier son état avant de l'imprimer. 4. Copier des images Appuyez sur le bouton "Copier" de la fenêtre de capture - Samsung SDP-950STA | Software Guide - Page 110
Enregistrement rapide et configuration Lorsqu'une image est affichée sur le visualiseur numérique, l'utilisateur peut l'enregistrer très rapidement en appuyant simultanément sur les touches « Ctrl » et « K ». L'image est enregistrée à la taille 1024x768 en mode Enregistrement rapide. L'emplacement - Samsung SDP-950STA | Software Guide - Page 111
English French Pannes(Macintosh Program) Symptôme Le visualiseur SDP ne fonctionne pas. Solution Pour pouvoir démarrer, le visualiseur numérique SDP doit être connecté à un ordinateur Macintosh. Le visualiseur numérique doit être sous tension. Vérifiez la connexion USB et le visualiseur numé - Samsung SDP-950STA | Software Guide - Page 112
Note 54 - Samsung SDP-950STA | Software Guide - Page 113
English French Benutzerhandbuch für die Software des Samsung Digital Presenters German Italian Spanish - Samsung SDP-950STA | Software Guide - Page 114
- Samsung SDP-950STA | Software Guide - Page 115
Wie kann ich den USB-Treiber und die Samsung Digital Presenter Software entfernen? 10 Arbeiten mit der Samsung Digital Presenter Software......11 Übersicht zum Samsung Digital Presenter View Panel 12 Übersicht zum Samsung Digital Presenter Control Panel 15 Erfassen (Scannen), Speichern, Drucken - Samsung SDP-950STA | Software Guide - Page 116
Inhalt (Macintosh Program) Installation des SDP Betrachters 37 Systemanforderungen 37 Anschluss des SDP 38 Programminstallation 39 Betrieb des SDP Betrachters 43 SDP Betrachterbildschirm 43 SDP Bedienungselemente des Betrachters 46 Bilderfassung/-speicherung/-ausgabe 49 Schnellspeicherung & - Samsung SDP-950STA | Software Guide - Page 117
English French German Installation der Software für den Samsung Digital Presenter Auf der mitgelieferten CD zum Samsung Digital Presenter befinden sich: • USB-Treiber • Samsung Digital Presenter Software Um Ihren Samsung Digital Presenter vom PC aus zu steuern, Bilder auf der Festplatte zu - Samsung SDP-950STA | Software Guide - Page 118
Seite 5. 3. Installieren Sie die Samsung Digital Presenter Software. Siehe auch Seite 7. Zum Abschluss der Installation folgen Sie den folgenden Anweisungen: Anschluss des Samsung Digital Presenter an den PC 1. Stellen Sie sicher, dass der Samsung Digital Presenter und der Computer eingeschaltet - Samsung SDP-950STA | Software Guide - Page 119
des USB-Treibers 1. Das Dialogfeld des Hardware-Assistenten wird angezeigt. (hier im Falle von Windows XP) 2. Aktivieren Sie das Kästchen Software von einer Liste oder bestimmten Quelle installieren (für fortgeschrittene Benutzer) und klicken Sie auf Weiter. (hier im Falle von Windows XP - Samsung SDP-950STA | Software Guide - Page 120
3. Legen Sie die SAMSUNG Programm-CD in Ihr CD-ROM Laufwerk, aktivieren Sie die Kästchen CD-ROM-Laufwerk und Folgende Quelle ebenfalls durchsuchen: und geben dann die Laufwerkskennung für das - Samsung SDP-950STA | Software Guide - Page 121
English French German Installation der Software für den Samsung Digital Presenter 1. Legen Sie die SAMSUNG Programm-CD in Ihr CD-ROM Laufwerk, das Installationsprogramm startet automatisch. Wählen Sie ENGLISH. Klicken Sie auf Next. 2. Das Fenster des Installationsassisten wird geöffnet. - Samsung SDP-950STA | Software Guide - Page 122
Dateien im SDP AVI Software-Bedienungsanleitung, AVI Capture Programm-Verknüpfung im [Start]-Menü. 6. Nach der korrekten Installation der Samsung Digital Presenter Software sehen Sie das Symbol Samsung Digital Presenter im [Start]-Menü und auf dem Desktop und das Symbol Software manual - Samsung SDP-950STA | Software Guide - Page 123
English French German Tipps zur Installation Wie kann ich feststellen, ob der USB-Anschluss meines Computers aktiviert ist? 1. Wir erklären das für Windows XP. Suchen Sie bitte in anderen Windows-Version den Gerätemanager selbst. 2. Wählen Sie Start System Gerätemanager 3. Wenn Sie in der Liste - Samsung SDP-950STA | Software Guide - Page 124
klicken Sie auf Entfernen. Im Dialogfeld Entfernen des Geräts bestätigen klicken Sie auf OK. Samsung Digital Presenter Software: 1. Wählen Sie unter Systemsteuerung Software den Eintrag SDP USB Viewer. 2. Führen Sie das Installationsprogramm aus, wie schon zuvor beschrieben. Wählen Sie im weiteren - Samsung SDP-950STA | Software Guide - Page 125
(automatisch auf dem Windows Desktop während der Installattion angelegt). Sie können die Samsung Digital Presenter Software auch über das Start-Menü aufrufen: Start Program SDP USB Viewer 3. Das Samsung Digital Presenter View Panel und das Control Panel werden geöffnet. 4. Der aktuelle USB-Status - Samsung SDP-950STA | Software Guide - Page 126
Übersicht zum Samsung Digital Presenter View Panel 4 1 2 3 1 Betrachtungsbereich In diesem Bereich können sie die projizierten Bilder des Presenters sehen. Wenn Sie die Abbildung mit dem Control Panel des Samsung Digital Presenters oder über die Fernbedienung einstellen, können Sie das Ergebnis - Samsung SDP-950STA | Software Guide - Page 127
English French German 2 • Beschreibung der Schaltflächen des View Panels (im Modus FULL nicht sichtbar). Erlaubt Ihnen, die Größe des Eingabebildes zu wählen. QUAR: 256 x 192 Größe der Abbildung, normales View Panel HALF: 512 x 384 Größe der Abbildung, normales View Panel. Drücken Sie die Taste [ - Samsung SDP-950STA | Software Guide - Page 128
4 Options-Dialog 1. Current Q-SAVE folder path (USB 2.0 only) Sie können den Ordner für Schnellspeicherungen von Bildern durch Betätigung der Schaltfläche Q-SAVE oder der Taste [F2] ändern. (nähere Details zur Funktion Q-SAVE auf Seite 23). 2. Auto-Hide Mini Control Delay Sie können die Zeit - Samsung SDP-950STA | Software Guide - Page 129
English French German Übersicht zum Samsung Digital Presenter Control Panel Mit der Samsung Digital Presenter Software können Sie die von Ihrem Presenter gezeigten Abbildungen bearbeiten und justieren. Sie können sie auch als Grafik-Dateien speichern und die Bilder über einen mit dem PC - Samsung SDP-950STA | Software Guide - Page 130
Umschalten von Control Panel Mini Control Panel 1 Im Modus FULL können Sie zwischen Control Panel und Mini Control Panel hin- und herschalten. 2 Schaltfläche HALF (im normalen Control Panel nicht sichtbar). Diese Schaltfläche erscheint, wenn Sie im Modus FULL das Control Panel aufrufen. Durch - Samsung SDP-950STA | Software Guide - Page 131
um. Ext. (Extern): Zum Umschalten zwischen interner oder externer Bildquelle. Das Bild im View Panel bleibt unverändert. 9 zeigt den Status von CONTROL FUNCTION und DIGITAL FUNCTION, PRESET. Zeigt den aktuellen Status des Presenters und außerdem die unter DIGITAL FUNCTION, PRESET gewählte Nummer. 17 - Samsung SDP-950STA | Software Guide - Page 132
FUNCTION/PRESET arbeitet zusammen mit den Nummern-Schaltflächen (1-8). (Siehe auch Benutzerhandbuch für den Samsung Digital Presenter). I-sav(Image Save) /I-rcl(Image Recall): • Sichert das Bild im internen Speicher des Geräts. • Um das Bild zu sichern/abzurufen, klicken Sie auf die - Samsung SDP-950STA | Software Guide - Page 133
im View Panel dargestellte Bild als Datei im Format BMP oder JPEG sichern. Das geht so: 1. Das Samsung Digital Presenter View Panel 10 zeigt gegenwärtig die Projektion vom Samsung Digital Presenter. Wenn das Bild wie gewünscht im View Panel erscheint klicken Sie auf die Schaltfläche Capture - Samsung SDP-950STA | Software Guide - Page 134
Druck von Bildern 1. Nach abgeschlossenem Capture-Vorgang steht die Schaltfläche Print zur Verfügung. Nach Anklicken der Schaltfläche wird das Dialogfeld Page Setup angezeigt. 2. Wählen Sie Papierformat / Druckposition / Druckformat / Seitenausrichtung usw. I Fit to page: Das Bild wird in die gewä - Samsung SDP-950STA | Software Guide - Page 135
Druckers den Standard-TCP/IP-Anschluss zu wählen. • Wenn Sie das Bild über den Netzwerkdrucker drucken, kann die Druckleistung in Ihrem Netzwerk sinken und der SDP Viewer sich verlangsamen. 21 Italian Spanish - Samsung SDP-950STA | Software Guide - Page 136
Übersicht zum Samsung Digital Presenter Mini Control Panel Das Mini Control Panel wird verwendet, 24. 4 Half: Siehe Seite 16. 5 Öffnet das Control Panel zur Bedienung aller Funktionen des Presenters. ✔ Hinweis: • Das Mini Control Panel wird nach einigen Sekunden ausgeblendet, Sie können die - Samsung SDP-950STA | Software Guide - Page 137
werden. (Der standardmäßige Pfad ist das Installationsverzeichnis der Samsung Digital Presenter Software + QuickCap). Schnellspeicherung 1. Wenn eine Projektion im View , das ein Unterverzeichnis des Installationsverzeichnisses der Software ist. (Bsp. > C:\Programme\SDP USB Viewer\Quick Cap\ , oder - Samsung SDP-950STA | Software Guide - Page 138
Anwendung der DIP-Funktionen (Digital Image Effect Processing) DIP produziert eine impressionistische Wirkung für einen Bildbereich durch die Anzeige von Rasterpunkten und durch Finden und Hervorheben des Kontrasts in einem Bild. Das Originalbild vom Presenter ändert sich nicht. Ein DIP-Bild wird - Samsung SDP-950STA | Software Guide - Page 139
das Histogramm auf der linken Seite an. Verfügbar unter Default, Grayscale und Binarization. [Anwendung: Sie können den Helligkeitswert des Presenter steuern oder die Leuchte einfach ein-/ausschalten]. ✔ Hinweis: Ein Histogramm zeigt die Pixelverteilung in einem Bild durch Darstellung der Pixel - Samsung SDP-950STA | Software Guide - Page 140
ist 8 und Sie können den Wert mittels Maus oder den Tasten [ ] und [ ] setzen. [Anwendung: Zerlegt das Originalbild des Presenters in ein Mosaik]. Digital Image Effects cts Default Grayscale Negative Binarization Edge Detection Image Rotation Emboss Mosaic Speichern O O O O O O O O Drucken - Samsung SDP-950STA | Software Guide - Page 141
der Samsung Digital Presenter Software (Details auf Seite 7). • Wenn Sie den TWAIN-Treiber nicht über die Routine Install Shield installiert haben, müssen Sie ihn manuell installieren. 3. Verwendung des TWAIN-Treibers mit der Software (Fallbeispiele) 1) Adobe Photoshop: [File] [Import] [SDP TWAIN - Samsung SDP-950STA | Software Guide - Page 142
Bilder scannen 1. Die Bilder des Presenters werden im View Panel angezeigt. Wählen Sie die gewünschte Größe des TWAIN-Scans. (Standard: Modus HALF im View Panel) 2. Klicken Sie auf die Schaltflä - Samsung SDP-950STA | Software Guide - Page 143
English French Tastaturübersicht Tasten [Alt+Eingabe] [ESC] [F2] [Alt + F4] Beschreibung Auswahl des Modus' SCREEN FULL Bemerkung [Während der Anzeige] Schaltet zurück in Modus HALF [Während Erfassung] Gibt erfasstes Bild frei Verzeichnispfad für Schnellspeicherung kann angegeben werden. ( - Samsung SDP-950STA | Software Guide - Page 144
) in eine AVI-Datei speichern (nur USB 2.0). 1. Achten Sie darauf, dass Ihr Samsung Digital Presenter mit dem PC verbunden ist und beide eingeschaltet sind. 2. Klicken Sie auf [Start] [Programme] [SDP USB Viewer] [SDP AVI Capture]. 3. Das AVI Capture-Programm arbeitet mit der USB 2.0-Schnittstelle - Samsung SDP-950STA | Software Guide - Page 145
. Wir empfehlen, den MPEG-4-Videocodec zu verwenden. (Zum Ausführen des Befehls "Formatieren/Konvertieren" wenden Sie sich an den technischen Support.) Maximale Dateigröße Keine Kompression MPEG-4 Hohe Qualität MPEG-4 Niedrige Qualität FAT32 4 GB ca. 6 Minuten ca. 12 Stunden ca. 40 Stunden - Samsung SDP-950STA | Software Guide - Page 146
4. Arbeiten mit dem SDP AVI Capture-Programm (1) Capture Time Limits (Aufzeichnungszeitlimits) Sie können ein Capture-Zeitlimit einstellen, um die Aufzeichnung der AVI-Datei auf eine bestimmte Dauer (in Minuten) - Samsung SDP-950STA | Software Guide - Page 147
image vertical (Bild vertikal rotieren) Je nach Linsenposition des Digital Presenter lassen sich die Vorschaubilder umdrehen. Sie können so mithilfe einer AVI-Datei die Ortszeit oben links anzeigen lassen. (7) Display user caption in AVI file (Benutzereigene Untertitel bei der Wiedergabe der AVI- - Samsung SDP-950STA | Software Guide - Page 148
das AVI-Capture-Programm. ✔ Hinweis : 1. Während der Aufzeichnung darf der Presenter nicht ausgeschaltet oder das USB-Kabel vom PC entfernt werden. Sonst kann es zu Problemen mit dem Presenter oder dem PC kommen. 2. Eine AVI-Datei lässt sich während - Samsung SDP-950STA | Software Guide - Page 149
English French German Problembehebung Problem Samsung Digital Presenter Software startet nicht Lösung Kommunikationsproblem zwischen dem Samsung Digital Presenter und dem Computer. Verlassen Sie das Programm und machen Sie folgendes: • USB-Kabel aus- und wieder einstecken. • Nicht benötigte - Samsung SDP-950STA | Software Guide - Page 150
Problem Fehlermeldung (Windows XP Meldung): "Ein HochgeschwindigkeitsUSB-Gerät wurde an einen NichtHochgeschwindigkeitsUSB-Hub angeschlossen." Lösung Das System läuft unter USB 1.1. • Prüfen Sie, ob USB 2.0 im - Samsung SDP-950STA | Software Guide - Page 151
English French German Installation des SDP Betrachters(Macintosh Program) Systemanforderungen * Power PC G3 400 MHz oder besser (USB 2.0: Power PC G4 800 MHz oder besser empfohlen) * MacOS 10.2 oder neuer * Mindestens - Samsung SDP-950STA | Software Guide - Page 152
Anschluss des SDP 1. Stellen Sie sicher, dass der Samsung Digital Presenter und der Computer eingeschaltet sind. 2. Verbinden Sie das USB-Kabel mit dem USB-Anschluss des Samsung Digital Presenters. 3. Verbinden Sie das andere Ende mit dem USB-Anschluss des Computers. ✔ VORSICHT : Bei einem mit USB - Samsung SDP-950STA | Software Guide - Page 153
English French German Programminstallation Nach Einlegen der CD doppelklicken Sie zur Ausführung auf das folgende Programmsymbol. Wenn der obengenannte Bildschirm erscheint, klicken Sie auf "Continue". Ist die Version des Betriebssystems älter als 10.2, wird die Installation abgebrochen. 39 - Samsung SDP-950STA | Software Guide - Page 154
Klicken Sie nach dem Überprüfen der Information auf "Continue". Klicken Sie nach der Anzeige der Informationen zum Urheberrecht auf "Agree" (wenn Sie zustimmen). 40 - Samsung SDP-950STA | Software Guide - Page 155
English French German Italian Spanish Wählen Sie die Festplatte für die Installation der Software. Wenn mehrere Festplatten im System verfügbar sind, wird die für die Installation geeignete angezeigt. Wählen Sie durch Anklicken und klicken Sie anschließend auf "Continue". 41 - Samsung SDP-950STA | Software Guide - Page 156
Nach Abschluss der Softwareinstallation klicken Sie auf "Close", um das Installationsprogramm zu verlassen. Die SDP Betrachter-Software ist im Verzeichnis "Programme" auf der gewählten Festplatte installiert. 42 - Samsung SDP-950STA | Software Guide - Page 157
English French German Betrieb der SDP Betrachter-Software SDP Betrachterbildschirm 1. Bildgröße einstellen Stellt die Größe eines Eingabebildes ein. Entsprechend der Anwenderwahl wird die Bildgröße auf 1024x768, 512x384 oder 256x192 geändert. Zeigt in 1024x768 - Samsung SDP-950STA | Software Guide - Page 158
Wenn die Bildgröße den Anzeigebereich übersteigt, wird die Abbildung auf den Anzeigebereich abgestimmt (eingepasst). Bei erneutem Anklicken wird das Bild in seiner Originalgröße angezeigt, aber ein Teil davon kann verborgen sein. Wenn der Benutzer das Fenster vergrößert, wird das ganze Bild ohne Rü - Samsung SDP-950STA | Software Guide - Page 159
Funktionen zur Steuerung eines Satzes. Genauere Informationen finden Sie unter "SDP Betrachter - ControlSchaltflächen". 6. Anzeigebereich In diesem Bereich wird das Bild gezeigt, das von dem Objektiv des Presenters aufgenommen wird angezeigt. Das resultierende Bild -durch die ControlSchaltflächen - Samsung SDP-950STA | Software Guide - Page 160
Bedienelemente des SDP Betrachters Durch Verwendung des Samsung Digital Visual Presenter Programms kann der Anwender ein Eingabebild durch Steuerung des Presenters verändern. 1. Schieberegler Bildsteuerung Mit dem Schieberegler kann der Anwender Zoom, Fokus, Helligkeit & Farbsättigung einstellen. - Samsung SDP-950STA | Software Guide - Page 161
°, 180°, 270° gedreht. Bilder im Anzeigebereich werden dadurch nicht beeinflusst. 3. Betriebsschalter für Lampe Schaltet bei Betätigung die Lampe des Presenters ein bzw. aus. 4. Gerätesteuerung Erstellt von einem Eingangsbild ein internes Bild. Erstellt von einem Eingangsbild ein externes Bild. Ein - Samsung SDP-950STA | Software Guide - Page 162
Nach Anklicken der Schaltfläche wählen Sie im Dialogfeld eine numerische Schaltfläche (1-8). (Nur für den DXA) Zeigt ein Bild aus dem Speicher des Presenters. Nach Anklicken der Schaltfläche wählen Sie im Dialogfeld eine numerische Schaltfläche (1-8). (Nur für den DXA) Speichert die vom Anwender ge - Samsung SDP-950STA | Software Guide - Page 163
PNG auf der Festplatte des Macintosh gespeichert, oder über einen Drucker ausgegeben werden. 1. Erfassung (Capture) von Bildern Wenn Bilder vom digitalen Presenter im Anzeigebereich erscheinen, klicken Sie auf Capture ( ). Wählen Sie die Größe im Dialogfeld. Das ganze Bild kann als 1024x768, 1/4 als - Samsung SDP-950STA | Software Guide - Page 164
2. Bilder speichern Zur Speicherung eines erfassten Bildes klicken Sie auf "Save image...". Nach Angabe von Dateinamen und -format klicken Sie auf "Save", um das Bild zu speichern. 50 - Samsung SDP-950STA | Software Guide - Page 165
dem Druckertreiber eingestellt. Bitte das Handbuch des aktuellen Druckers konsultieren. Durch Anklicken von "Preview" wird das aktuelle Bild in das Format PDF umgewandelt, was dem Anwender vor dem Druck die Möglichkeit der Qualitätskontrolle gibt. 4. Bilder kopieren Klicken Sie auf im Capture - Samsung SDP-950STA | Software Guide - Page 166
Schnellspeicherung & Konfiguration Ein im digitalen Presenter angezeigtes Bild kann vom Anwender über das Tastenkürzel "Strg-K" schnell gespeichert werden. Bilder werden im Schnellspeichermodus in der Größe 1024x768 gesichert. Speicherort und -format kö - Samsung SDP-950STA | Software Guide - Page 167
English French Problembehebung(Macintosh Program) Problem Der SDP Betrachter läuft nicht Lösung Um den SDP Betrachter zu aktivieren, muss der digitale Presenter an einen Macintosh angeschlossen sein. Die Stromversorgung des Presenters muss eingeschaltet sein. Prüfen Sie die USB-Verbindung und - Samsung SDP-950STA | Software Guide - Page 168
Note 54 - Samsung SDP-950STA | Software Guide - Page 169
English French Samsung Digital Presenter Manuale d'uso del software German Italian Spanish - Samsung SDP-950STA | Software Guide - Page 170
- Samsung SDP-950STA | Software Guide - Page 171
Windows) Installazione del software Samsung Digital Presenter ........3 Requisiti di sistema 3 Installazione del software 4 Collegamento del Samsung Digital Presenter al PC 4 Installazione del driver USB 5 Installazione del programma Samsung Digital Presenter 7 Suggerimenti per l'installazione - Samsung SDP-950STA | Software Guide - Page 172
Sommario (Macintosh Program) Installazione del Viewer SDP 37 Requisiti di sistema 37 Collegamento dell' SDP 38 Installazione del programma 39 Esecuzione del Viewer SDP 43 Schermata del Viewer SDP 43 Pulsanti di controllo del Viewer SDP 46 Cattura/Salvataggio/Uscita delle immagini 49 - Samsung SDP-950STA | Software Guide - Page 173
English French German Installazione del software Samsung Digital Presenter Il CD (in dotazione) del programma Samsung Digital Presenter contiene: • il driver USB • il programma Samsung Digital Presenter Per controllare il Samsung Digital Presenter dal PC, nonché per salvare le immagini nel disco - Samsung SDP-950STA | Software Guide - Page 174
installare il software, eseguire le operazioni descritte di seguito. 1. Collegare il Samsung Digital Presenter al PC utilizzando il cavo USB. Vedere la pagina corrente. 2. Installare il driver USB. Vedere la pagina 5. 3. Installare il programma di controllo del Samsung Digital Presenter. Vedere la - Samsung SDP-950STA | Software Guide - Page 175
English French German Installazione del driver USB 1. Viene visualizzata la finestra di dialogo Configurazione guidata nuovo hardware. (Nel caso di Windows XP) 2. Selezionare la casella Installa da un elenco o percorso specifico ( - Samsung SDP-950STA | Software Guide - Page 176
3. Inserire il CD del programma SAMSUNG nell'unità CD-ROM, selezionare le caselle Unità CD-ROM e Includi il seguente percorso nella ricerca, quindi digitare x:\ (dove x sta per la lettera dell'unità CD-ROM). Fare clic su Avanti. 4. Fare clic su Fine. Il driver USB viene installato. 6 - Samsung SDP-950STA | Software Guide - Page 177
English French German Installazione del programma Samsung Digital Presenter 1. Inserire il CD del programma Samsung Digital Presenter nell'unità CD-ROM. Il programma d'installazione è a esecuzione automatica. Selezionare la lingua inglese (ENGLISH). Fare clic su Avanti. 2. Viene visualizzata la - Samsung SDP-950STA | Software Guide - Page 178
clic su [Yes] (Sì) per completare l'installazione. Manuale del software, collegamento rapido al programma AVI Capture nel menu [Start]. 6. Al termine dell'installazione del software Samsung Digital Presenter, l'icona Samsung Digital Presenter viene visualizzata nel menu [Start] e sulla scrivania - Samsung SDP-950STA | Software Guide - Page 179
English French German Suggerimenti per l'installazione Come posso sapere se la porta USB del mio computer è abilitata? 1. Spiegheremo la procedura facendo riferimento a Windows XP. Nelle altre versioni di Windows, individuare da soli il componente Gestione periferiche. 2. Selezionare Start - Samsung SDP-950STA | Software Guide - Page 180
Come faccio a rimuovere il driver USB e il programma Samsung Digital Presenter? Driver USB: 1. Spiegheremo la procedura facendo imaging. 4. Nell'elenco delle periferiche di imaging, selezionare il Samsung Digital Presenter SDP, quindi fare clic su Rimuovi. Nella finestra di dialogo Conferma - Samsung SDP-950STA | Software Guide - Page 181
si installa il programma). In alternativa, selezionare il programma Samsung Digital Presenter facendo clic su Start Programmi SDP USB Viewer 3. Si aprono il pannello di visualizzazione e il pannello di controllo di Samsung Digital Presenter. 4. Lo stato USB corrente (modalità USB 2.0 oppure USB - Samsung SDP-950STA | Software Guide - Page 182
2 3 1 Area di visualizzazione In quest'area è possibile visualizzare le immagini provenienti dal Presenter. Quando si regola l'immagine utilizzando il pannello di controllo del Samsung Digital Presenter, oppure il telecomando, le modifiche apportate possono essere visualizzate in quest'area. 12 - Samsung SDP-950STA | Software Guide - Page 183
English French German 2 • Descrizione dei pulsanti del pannello di visualizzazione (invisibili nella modalità FULL). I pulsanti servono per selezionare il formato dell'immagine in ingresso. QUAR: formato immagine 256 x 192, finestra normale del pannello di visualizzazione HALF: formato immagine - Samsung SDP-950STA | Software Guide - Page 184
4 Option Dialog (Finestra di dialogo Opzioni) 1. Current Q-SAVE folder path (USB 2.0 only) (Percorso cartella Q-SAVE corrente solo per USB 2.0) È possibile modificare la cartella Q-SAVE in cui salvare le immagini quando si preme il pulsante Q-SAVE oppure il tasto [F2]. (Per informazioni su Q-SAVE, - Samsung SDP-950STA | Software Guide - Page 185
acquisizione, il salvataggio e la stampa delle immagini. 2. I pulsanti del pannello di controllo corrispondono a quelli del Samsung 5 Digital Presenter e del telecomando. 6 7 (Per ulteriori informazioni, consultare il manuale d'uso del Samsung Digital Presenter.) 8 9 10 Italian Spanish 15 - Samsung SDP-950STA | Software Guide - Page 186
Pulsante di commutazione Pannello di controllo (Minipannello di controllo 1 Nella modalità FULL è possibile passare dal pannello di controllo al minipannello di controllo. 2 Pulsante HALF (invisibile nel pannello di controllo standard) Questo pulsante viene visualizzato quando si attiva la - Samsung SDP-950STA | Software Guide - Page 187
per selezionare un'immagine interna o esterna. Le immagini del pannello di visualizzazione non subiscono modifiche. 9 Visualizza lo stato delle seguenti funzioni: CONTROL FUNCTION, DIGITAL FUNCTION e PRESET. Visualizza lo stato corrente del Presenter e mostra il numero selezionato per la funzione - Samsung SDP-950STA | Software Guide - Page 188
/PRESET interagisce con il tasto numerico (1~8). (Per ulteriori informazioni, consultare il manuale d'uso del Samsung Digital Presenter.) I-sav (Image Save) /I-rcl (Image Recall): • Salva l'immagine proiettata nella memoria dell'unità. • Richiama l'immagine dalla memoria. Per salvare/richiamare - Samsung SDP-950STA | Software Guide - Page 189
o JPEG. Eseguire le operazioni descritte di seguito. 1. Il pannello di visualizzazione del Samsung 10 Digital Presenter visualizza l'immagine presentata in quel momento dal Samsung Digital Presenter. Quando l'immagine desiderata appare nel pannello di visualizzazione, fare clic sul pulsante - Samsung SDP-950STA | Software Guide - Page 190
Stampa delle immagini 1. Al termine dell'acquisizione, il pulsante Print diventa disponibile. Fare clic sul pulsante Print; viene visualizzata la finestra di dialogo Imposta pagina. 2. Selezionare il formato della carta, la posizione per la stampa, il formato di stampa, l'orientamento ecc. I Fit to - Samsung SDP-950STA | Software Guide - Page 191
. • Quando si stampa l'immagine per mezzo della stampante condivisa in rete, può verificarsi un calo delle prestazioni di stampa sulla rete e l'elaborazione da parte di SDP Viewer può avvenire più lentamente. 21 Italian Spanish - Samsung SDP-950STA | Software Guide - Page 192
Panoramica del minipannello di controllo di Samsung Digital Presenter Il minipannello di controllo viene utilizzato pagina 16. 5 Apre il pannello di controllo che consente di regolare tutte le funzioni del Presenter. ✔ Nota: • Il minipannello di controllo scompare entro alcuni secondi. Il tempo di - Samsung SDP-950STA | Software Guide - Page 193
corrisponde a quello in cui è stato installato il programma Samsung Digital Presenter + QuickCap.) Come eseguire un salvataggio rapido (Q-SAVE) 1. immagine acquisita viene salvata in formato JPEG (esempio> c:\Program Files\SDP USB Viewer\Quick Cap oppure la directory specificata nella finestra di di - Samsung SDP-950STA | Software Guide - Page 194
Applicazione delle funzioni DIP (Digital Image Effect Processing) L'elaborazione DIP produce effetti impressionistici su una selezione visualizzando i pixel e individuando ed evidenziando il contrasto dell'immagine. L'immagine originale del Presenter non subisce modifiche. L'immagine DIP viene - Samsung SDP-950STA | Software Guide - Page 195
in alto a sinistra. Questo effetto è disponibile nelle modalità Default, Grayscale e Binarization. [Utilizzo: consente di regolare la luminosità del Digital Presenter nonché di accendere e spegnere la lampada in modo efficiente.] ✔ .Nota: Un istogramma illustra la distribuzione dei pixel nell - Samsung SDP-950STA | Software Guide - Page 196
valore utilizzando il mouse oppure i tasti [ ], [ ]. [Utilizzo: visualizza sotto forma di mosaico l'immagine originale proveniente dal Digital Presenter.] Effetti digitali applicati all'immagine Default (Predefinito) Grayscale (Scala dei grigi) Negative (Negativo) Binarization (Binarizzazione) Edge - Samsung SDP-950STA | Software Guide - Page 197
altri software applicativi supportati da TWAIN, consultare il manuale d'uso corrispondente. 4. Scansione delle immagini per mezzo del driver TWAIN SDP Il driver TWAIN del Samsung Digital Presenter funziona in modo pressoché identico al programma USB del Samsung Digital Presenter. Fare riferimento - Samsung SDP-950STA | Software Guide - Page 198
Scansione di immagini 1 Le immagini provenienti dal Presenter vengono riportate nel pannello di visualizzazione. Selezionare il formato viene trasferita al programma applicativo. 4 Per ulteriori informazioni sul driver TWAIN, consultare il manuale del programma di grafica. ✔ .Nota: • Nelle modalità - Samsung SDP-950STA | Software Guide - Page 199
English French Mappa della tastiera Tasti [Alt+Invio] [ESC] [F2] [Alt + F4] Descrizione Imposta la modalità SCREEN FULL della finestra [Durante la visualizzazione] Ritorna alla modalità del formato HALF [Durante l'acquisizione] Annulla l'acquisizione dell'immagine L'utente può specificare il - Samsung SDP-950STA | Software Guide - Page 200
Uso del programma AVI Capture per il Samsung Digital Presenter 1. Verificare che il Samsung Digital Presenter sia collegato al computer e che entrambi siano accesi. 2. Selezionare e fare clic su [Start] [Programmi] [SDP USB Viewer] [SDP AVI Capture]. 3. Il programma AVI Capture è disponibile nella - Samsung SDP-950STA | Software Guide - Page 201
English ✔ Avvertenza : • Se il file system del PC è del tipo FAT 32, la dimensione massima di un singolo file è di 4 GB. Controllare il file system di Windows nella finestra di dialogo Proprietà volume. French German Italian Spanish Per acquisire più di 4 GB su un singolo file è necessario - Samsung SDP-950STA | Software Guide - Page 202
4. Uso del programma SDP AVI Capture (1) Capture Time Limits (Limitazioni tempo di acquisizione) L'utente può impostare dei limiti temporali per l'acquisizione di un file AVI durante un periodo prefissato - Samsung SDP-950STA | Software Guide - Page 203
in verticale) A seconda della posizione dell'obiettivo del Digital Presenter, è possibile capovolgere le immagini in anteprima. Utilizzando l' locale nella sezione superiore sinistra del file di playback AVI. (7) Display User Caption in AVI File (Visualizza sottotitolo utente nel file AVI) Questa - Samsung SDP-950STA | Software Guide - Page 204
Chiude il programma AVI Capture. ✔ Avvertenza: 1. Durante la procedura di acquisizione, non spegnere il Presenter e non staccare il cavo USB dal PC. Così facendo si possono provocare danni al Presenter o al PC. 2. Durante la procedura di acquisizione, il pulsante [Exit] non provoca la finalizzazione - Samsung SDP-950STA | Software Guide - Page 205
Samsung Digital Presenter e il computer. Chiudere il programma Samsung Digital Presenter ed eseguire le seguenti operazioni: • Disinserire e inserire di nuovo il cavo USB. • Chiudere gli altri programi software nell'unità CD-ROM o in un driver di archiviazione protetto dalla scrittura. • L'immagine - Samsung SDP-950STA | Software Guide - Page 206
Sintomo Viene visualizzato il seguente messaggio di errore (Windows XP): "Periferica USB HI-SPEED collegata a hub di tipo non HI-SPEED." " Soluzione In casi come questo, il sistema opera nella modalità USB 1.1. • Verificare che la funzione USB 2.0 sia attivata in CMOS. • Scaricare e installare i - Samsung SDP-950STA | Software Guide - Page 207
English French Installazione del Viewer SDP(Macintosh Program) Requisiti di sistema • PowerPC G3 da 400 MHz o ROM ✔ Nota : • Le schede PCI USB 2.0 o PCMCIA USB 2.0 non sono formalmente supportate. • Le schede PCMCIA USB 2.0 potrebbero non fornire tutte le funzionalità USB 2.0. German Italian - Samsung SDP-950STA | Software Guide - Page 208
Collegamento dell' SDP 1. Verificare che il Samsung Digital Presenter e il computer siano entrambi accesi. 2. Inserire un'estremità del cavo USB nella porta USB del Samsung Digital Presenter. 3. Inserire l'altra estremità nella porta USB del computer. ✔ AVVERTENZE : Nel caso di un Macintosh - Samsung SDP-950STA | Software Guide - Page 209
English French German Installazione del programma Dopo aver inserito il CD, fare doppio clic sull'icona programma seguente per lanciare l'esecuzione. Quando viene visualizzata la schermata precedente, fare clic sul pulsante "Continue". L'installazione non può proseguire se la versione del sistema - Samsung SDP-950STA | Software Guide - Page 210
Dopo aver letto le informazioni, fare clic sul pulsante "Continue". Dopo aver letto le informazioni sul copyright, fare clic sul pulsante "Agree" (se si accettano i termini). 40 - Samsung SDP-950STA | Software Guide - Page 211
English French German Italian Spanish Selezionare l'hard disk in cui verrà installato il software. Nel caso di sistemi con più hard disk, verrà visualizzato quello in cui è possibile installare il software. Fare clic sull'hard disk per selezionarlo, quindi premere il pulsante "Continue". 41 - Samsung SDP-950STA | Software Guide - Page 212
Al termine dell'installazione del software, fare clic su "Close" per uscire dal programma di installazione. Il software "SDP Viewer" viene installato nella cartella "Applications" (Programmi) dell'hard disk selezionato. 42 - Samsung SDP-950STA | Software Guide - Page 213
English French German Esecuzione del Viewer SDP Schermata del Viewer SDP 1. Regolazione delle dimensioni dell'immagine Queste opzioni servono per regolare le dimensioni dell'immagine in ingresso. In base alla selezione dell'utente, la dimensione dell' - Samsung SDP-950STA | Software Guide - Page 214
Quando le dimensioni dell'immagine superano quelle dell'area di visualizzazione della finestra, l'immagine viene adattata all'area di visualizzazione. Se si preme di nuovo questo pulsante, l'immagine viene visualizzata nel formato originale, ma alcune parti potrebbero rimanere nascoste. Se l'utente - Samsung SDP-950STA | Software Guide - Page 215
di controllo del Viewer UF". 6. Area di visualizzazione In quest'area viene visualizzata un'immagine ripresa dall'obiettivo del Digital Visual Presenter. In questa schermata è possibile controllare l'immagine risultante, regolata per mezzo dei pulsanti di controllo, del pannello operativo o del - Samsung SDP-950STA | Software Guide - Page 216
Pulsanti di controllo del Viewer SDP Utilizzando il programma Samsung Digital Visual Presenter, l'utente può modificare un'immagine in ingresso controllando il Digital Presenter. 1. Cursore di controllo immagine Con il cursore di controllo l'utente può controllare lo zoom, la messa a fuoco e la - Samsung SDP-950STA | Software Guide - Page 217
dei colori. Quando premuto, alterna fra la modalità immagine e quella testo. Esegue la messa a fuoco automatica. Quando premuto, l'immagine sul Digital Visual Presenter viene ruotata di 90°, 180°, 270° oppure 0°. Le immagini nell'area di visualizzazione non sono influenzate da questa modifica - Samsung SDP-950STA | Software Guide - Page 218
, selezionare un tasto numerico (1-8) nella finestra di dialogo. (Solo per il modello DXA) Visualizza un'immagine salvata nella memoria del Digital Visual Presenter. Dopo aver premuto il pulsante, selezionare un tasto numerico (1-8) nella finestra di dialogo.(Solo per il modello DXA) Salva i valori - Samsung SDP-950STA | Software Guide - Page 219
o PNG sull'hard disk di un computer Macintosh e quindi inviate a una stampante. 1. Cattura di immagini Quando le immagini del Digital Visual Presenter vengono trasmesse all'area di visualizzazione, premere il pulsante Cattura ( ). Selezionare un formato di cattura nella finestra di dialogo. L'intera - Samsung SDP-950STA | Software Guide - Page 220
2. Salvataggio delle immagini Per salvare un'immagine catturata, premere il pulsante "Save image...". Dopo aver specificato un nome di file e un formato di salvataggio, premere il pulsante "Save" per salvare l'immagine. 50 - Samsung SDP-950STA | Software Guide - Page 221
, compresi il tipo di carta e il metodo di stampa, viene impostata in base al driver di stampa. Consultare il manuale della stampante in uso. Premere il pulsante "Preview" per convertire l'immagine in formato PDF; in questo modo l'utente potrà controllarne lo stato prima della stampa. 4. Copia di - Samsung SDP-950STA | Software Guide - Page 222
formato di salvataggio di un'immagine possono essere specificati nel menu di configurazione. Quando un'immagine viene visualizzata nel Digital Visual Presenter, l'utente può salvarla rapidamente premendo il tasto di collegamento rapido "Ctrl-K". Nella modalità di salvataggio rapido, l'immagine viene - Samsung SDP-950STA | Software Guide - Page 223
non funziona Soluzione Per eseguire il Viewer SDP, il Digital Visual Presenter deve essere collegato a un Macintosh. In aggiunta, il Digital Visual Presenter deve essere acceso. Controllare la connessione USB e l'alimentazione del Digital Visual Presenter. Il dispositivo opera nella modalità USB - Samsung SDP-950STA | Software Guide - Page 224
Nota 54 - Samsung SDP-950STA | Software Guide - Page 225
English French Guía del usuario del software Samsung Digital Presenter German Italian Spanish - Samsung SDP-950STA | Software Guide - Page 226
- Samsung SDP-950STA | Software Guide - Page 227
de Windows) Instalación del software Samsung Digital Presenter ......3 Requisitos del sistema 3 Instalación del software 4 Conexión de Samsung Digital Presenter al ordenador 4 Instalación del controlador de USB 5 Instalación del programa Samsung Digital Presenter 7 Consejos de instalaci - Samsung SDP-950STA | Software Guide - Page 228
Contenido (Macintosh Program) Instalación del Visor SDP 37 Requisitos del sistema 37 Conexión del SDP 38 Instalación del programa 39 Ejecución del Visor SDP 43 Pantalla del visor SDP 43 Botones de control del visor SDP 46 Capturar, guardar y producir imágenes 49 Guardar y configurar rá - Samsung SDP-950STA | Software Guide - Page 229
English French German Instalación del software Samsung Digital Presenter El CD suministrado del programa Samsung Digital Presenter contiene: • Controlador de USB • Programa Samsung Digital Presenter Para controlar Samsung Digital Presenter en el ordenador, guarde las imágenes en su disco duro o - Samsung SDP-950STA | Software Guide - Page 230
Instalación del software Para instalar el software 1. Conecte Samsung Digital Presenter al ordenador con el cable USB. Consulte la página actual. 2. Instale el controlador de USB. Consulte la página 5. 3. Instale el programa de control Samsung Digital Presenter. Consulte la página 7. Siga las - Samsung SDP-950STA | Software Guide - Page 231
English French German Instalación del controlador de USB 1. Aparece el cuadro de diálogo Asistente para agregar nuevo hardware. (Para Windows XP) 2. Seleccione Instalar desde una lista o ubicación específica (Avanzado) y haga clic en Siguiente. (Para Windows XP) ✔ .Nota: En Windows 98, quizá - Samsung SDP-950STA | Software Guide - Page 232
3. Inserte el CD del programa de SAMSUNG en la unidad de CD-ROM y active la casilla Unidades de CD-ROM y la casilla Incluir esta ubicación en la búsqueda, después escriba x:\ (siendo x la - Samsung SDP-950STA | Software Guide - Page 233
English French German Instalación del programa Samsung Digital Presenter 1. Inserte el CD del programa Samsung Digital Presenter en una unidad de CD-ROM y se ejecutará automáticamente el programa de instalación. Después seleccione ENGLISH. Haga clic en Next. 2. Aparecerá la ventana del - Samsung SDP-950STA | Software Guide - Page 234
xxx. Haga clic en [Yes] para completar la instalación. Manual de software, acceso directo al programa AVI Capture en el menú [Start]. 6. Tras haber instalado correctamente el software Samsung Digital Presenter, podrá ver el icono Samsung Digital Presenter en el menú [Start] y en el escritorio y el - Samsung SDP-950STA | Software Guide - Page 235
English French German Consejos de instalación ¿Cómo puedo determinar si el puerto USB de mi ordenador está activado? 1. Lo explicaremos con Windows XP. Busque el Administrador de dispositivos en otra versión de Windows. 2. Seleccione Inicio Sistema Administrador de dispositivos 3. Si ve - Samsung SDP-950STA | Software Guide - Page 236
, y haga clic en Quitar. En el cuadro de diálogo Confirmar la eliminación del dispositivo, haga clic en Aceptar. Programa Samsung Digital Presenter: 1. Seleccione SDP USB Viewer en el Panel de control lista de Agregar y quitar programas. 2. Ejecute el programa de instalación de nuevo como lo instal - Samsung SDP-950STA | Software Guide - Page 237
de Windows cuando lo instala). También puede seleccionar el programa Samsung Digital Presenter haciendo clic en Inicio Programa SDP USB Viewer 3. Se abrirá el panel de visualización y el panel de control de Samsung Digital Presenter. 4. El estado de USB actual (modo USB 2.0 o USB 1.1) aparece - Samsung SDP-950STA | Software Guide - Page 238
de visualización de Samsung Digital Presenter 4 1 2 3 1 Zona de visualización Puede ver las imágenes presentadas desde el programa en esta zona de visualización. Cuando ajusta la imagen al utilizar el mando a distancia o el panel de control de Samsung Digital Presenter, puede ver el resultado - Samsung SDP-950STA | Software Guide - Page 239
English French German 2 • Descripción del botón View Panel (no está visible en el modo FULL). Permite seleccionar el tamaño de la imagen de entrada. QUAR: tamaño de imagen 256 x 192, ventana View Panel normal HALF: tamaño de imagen 512 x 384, ventana View Panel normal. Pulse la tecla [Esc] si - Samsung SDP-950STA | Software Guide - Page 240
4 Option Dialog 1. Ruta de la carpeta Q-SAVE actual (sólo USB 2.0) Puede cambiar la carpeta Q-SAVE para guardar imágenes cuando pulse el botón Q-SAVE o la tecla [F2]. (Para ver detalles sobre Q-SAVE, consulte la página 23). 2. Auto-Hide Mini Control Delay Puede ajustar el tiempo que desea ver el - Samsung SDP-950STA | Software Guide - Page 241
la captura, guardar e imprimir imágenes en el panel de control. 2. Los botones de Control Panel son los mismos que los de Samsung Digital Presenter o los de un mando a distancia. (Para obtener detalles, consulte el manual del usuario de Samsung Digital Presenter.) 8 9 10 Italian Spanish 15 - Samsung SDP-950STA | Software Guide - Page 242
Control Panel botón conmutador de Mini Control Panel 1 En el modo FULL puede cambiar del Control Panel al Mini Control Panel. 2 Botón HALF (no se ve en el Control Panel habitual). Este botón aparece cuando llama al Control Panel en el modo FULL. Hace que el programa vuelva a la ventana normal. ( - Samsung SDP-950STA | Software Guide - Page 243
vídeo a NTSC o PAL. Ext. (Externo): para seleccionar una imagen interna o externa. Las imágenes de View Panel no cambian. 9 Muestra el estado de CONTROL FUNCTION y DIGITAL FUNCTION, PRESET. Muestra el estado actual del presentador y el número seleccionado en - Samsung SDP-950STA | Software Guide - Page 244
FUNCTION/PRESET interactúa con el botón de número (1~8). (Consulte el manual del usuario de Samsung Digital Presenter) I-sav (Guardar imagen) /I-rcl (Recuperar imagen): • Guarda la imagen proyectada en la memoria de esta unidad. • Recupera la imagen de la memoria. • Para guardar o recuperar - Samsung SDP-950STA | Software Guide - Page 245
en View Panel como archivo gráfico de formato BMP o JPEG. Haga lo siguiente: 1. View Panel de Samsung Digital Presenter 10 muestra la imagen presentada actualmente desde Samsung Digital Presenter. Cuando la imagen deseada aparece en View Panel, haga clic en el botón Capture. 2. Una vez - Samsung SDP-950STA | Software Guide - Page 246
Impresión de imágenes 1. Una vez finalizada la captura, se activará el botón Print. Haga clic en el botón Print para que aparezca el cuadro de diálogo Page Setup. 2. Seleccione el tamaño del papel, la posición de impresión, el tamaño de impresión, la orientación, etc. I Fit to page: la imagen se - Samsung SDP-950STA | Software Guide - Page 247
ándar. • Al imprimir la imagen a través de la impresora en red compartida, es posible que la calidad de impresión sea inferior en red y puede que SDP Viewer procese los datos más despacio. 21 Italian Spanish - Samsung SDP-950STA | Software Guide - Page 248
Introducción del mini panel de control de Samsung Digital Presenter Mini Control Panel se utiliza para no ocultar la imagen en el modo FULL y se compone de funciones de teclas de Control Panel. Si desea - Samsung SDP-950STA | Software Guide - Page 249
imágenes puede configurarse en el cuadro de diálogo Option. (La ruta predeterminada se encuentra en el lugar de instalación del programa Samsung Digital Presenter + QuickCap). Cómo guardar con Q-SAVE 1. Cuando aparece la imagen cerrada en View Panel, haga clic en el botón Q-SAVE o pulse la tecla [F2 - Samsung SDP-950STA | Software Guide - Page 250
Aplicación de las funciones de DIP (Procesamiento de efectos de imágenes digitales) DIP produce un efecto impresionante en una selección mostrando píxeles y encontrando y resaltando el contraste en una imagen. La imagen original del presentador no cambia. La imagen de DIP se transforma sólo en el PC - Samsung SDP-950STA | Software Guide - Page 251
superior izquierdo. Este efecto está disponible en el modo Default, Grayscale, Binarization. [Usos: permite ajustar el valor de brillo de Digital Presenter o activar o desactivar la lámpara con eficacia]. ✔ .Nota: Un histograma ilustra cómo se distribuyen los píxeles en una imagen representando gr - Samsung SDP-950STA | Software Guide - Page 252
y puede configurarlo con el ratón o con las teclas [ ], [ ]. [Usos: divide en mosaico la imagen original de Digital Presenter]. Efectos de imagen digital Predeterminado Escala de grises Negativo Binarización Detección de borde Rotación de la imagen Mosaico Mosaic Guardar O O O O O O O O Imprimir - Samsung SDP-950STA | Software Guide - Page 253
Data Source] y después [Custom Insert]. 4) Para el otro software de aplicación compatible con TWAIN, consulte el manual de la aplicación. 4. Escanear imágenes mediante el controlador SDP TWAIN El controlador TWAIN de Samsung Digital Presenter funciona prácticamente del mismo modo que el programa USB - Samsung SDP-950STA | Software Guide - Page 254
Si hace clic en el botón, la imagen capturada se transferirá al programa de aplicación. 4 Para obtener más información sobre el controlador TWAIN, consulte el manual del software de aplicación de gráficos. ✔ Nota: • En el modo FULL /SCREEN FULL puede escanear sólo imágenes de tamaño FULL (1024 x 768 - Samsung SDP-950STA | Software Guide - Page 255
English French Mapa de teclas Teclas [Alt + Enter] [ESC] [F2] [Alt + F4] Descripción Configura el modo SCREEN FULL de la ventana Observación [Durante la visualización] Vuelve al modo de tamaño HALF [Durante la captura] Libera la imagen de captura Puede especificar la ruta donde se guardarán - Samsung SDP-950STA | Software Guide - Page 256
20 cuadros/seg) para un archivo AVI (sólo USB 2.0) 1. Asegúrese de que Samsung Digital Presenter esté conectado al ordenador y de que ambos estén encendidos. 2. Seleccione y haga clic en [Inicio] [Programas] [SDP USB Viewer] [SDP AVI Capture] 3. El programa AVI Capture está disponible en el modo USB - Samsung SDP-950STA | Software Guide - Page 257
English ✔ Atención : • Si tiene el sistema de archivos FAT32 en el ordenador, el tamaño de cada archivo se limitará a un máximo de 4 GB. Compruebe el sistema de archivos de Windows en el cuadro de diálogo de propiedad de volumen. French German Italian Spanish Debe formatear o convertir el - Samsung SDP-950STA | Software Guide - Page 258
4. Utilización del programa SDP AVI Capture (1) Límites de tiempo de captura Puede configurar límites de tiempo de captura para capturar un archivo AVI durante un periodo fijo por minuto. - Samsung SDP-950STA | Software Guide - Page 259
en rojo y el tiempo de captura aparecerá bajo la lámpara de estado. (4) Voltear la imagen verticalmente Según la posición del objetivo del presentador digital, las imágenes de vista previa podrán invertirse. De modo que con la opción Flip image vertical puede capturar la imagen de dirección correcta - Samsung SDP-950STA | Software Guide - Page 260
(9) Stop El botón Stop se activará cuando se establezca el proceso de captura y podrá guardar el archivo AVI con seguridad haciendo clic en este botón. (10) Salir Sale del programa de captura de AVI. ✔ Aviso: 1. Durante el proceso de captura, no apague el presentador ni quite el cable USB del - Samsung SDP-950STA | Software Guide - Page 261
Samsung Digital Presenter Solución Existe un error de comunicación entre Samsung Digital Presenter y el ordenador. Salga del programa Samsung Digital Presenter y haga lo siguiente: • Desenchufe el cable USB y vuelva a conectarlo. • Cierre todos los programas de software USB device driver. Check the - Samsung SDP-950STA | Software Guide - Page 262
Síntoma El siguiente mensaje de error (Windows XP): "HI-SPEED USB device is plugged in non-HI-SPEED USB hub. " Cuando el archivo capturado no puede reproducise. Solución El sistema opera el modo USB 1.1 como en este caso. • La función USB 2.0 debe estar activada en CMOS. • Descargue e instale los - Samsung SDP-950STA | Software Guide - Page 263
English French German Instalacón del Visor SDP(Macintosh Program) Requisitos del sistema • Power PC G3 400 MHz o más (USB 2.0: se recomienda PowerPC G4 800 MHz o superior) • MacOS 10.2 o posterior • Al menos 64 MB - Samsung SDP-950STA | Software Guide - Page 264
Conexión del SDP 1. Asegúrese de que Samsung Digital Presenter y el ordenador estén encendidos. 2. Conecte un extremo del cable USB al puerto USB de Samsung Digital Presenter. 3. Conecte el otro extremo en el puerto USB del ordenador. ✔ PRECAUCIÓN : Para un Macintosh instalado con USB 2.0, el puerto - Samsung SDP-950STA | Software Guide - Page 265
English French German Instalación del programa Tras insertar el CD, haga doble clic en el siguiente icono del programa para ejecutarlo. Cuando aparezca la pantalla superior, haga clic en el botón "Continue". La instalación no proseguirá si la versión actual del SO es más antiguo que 10.2. 39 - Samsung SDP-950STA | Software Guide - Page 266
Tras revisar la información, haga clic en el botón "Continue". Tras revisar la información de derechos de autor, haga clic en el botón "Agree" (si está de acuerdo). 40 - Samsung SDP-950STA | Software Guide - Page 267
English French German Italian Spanish Seleccione el disco duro donde se instalará el software. Si hay varios discos duros disponibles en el sistema, aparecerá aquél donde se puede instalar el software. Selecciónelo haciendo clic en él y pulse el botón "Continue". 41 - Samsung SDP-950STA | Software Guide - Page 268
Cuando termine la instalación del software, haga clic en "Close" para salir del programa de instalación. El software SDP Viewer se instala en la carpeta "Applications" en el disco duro seleccionado. 42 - Samsung SDP-950STA | Software Guide - Page 269
English French German Ejecuión del Visor SDP Pantalla del visor SDP 1. Ajuste del tamaño de la imagen Ajusta el tamaño de una imagen de entrada. Según la selección del usuario, el tamaño de la imagen cambia a - Samsung SDP-950STA | Software Guide - Page 270
Cuando el tamaño de una imagen es más grande que el de la zona de visualización de la ventana, la imagen se ajusta a la zona de visualización. Si se pulsa de nuevo, la imagen aparecerá en su tamaño original, pero quizá se oculte una parte. Si el usuario amplía el tamaño de la ventana, aparecerá toda - Samsung SDP-950STA | Software Guide - Page 271
obtener información adicional, consulte "UF-Viewer Control Buttons". 6. Zona de visualización Una imagen puesta a través del objetivo del presentador visual digital aparece en esta zona. La imagen resultante, ajustada con los botones de control, el panel de operaciones o el mando a distancia, puede - Samsung SDP-950STA | Software Guide - Page 272
Botones de control del visor SDP Con el programa del presentador visual digital de Samsung el usuario puede cambiar una imagen de entrada controlando el presentador visual. 1. Deslizador de control de imagen Con el deslizador de control, el usuario puede - Samsung SDP-950STA | Software Guide - Page 273
se pulsa, alterna entre el modo de imagen y el modo de texto. Realiza el enfoque automático. Si se pulsa, la imagen del presentador visual digital gira 90°, 180°, 270°, 0°. Este cambio no afecta a las imágenes de la zona de visualización. 3. Botón Lamp Power Si se pulsa, la lámpara del - Samsung SDP-950STA | Software Guide - Page 274
botón, seleccione un botón de número (1-8) en el cuadro de diálogo. (Sólo para DXA) Muestra una imagen guardada en la memoria del presentador visual digital. Tras pulsar el botón, seleccione un botón de número (1-8) en el cuadro de diálogo.(Sólo para DXA) Guarda los valores que cambió el usuario - Samsung SDP-950STA | Software Guide - Page 275
capturarse y guardarse en formato JPG, TIFF o PNG en un disco duro Macintosh e imprimirse. 1. Captura de imágenes Cuando las imágenes del presentador visual digital se transmitan a la zona de visualización, pulse el botón de captura ( ). Seleccione un tamaño de captura en el cuadro de diálogo. Toda - Samsung SDP-950STA | Software Guide - Page 276
2. Guardar imágenes Para guardar una imagen capturada, pulse el botón "Save image...". Tras especificar un nombre de archivo y un formato para guardar la imagen, pulse el botón "Save" para guardarla. 50 - Samsung SDP-950STA | Software Guide - Page 277
papel y el método de impresión se configuran conforme al controlador de la impresora. Consulte el manual de la impresora que está utilizando. Si pulsa el botón "Preview" convertirá la imagen actual en formato PDF para que el usuario pueda comprobar su estado antes de imprimirla. 4. Copia de imágenes - Samsung SDP-950STA | Software Guide - Page 278
Guardar y configurar rápidamente Cuando una imagen aparece en el presentador visual digital, el usuario puede guardarla rápidamente pulsando la tecla de acceso directo "Ctrl-K". La imagen se guarda en tamaño 1024x768 en el modo de guardar rápidamente. - Samsung SDP-950STA | Software Guide - Page 279
French Solución de problemas(Macintosh Program) Síntoma Si el visor SDP no se ejecuta Solución Para ejecutar el visor SDP, el presentador visual digital debe estar conectado a un Macintosh. También debe haber encendido el presentador visual digital. Compruebe la conexión USB y si el presentador - Samsung SDP-950STA | Software Guide - Page 280
Nota 54 - Samsung SDP-950STA | Software Guide - Page 281
English French German Italian Spanish - Samsung SDP-950STA | Software Guide - Page 282
- Samsung SDP-950STA | Software Guide - Page 283
English French German Italian Spanish - Samsung SDP-950STA | Software Guide - Page 284
- Samsung SDP-950STA | Software Guide - Page 285
English French German Italian Spanish - Samsung SDP-950STA | Software Guide - Page 286
- Samsung SDP-950STA | Software Guide - Page 287
English French German Italian Spanish - Samsung SDP-950STA | Software Guide - Page 288
- Samsung SDP-950STA | Software Guide - Page 289
English French German Italian Spanish - Samsung SDP-950STA | Software Guide - Page 290
- Samsung SDP-950STA | Software Guide - Page 291
English French German Italian Spanish - Samsung SDP-950STA | Software Guide - Page 292
- Samsung SDP-950STA | Software Guide - Page 293
English French German Italian Spanish - Samsung SDP-950STA | Software Guide - Page 294
4 1 2 3 - Samsung SDP-950STA | Software Guide - Page 295
English French German Italian Spanish - Samsung SDP-950STA | Software Guide - Page 296
- Samsung SDP-950STA | Software Guide - Page 297
English 1 2 3 4 French German 5 6 7 8 9 Italian Spanish 10 - Samsung SDP-950STA | Software Guide - Page 298
1 2 3 4 5 - Samsung SDP-950STA | Software Guide - Page 299
6 English 7 NEGA/POSI : French German 8 Italian NTSC/PAL: Spanish 9 - Samsung SDP-950STA | Software Guide - Page 300
9 - Samsung SDP-950STA | Software Guide - Page 301
English 10 French German Italian Spanish - Samsung SDP-950STA | Software Guide - Page 302
- Samsung SDP-950STA | Software Guide - Page 303
English French German Italian Spanish - Samsung SDP-950STA | Software Guide - Page 304
5 1 2 3 4 - Samsung SDP-950STA | Software Guide - Page 305
English French German Italian Spanish - Samsung SDP-950STA | Software Guide - Page 306
- Samsung SDP-950STA | Software Guide - Page 307
English French German Italian Spanish - Samsung SDP-950STA | Software Guide - Page 308
- Samsung SDP-950STA | Software Guide - Page 309
English French German Italian Spanish - Samsung SDP-950STA | Software Guide - Page 310
- Samsung SDP-950STA | Software Guide - Page 311
English French German Italian Spanish - Samsung SDP-950STA | Software Guide - Page 312
- Samsung SDP-950STA | Software Guide - Page 313
English French German Italian Spanish - Samsung SDP-950STA | Software Guide - Page 314
- Samsung SDP-950STA | Software Guide - Page 315
English French German Italian Spanish - Samsung SDP-950STA | Software Guide - Page 316
- Samsung SDP-950STA | Software Guide - Page 317
English French German Italian Spanish - Samsung SDP-950STA | Software Guide - Page 318
- Samsung SDP-950STA | Software Guide - Page 319
English French German Italian Spanish - Samsung SDP-950STA | Software Guide - Page 320
- Samsung SDP-950STA | Software Guide - Page 321
English French German Italian Spanish - Samsung SDP-950STA | Software Guide - Page 322
- Samsung SDP-950STA | Software Guide - Page 323
English French German Italian Spanish - Samsung SDP-950STA | Software Guide - Page 324
- Samsung SDP-950STA | Software Guide - Page 325
English French German Italian Spanish - Samsung SDP-950STA | Software Guide - Page 326
- Samsung SDP-950STA | Software Guide - Page 327
English French German Italian Spanish - Samsung SDP-950STA | Software Guide - Page 328
- Samsung SDP-950STA | Software Guide - Page 329
English French German Italian Spanish - Samsung SDP-950STA | Software Guide - Page 330
- Samsung SDP-950STA | Software Guide - Page 331
English French German Italian Spanish - Samsung SDP-950STA | Software Guide - Page 332
- Samsung SDP-950STA | Software Guide - Page 333
English French German Italian Spanish - Samsung SDP-950STA | Software Guide - Page 334
- Samsung SDP-950STA | Software Guide - Page 335
English French German Italian Spanish - Samsung SDP-950STA | Software Guide - Page 336
TECHWIN MOSCOW OFFICE LENNINGRADSKY PR-KT, 37-A. KORP.14 RUSSIA, 125167, MOSCOW TEL: +7-095-258-9296, 9298 FAX: +7-095-258-9297 I SAMSUNG OPTO-ELECTRONICS UK LTD (SOUK) Samsung House,1000 Hillswood Drive Hillswood Business Park Chertsey Surrey KT16OPS TEL :44-(0)1932-45-5308 FAX :44-(0)1932-45-5325
-
 1
1 -
 2
2 -
 3
3 -
 4
4 -
 5
5 -
 6
6 -
 7
7 -
8
-
9
-
10
-
11
-
12
-
13
-
14
-
15
-
16
-
17
-
18
-
19
-
20
-
21
-
22
-
23
-
24
-
25
-
26
-
27
-
28
-
29
-
30
-
31
-
32
-
33
-
34
-
35
-
36
-
37
-
38
-
39
-
40
-
41
-
42
-
43
-
44
-
45
-
46
-
47
-
48
-
49
-
50
-
51
-
52
-
53
-
54
-
55
-
56
-
57
-
58
-
59
-
60
-
61
-
62
-
63
-
64
-
65
-
66
-
67
-
68
-
69
-
70
-
71
-
72
-
73
-
74
-
75
-
76
-
77
-
78
-
79
-
80
-
81
-
82
-
83
-
84
-
85
-
86
-
87
-
88
-
89
-
90
-
91
-
92
-
93
-
94
-
95
-
96
-
97
-
98
-
99
-
100
-
101
-
102
-
103
-
104
-
105
-
106
-
107
-
108
-
109
-
110
-
111
-
112
-
113
-
114
-
115
-
116
-
117
-
118
-
119
-
120
-
121
-
122
-
123
-
124
-
125
-
126
-
127
-
128
-
129
-
130
-
131
-
132
-
133
-
134
-
135
-
136
-
137
-
138
-
139
-
140
-
141
-
142
-
143
-
144
-
145
-
146
-
147
-
148
-
149
-
150
-
151
-
152
-
153
-
154
-
155
-
156
-
157
-
158
-
159
-
160
-
161
-
162
-
163
-
164
-
165
-
166
-
167
-
168
-
169
-
170
-
171
-
172
-
173
-
174
-
175
-
176
-
177
-
178
-
179
-
180
-
181
-
182
-
183
-
184
-
185
-
186
-
187
-
188
-
189
-
190
-
191
-
192
-
193
-
194
-
195
-
196
-
197
-
198
-
199
-
200
-
201
-
202
-
203
-
204
-
205
-
206
-
207
-
208
-
209
-
210
-
211
-
212
-
213
-
214
-
215
-
216
-
217
-
218
-
219
-
220
-
221
-
222
-
223
-
224
-
225
-
226
-
227
-
228
-
229
-
230
-
231
-
232
-
233
-
234
-
235
-
236
-
237
-
238
-
239
-
240
-
241
-
242
-
243
-
244
-
245
-
246
-
247
-
248
-
249
-
250
-
251
-
252
-
253
-
254
-
255
-
256
-
257
-
258
-
259
-
260
-
261
-
262
-
263
-
264
-
265
-
266
-
267
-
268
-
269
-
270
-
271
-
272
-
273
-
274
-
275
-
276
-
277
-
278
-
279
-
280
-
281
-
282
-
283
-
284
-
285
-
286
-
287
-
288
-
289
-
290
-
291
-
292
-
293
-
294
-
295
-
296
-
297
-
298
-
299
-
300
-
301
-
302
-
303
-
304
-
305
-
306
-
307
-
308
-
309
-
310
-
311
-
312
-
313
-
314
-
315
-
316
-
317
-
318
-
319
-
320
-
321
-
322
-
323
-
324
-
325
-
326
-
327
-
328
-
329
-
330
-
331
-
332
-
333
-
334
-
335
-
336
 |
 |
Samsung Digital
Presenter
Software
User’s Guide
French
German
Italian
Spanish
English