Samsung SGH-T539 User Manual (user Manual) (ver.f3) (English) - Page 78
Delete all, Select, Delete, Service center, Destination address, Validity period, Reply path,
 |
View all Samsung SGH-T539 manuals
Add to My Manuals
Save this manual to your list of manuals |
Page 78 highlights
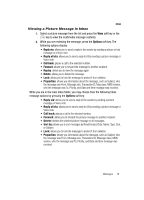
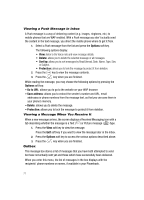
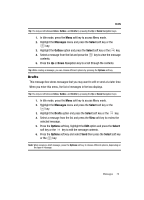
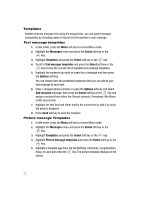
3. Highlight Delete all and press the Select soft key or the key. 4. To select a message box to clear, press the Up or Down Navigation key. To delete all of your messages, select the Delete all option. 5. To place or remove a check mark, press the key. 6. Press the Delete soft key to delete the marked objects. 7. After you receive a confirmation message, press the Yes soft key to delete the selected message box contents. Otherwise, press the No soft key. Settings In this menu, you can set up default text message and picture message information. The last setting you accessed is automatically activated for sending subsequent messages. Text messages • Service center: allows you to store or change the number of your message center, which is required when sending messages. You must obtain this number from your service provider. • Destination address: allows you to enter a number that you would like to which you would like to send all messages. You can still message others, but this number always displays in the Send list. • Validity period: allows you to set the length of time your text messages are stored at the message center while attempts are made to deliver them. • Reply path: when this option is check marked it allows the recipient of your message to send you a reply message using your message center, if your network supports this service. • Delivery report: when this option is check marked, the network informs you whether or not your message was delivered. Picture message The following options are used to set Send and Receive settings for Picture messages. Sending options • Delivery report: when this option is enabled, the network informs you whether or not your message was delivered. • Read reply: when this option is enabled, your phone sends a request for a reply along with your message to the recipient. • Priority: you can select the priority level of your messages. 75
-
 1
1 -
2
-
3
-
4
-
5
-
6
-
7
-
8
-
9
-
10
-
11
-
12
-
13
-
14
-
15
-
16
-
17
-
18
-
19
-
20
-
21
-
22
-
23
-
24
-
25
-
26
-
27
-
28
-
29
-
30
-
31
-
32
-
33
-
34
-
35
-
36
-
37
-
38
-
39
-
40
-
41
-
42
-
43
-
44
-
45
-
46
-
47
-
48
-
49
-
50
-
51
-
52
-
53
-
54
-
55
-
56
-
57
-
58
-
59
-
60
-
61
-
62
-
63
-
64
-
65
-
66
-
67
-
68
-
69
-
70
-
71
-
72
-
 73
73 -
 74
74 -
 75
75 -
 76
76 -
 77
77 -
 78
78 -
 79
79 -
 80
80 -
 81
81 -
 82
82 -
 83
83 -
84
-
85
-
86
-
87
-
88
-
89
-
90
-
91
-
92
-
93
-
94
-
95
-
96
-
97
-
98
-
99
-
100
-
101
-
102
-
103
-
104
-
105
-
106
-
107
-
108
-
109
-
110
-
111
-
112
-
113
-
114
-
115
-
116
-
117
-
118
-
119
-
120
-
121
-
122
-
123
-
124
-
125
-
126
-
127
-
128
-
129
-
130
-
131
-
132
-
133
-
134
-
135
-
136
-
137
-
138
-
139
-
140
-
141
-
142
-
143
-
144
-
145
-
146
-
147
-
148
-
149
-
150
-
151
-
152
-
153
-
154
-
155
-
156
-
157
-
158
-
159
-
160
-
161
-
162
-
163
-
164
-
165
-
166
-
167
-
168
-
169
-
170
-
171
-
172
-
173
-
174
-
175
-
176
-
177
 |
 |