Sharp DK-CL3P DK-CL3P Operation Manual - Page 12
Setting the time and date
 |
UPC - 074000369771
View all Sharp DK-CL3P manuals
Add to My Manuals
Save this manual to your list of manuals |
Page 12 highlights
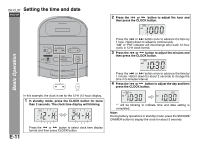
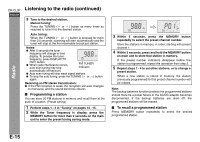
DK-CL3P Setting the time and date ENGLISH 2 Press the or button to adjust the hour and then press the CLOCK button. MON Press the or button once to advance the time by 1 hour. Hold it down to advance continuously. "AM" or "PM" indicator will interchange after each 12 hour cyclic in 12-H clock format. 3 Press the or button to adjust the minutes and then press the CLOCK button. MEMORY MON Basic Operation MEMORY In this example, the clock is set for the 12-H (12 hour) display. 1 In standby mode, press the CLOCK button for more than 2 seconds. The clock time display will blinking. MON MON E-11 Press the or button to select clock time display format and then press CLOCK button. Press the or button once to advance the time by 1 minute. Hold it down for about 2 seconds to change the time in 5-minutes interval. 4 Press the or button to adjust the day and then press the CLOCK button. MON THU ":" will be blinking to indicate time and date setting is completed. Note: During battery operations in standby mode, press the SNOOZE/ DIMMER button to display the clock for about 5 seconds.
-
 1
1 -
2
-
3
-
4
-
5
-
6
-
 7
7 -
 8
8 -
 9
9 -
 10
10 -
 11
11 -
 12
12 -
 13
13 -
 14
14 -
 15
15 -
 16
16 -
 17
17 -
18
-
19
-
20
-
21
-
22
-
23
-
24
-
25
-
26
 |
 |
