Sharp LC22DV17UT LC-22DV17U Operation Manual - Page 18
Watching TV - 22
 |
UPC - 074000372016
View all Sharp LC22DV17UT manuals
Add to My Manuals
Save this manual to your list of manuals |
Page 18 highlights
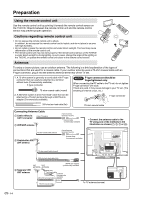
Watching TV Preparation Perform the following steps before you press POWER on the remote control unit. 1 Insert the batteries into the remote control unit. (See page 10.) 2 Connect the antenna cable to the TV/DVD. (See page 14.) 3 Plug in the AC cord to the AC outlet. (See page 9.) Turning on the power Press POWER on the TV/DVD, or POWER on the remote control. TV status indicator (POWER) ON Lighting (Green) OFF/Standby Lighting (Red) • POWER indicator (Green): The TV/DVD is on. ("Please wait" will appear for a few seconds on the screen.) Auto Setup The Auto Setup menu appears the first time you turn on the TV/DVD, and assists you to select the menu language, specify the Air/Cable setting, and program your channels automatically. IMPORTANT: Make sure that the antenna or cable TV system connection is made! 1 The turn on the TV/DVD, press POWER (POWER indicator on the front of the unit changes green. It may take approx. 10 seconds for a picture to appear on screen.). 2 The "Auto Setup" function begins. Press ◀/▶ to select your desired language. 3 Press ▲/▼ to select "Signal Type", then press ◀/▶ to select "Cable" or "Air". Air VHF/UHF channels Cable CABLE TV channels 4 Press ▲/▼ to select "Automatic Search", then press ENTER. 5 The TV will begin memorizing all the channels available in your area. • It may take from 15 minutes to 30 minutes to complete memorizing digital cable channels. Depending on the reception condition, a BAR display may not advance for several minutes, please be patient. NOTE • If you press EXIT in the process of "Auto Setup", the Auto Setup stops and changes to the normal screen. • When you make a menu selection, your changes occur immediately. You do not have to press EXIT to see your changes. • When you are finished programming the menus, press EXIT. Select the TV mode Press TV/DVD to select the TV mode. Turning off the power Press POWER on the TV/DVD, or POWER on the remote control. • The TV enters standby mode and the image on the screen disappears. • The POWER indicator on the TV/DVD changes to Red. NOTE • If you are not going to use this TV/DVD for a long period of time, be sure to remove the AC cord from the power outlet. • Weak electric power is still consumed even when POWER is turned off. Changing channels You can change channels in several ways. Method 1 Using CH / on the remote control unit or on the TV/DVD. NOTE • If your cable-TV system includes analog and digital channels using the same channel number, your channel up function will scroll through the analog channel first, then the digital channel. Although it may appear as though the channel does not change, it actually moves from the analog to the digital channel in sequence. If you use channel-down, it will move in reverse, from the digital channel to the analog channel. Method 2 Using remote control buttons 0-9, • (DOT) to select channels for VHF/UHF/CATV/DIGITAL. To select a 1 or 2-digit channel number (e. g., Channel 5): Press 5 NOTE • When selecting a 1-digit channel number, it is not necessary to press 0 before the number. • When you enter 0-9 only, channel selection will be made if there is no operation within a few seconds. To select a 3-digit channel number (e. g., Channel 115): Press 1g1g5 To select a 4-digit channel number (e. g., Channel 22.1): Press 2g2g • (DOT) g1 NOTE • When you enter 0-9 only, channel selection will be made if there is no operation within a few seconds. • If you press 0 by itself in "Air" reception, nothing will happen. • Complete the above steps within a few seconds. • When you enter 0-9 and • (DOT), channel selection will be made if there is no operation within a few seconds. 16
-
 1
1 -
2
-
3
-
4
-
5
-
6
-
7
-
8
-
9
-
10
-
11
-
12
-
 13
13 -
 14
14 -
 15
15 -
 16
16 -
 17
17 -
 18
18 -
 19
19 -
 20
20 -
 21
21 -
 22
22 -
 23
23 -
24
-
25
-
26
-
27
-
28
-
29
-
30
-
31
-
32
-
33
-
34
-
35
-
36
-
37
-
38
-
39
-
40
-
41
 |
 |