Sharp VL-WD250U VLWD250U Operation Manual
Sharp VL-WD250U Manual
 |
View all Sharp VL-WD250U manuals
Add to My Manuals
Save this manual to your list of manuals |
Sharp VL-WD250U manual content summary:
- Sharp VL-WD250U | VLWD250U Operation Manual - Page 1
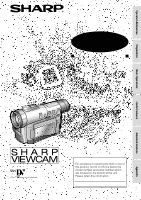
Operation References LIQUID CRYSTAL DISPLAY CAMCORDER MODEL VL-WD250U OPERATION MANUAL Preparation Basic Operations Useful Features Advanced Features ;;;;;; Please read this operation manual carefully before using the VIEWCAM. Important For assistance in reporting the theft or loss of this - Sharp VL-WD250U | VLWD250U Operation Manual - Page 2
Thank you for purchasing this camcorder from SHARP. The camcorder will enhance your home video enjoyment and allow you to capture those special moments. Please read this operation manual to familiarize yourself with the camcorder's features, so that you will get the most out of it. The video - Sharp VL-WD250U | VLWD250U Operation Manual - Page 3
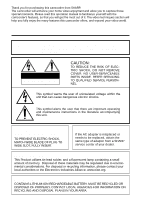
the limits for a Class B digital device pursuant to Part 15 of in accordance with the instructions, may cause harmful batteries backwards. Warn children not to take out batteries or install them. Parents should install the lithium battery in the camcorder. COPYRIGHT WARNING: It is the intent of SHARP - Sharp VL-WD250U | VLWD250U Operation Manual - Page 4
to your home, consult your product dealer or local power company. For products intended to operate from battery power, or other sources, refer to the operating instructions. 12. Grounding or Polarization-This product may be equipped with a polarized alternating-current line plug (a plug having - Sharp VL-WD250U | VLWD250U Operation Manual - Page 5
normally by following the operating instructions. Adjust only those controls that are covered by the operating instructions as an improper adjustment of other 21. Safety Check-Upon completion of any service or repairs to this product, ask the service technician to perform safety checks to determine - Sharp VL-WD250U | VLWD250U Operation Manual - Page 6
with the a mark on the charger (1) and guide the battery into the groove. Pressing the battery (2), slide it in the direction of the arrow (3) until it locks into place. Inserting a Mini DV Cassette 1 Attach the power source to the camcorder, then slide the cassette compartment door release and - Sharp VL-WD250U | VLWD250U Operation Manual - Page 7
the Power switch to CAMERA. Tape Playback 1 Press the LCD monitor OPEN release button (1), and open the LCD monitor to a 90° angle to the camcorder body (2). LCD monitor OPEN release button Lock button 90 4 Press the REC START/STOP button to begin recording. 2 Adjust the LCD monitor to an angle - Sharp VL-WD250U | VLWD250U Operation Manual - Page 8
Lens cap GCOVH1271TASA Shoulder strap UBNDS0010TASA * The part numbers for the AC adapter/battery charger and battery pack supplied with this camcorder are valid only in the U.S. and Latin America. If this camcorder was purchased outside of these areas, the part numbers may be different. Please - Sharp VL-WD250U | VLWD250U Operation Manual - Page 9
pack BT-L221n Extended-life battery pack BT-L441n Zoom microphone VR-5MCN PixLab Video Capture Software (Lite Version) VR-PK50E Note: The listed model names are for U.S. accessories. For optional and additional accessories, contact your local dealer, call the Sharp Accessories and Supply Center - Sharp VL-WD250U | VLWD250U Operation Manual - Page 10
. • Some small, portable tripods may be difficult to attach and may not be sturdy enough to support your camcorder. Be sure to use only a strong, stable tripod. • When using your camcorder in a cold environment, the LCD monitor screen often appears less bright immediately after the power is turned - Sharp VL-WD250U | VLWD250U Operation Manual - Page 11
VCRs (based on Sharp models). Clear images with Mini DV cassettes with the i mark. Mini DV cassette DV cassette 8 mm, VHS, and Beta cassettes cannot be used for playback or recording with this camcorder. 8 mm cassette VHS cassette Beta cassette The "DV" trademark can only be used on digital - Sharp VL-WD250U | VLWD250U Operation Manual - Page 12
Battery Pack 7 Attaching and Removing the Battery Pack 8 Powering the Camcorder from an AC Outlet 9 Inserting and Removing a Mini DV Cassette .......... 10 Installing the Lithium Memory Battery Recording Mode 28 Digital Image Stabilization (DIS 28 Setting the Digital Zoom 29 Gamma Brightness - Sharp VL-WD250U | VLWD250U Operation Manual - Page 13
Manual Exposure 42 Manual Focus 43 Setting the Shutter Speed 45 White Balance Lock 47 Scene Menu (Program AE 48 Digital Source 57 Editing with the DV Terminal (IEEE1394 58 Audio Dubbing Information 64 Demonstration Mode 69 Before Requesting Service 70 Specifications 72 • Guía de operaci - Sharp VL-WD250U | VLWD250U Operation Manual - Page 14
switch [p. 32] Lens hood AUTO ON/OFF button [p. 25] Operation button [p. 24] Zoom lens Remote sensor [p. 37] ;;;; Stereo microphone [p. 59] MENU/DISPLAY button [p. 24] DIS (Digital Image Stabilization) switch [p. 28] 1 - Sharp VL-WD250U | VLWD250U Operation Manual - Page 15
Left view Viewfinder [p. 16] Zoom microphone mounting hole [p. 50] LCD monitor [p. 17] LCD monitor OPEN release button [p. 17] Lithium battery compartment door [p. 11] Diopter adjustment [p. 16] Power source PUSH release button [pp. 8, 9] Power source mounting surface [pp. 8, 9] Shoulder strap - Sharp VL-WD250U | VLWD250U Operation Manual - Page 16
) [p. 24] RECord START/STOP button Jack cover [p. 18] [pp. 22, 56, 57] Cassette compartment door [p. 10] Cassette compartment door release [p. 10] PC connection jack [p. 62] DV terminal [p. 58] Hand strap [p. 15] EarPHONES jack [p. 21] Jack cover [pp. 21, 58, 62] Speaker [p. 21] 3 - Sharp VL-WD250U | VLWD250U Operation Manual - Page 17
page 29 (Setting the Digital Zoom) • To record a backlit subject. - See page 30 (Gamma Brightness Compensation) or page 42 (Manual Exposure) • To record subject. - See page 43 (Manual Focus) • To turn off the confirmation sounds which are made when you operate the camcorder. - See page 49 (Setting - Sharp VL-WD250U | VLWD250U Operation Manual - Page 18
to the page number indicated. CAMERA mode AUTO pp. 18, 25 p. 28 p. 18 MANUAL SE T MAN. FOCUS SHUT. SPE ED E XPOSURE P I C. EFFECT SCE NE MENU SNAP SNAP EF F. SOUND D I SPLAY p. 33 p. 34 p. 35 p. 36 p. 49 p. 14 MANUAL SE T MAN. FOCUS SHUT. SPE ED E XPOSURE P I C. EFFECT SCE NE MENU FADE QK. RE - Sharp VL-WD250U | VLWD250U Operation Manual - Page 19
10 seconds after this warning appears, the camcorder automatically turns off. The video heads are clogged and should be cleaned (see page 68). The fluorescent lamp behind the LCD monitor is close to the end of its service life. Call your local authorized Sharp dealer to have it replaced. When the - Sharp VL-WD250U | VLWD250U Operation Manual - Page 20
the s mark on the battery pack with the a mark on the charger (1) and guide the battery into the groove. Pressing the battery (2), slide it in the direction months: 1 Charge the battery pack until the CHARGE indicator of the charger turns off. 2 Attach the battery pack to the camcorder, and set the - Sharp VL-WD250U | VLWD250U Operation Manual - Page 21
head drum, potentially causing damage to the tape. • Remove the battery pack from the camcorder if you will not use the camcorder for a long period of time. • Use only SHARP model BT-L221 or BT-L441 battery packs with this camcorder. Use of other batteries may present a risk of fire or explosion. 8 - Sharp VL-WD250U | VLWD250U Operation Manual - Page 22
it locks into place (2). DC cable connecting plate Note: • When the AC adapter/battery charger is used to power the camcorder, it cannot be used to charge the battery pack. Removing the DC cable from the camcorder Perform steps 1 and 2 above. Press the power source PUSH release button (1), and - Sharp VL-WD250U | VLWD250U Operation Manual - Page 23
Inserting and Removing a Mini DV Cassette Inserting a Cassette 1 Attach the power source to the camcorder, then slide the pick up the camcorder by the cassette compartment door. Notes: • If the battery power is too low, you may not be able to eject the cassette. Replace the battery pack with - Sharp VL-WD250U | VLWD250U Operation Manual - Page 24
until it clicks into place. Removing the lithium battery Perform steps 1 and 2 above. Lift up the battery using a pointed object, and take it out. Note: • Replace the battery with a new CR2025 lithium battery when the time indicator of the camcorder starts to fall behind the correct time. 2 Open - Sharp VL-WD250U | VLWD250U Operation Manual - Page 25
Selecting the Language for the On-screen Display This camcorder allows you to choose from among English, French or Spanish for the onscreen display language. Note: • The operation procedures in the following sections of this operation manual are based on the use of on-screen displays in English. - Sharp VL-WD250U | VLWD250U Operation Manual - Page 26
June 2, 2002 (JUN. 2. 2002) and the time to 10:30 am (10:30 AM). Note: • Before performing the procedure below, make sure that the lithium battery has been installed (see page 11). MENU/DISPLAY button Power switch 4 Press r on the Operation button. CLOCK SE T D I SPLAY SE T T I NG 12H 24H JAN - Sharp VL-WD250U | VLWD250U Operation Manual - Page 27
Preparation Changing to the 24-hour Time Mode 1 After performing step 9 above, press d or y (1) to select "12H/24H", and then press r (2). CLOCK SE T D I SPLAY SE T T I NG 12H 24H 12H 24H 2 Press d or y to select "24H", and then press e. 12H 24H 24H 3 Press the MENU/DISPLAY button to turn - Sharp VL-WD250U | VLWD250U Operation Manual - Page 28
the grip strap and the hand strap flap. Caution: • Do not swing the camcorder by the hand strap. Using the Lens Cap Attach the strap of the lens replace the lens cap on the lens when the camcorder is not in use. Attaching the Shoulder Strap 1 Remove the battery pack. 2 Hold one end of the strap and - Sharp VL-WD250U | VLWD250U Operation Manual - Page 29
. You can also watch playback through the viewfinder. Viewfinder Power switch 1 Lift up the viewfinder. Note: • You can raise the viewfinder to aim the camcorder better depending on your position. 2 Hold down the Lock button and set the Power switch to CAMERA or VCR. • A picture is displayed in the - Sharp VL-WD250U | VLWD250U Operation Manual - Page 30
the viewfinder instead of the LCD monitor when you want to save battery power. • Use the viewfinder if the LCD screen becomes difficult vertically. 180 90 Note: • You can also fold the LCD monitor into the camcorder with the screen facing out for watching playback on the monitor. Cautions: • Do not - Sharp VL-WD250U | VLWD250U Operation Manual - Page 31
PAUSE Lock button Note: If "MANUAL" is displayed at this time, press the AUTO ON/OFF button to set the camcorder to Auto mode. 3 Press the soon. • If the camcorder remains in Recording Standby mode for more than 5 minutes, the power will automatically turn off to save battery power and to protect - Sharp VL-WD250U | VLWD250U Operation Manual - Page 32
angle Put your right hand through the hand strap, and Tele- place your left hand under the camcorder for photo support. Zooming out (when you want to show the surroundings) To zoom in Push the Power Zoom control to the T (telephoto) side to get a close-up - Sharp VL-WD250U | VLWD250U Operation Manual - Page 33
displays the approximate remaining tape time in minutes. During recording, press the MENU/DISPLAY button until the remaining recording time indicator appears. Remaining Battery Power Display When using the camcorder with the battery pack as the power source, you can turn on and off the remaining - Sharp VL-WD250U | VLWD250U Operation Manual - Page 34
cannot monitor the sound through the speaker when watching the playback in the viewfinder. Volume Control 4 Press y to begin playback. AUDIO1+2 When the camcorder is in VCR mode, push the Volume control to the L or + side to increase (1) or decrease (2) the volume. The volume level indicator will - Sharp VL-WD250U | VLWD250U Operation Manual - Page 35
as you normally do to see the signal from the VCR. (See the operation manuals of your TV and VCR.) 4 Set the Power switch on the camcorder to VCR, and begin playback (see page 21). Jack cover 2 Connect the camcorder to your TV (or VCR) with the supplied audio/video cable, as shown - Sharp VL-WD250U | VLWD250U Operation Manual - Page 36
search. This is not a malfunction. To return to normal playback, press y again. Notes: • The sound is off in Still mode. • To protect the tape, the camcorder automatically returns to normal playback if it is left in Still mode for more than 5 minutes. Basic Operations 23 - Sharp VL-WD250U | VLWD250U Operation Manual - Page 37
Features Using the Controls The following controls on the camcorder can be used to select and operate the various the power on, hold down the Lock button and set the Power switch to CAMERA or VCR. Menu screen MANUAL SE T MAN. FOCUS SHUT. SPE ED E XPOSURE P I C. EFFECT SCE NE MENU FADE QK. RE - Sharp VL-WD250U | VLWD250U Operation Manual - Page 38
the User Mode This camcorder features three user modes for camera recording functions. The selectable items on the menu screen are different depending on the user mode. User mode Auto mode (AUTO): Lets you adjust all menu settings except manual settings. Manual mode (MANUAL): Lets you adjust all - Sharp VL-WD250U | VLWD250U Operation Manual - Page 39
SPEED 50 100 780 Lock button 2 Press the MENU/DISPLAY button until the menu screen appears. MANUAL SE T MAN. FOCUS SHUT. SPE ED E XPOSURE P I C. EFFECT SCE NE MENU the MENU/DISPLAY button. Notes: • Certain menu items are common among Camcorder modes. If the REMOTE menu item, for example, is set to " - Sharp VL-WD250U | VLWD250U Operation Manual - Page 40
) mode. 1 Set the camcorder to CAMERA mode. 2 Press the MENU/DISPLAY button until the menu screen appears. MANUAL SE T MAN. FOCUS SHUT camcorder is played back on a Mini DV player or camcorder from another manufacturer. -When a tape recorded in LP mode is played back on a Mini DV player or camcorder - Sharp VL-WD250U | VLWD250U Operation Manual - Page 41
Selecting the 16-bit Audio Recording Mode Digital Image Stabilization (DIS) This camcorder allows you to select between the 12-bit and 16-bit audio recording modes. The camcorder normally records audio in the 12-bit audio recording mode. For higher-quality audio recording, select the 16-bit audio - Sharp VL-WD250U | VLWD250U Operation Manual - Page 42
zoom range of 1-780K. • As the image is enlarged digitally, the picture quality decreases when higher digital zoom settings are used. 1 Set the camcorder to CAMERA mode. 2 Press the MENU/DISPLAY button until the menu screen appears. MANUAL SE T MAN. FOCUS SHUT. SPE ED E XPOSURE P I C. EFFECT SCE - Sharp VL-WD250U | VLWD250U Operation Manual - Page 43
Gamma Brightness Compensation When the subject is backlit, the image will appear dark if it is recorded normally. The gamma brightness compensation function improves the picture by increasing the brightness of the subject while leaving the brighter portion of the image unaffected. GAMMA/BRIGHTER - Sharp VL-WD250U | VLWD250U Operation Manual - Page 44
is displayed. • When the ` indicator is displayed, a residual image may appear behind a subject that exhibits a lot of movement. • Fine brightness adjustment is possible using the manual exposure function (see page 42). AUTO GAMMA L I GHT Useful Features 31 - Sharp VL-WD250U | VLWD250U Operation Manual - Page 45
to OFF. Notes: • The picture will turn white if you use Night Recording in a bright location. • The camcorder may not be able to focus correctly when using Night Recording. In such cases, use the manual focus function to obtain proper focus (see page 43). • The following functions do not work when - Sharp VL-WD250U | VLWD250U Operation Manual - Page 46
T, then press r on the Operation button. Select "FADE" (1), then press r (2). MANUAL SE T MAN. FOCUS SHUT. SPE ED E XPOSURE P I C. EFFECT SCE NE MENU image and sound fade out as the picture gradually turns white. The camcorder then returns to Recording Standby mode. AUTO 12 bit FADE OUT 2 - Sharp VL-WD250U | VLWD250U Operation Manual - Page 47
r on the Operation button. Select "QK. RETURN" (1), then press r (2). MANUAL SE T MAN. FOCUS SHUT. SPE ED E XPOSURE P I C. EFFECT SCE NE the end of the last recorded scene, "FINISHED" is displayed, and the camcorder enters Recording Standby mode. 4 Press the MENU/DISPLAY button to turn off the - Sharp VL-WD250U | VLWD250U Operation Manual - Page 48
", then press r (2). To pause recording Press the REC START/STOP button. To cancel the still image In SNAP mode, press the STILL button while the camcorder is in Recording Standby mode. In STILL mode, press the STILL button. CAMERA SE T PHOTO SNAP SNAP SNAP EFF. ST I LL DG T L ZOOM TAPE SPEED - Sharp VL-WD250U | VLWD250U Operation Manual - Page 49
/STOP button. • The still image of the subject will be recorded. To cancel the still image In SNAP mode, press the STILL button while the camcorder is in Recording Standby mode. In STILL mode, press the STILL button. To cancel still recording effect Select "OFF" in step 5 of "Setting a still - Sharp VL-WD250U | VLWD250U Operation Manual - Page 50
43. In these situations, use the manual focus function. Use the supplied remote control to operate the camcorder from a distance, such as when you want to record yourself in a scene, or when the camcorder is connected to a TV for use as a VCR. Installing the Batteries in the Remote Control 1 Open - Sharp VL-WD250U | VLWD250U Operation Manual - Page 51
180 90 2 Set the Power switch on the camcorder to CAMERA or VCR. 3 Aim the remote control at the remote sensor of the camcorder, and press the control buttons for operation. control and the remote sensor. • When the batteries are depleted and the remote control does not operate, replace them with new AA (R6 - Sharp VL-WD250U | VLWD250U Operation Manual - Page 52
vertically so that the screen faces the other way and the subject can monitor the shot while you are recording with the viewfinder. If the camcorder is steadied, you can record yourself in the scene by watching yourself on the LCD monitor. The supplied remote control is useful for such occasions - Sharp VL-WD250U | VLWD250U Operation Manual - Page 53
Features To view slow playback in reverse, press the j button. To return to normal playback, press the PLAY button (t). Note: • To protect the tape, the camcorder automatically returns to normal playback if it is left in Slow mode for more than 10 minutes. 40 - Sharp VL-WD250U | VLWD250U Operation Manual - Page 54
Useful Features Playback Using the Time Code The time code shows the hour, minute and second of recording, and the frame number (1 frame = approx. 1/30 sec.). This is automatically recorded along with the subject. You can display the time code on the screen as an accurate counter in both VCR and - Sharp VL-WD250U | VLWD250U Operation Manual - Page 55
is too bright against background. • Decrease the exposure level to allow less light through the lens. 1 Set the camcorder to CAMERA mode. 2 Press the AUTO ON/OFF button to select Manual mode. 3 Press the MENU/DISPLAY button until the menu screen appears. 4 Select T, then press r on the Operation - Sharp VL-WD250U | VLWD250U Operation Manual - Page 56
is too dark. Lack of contrast, e.g. snow scene. Fast-moving subject. Background is too bright. 1 Set the camcorder to CAMERA mode. 2 Press the AUTO ON/OFF button to select Manual mode. 3 Press the MENU/DISPLAY button until the menu screen appears. 4 Select T, then press r on the Operation - Sharp VL-WD250U | VLWD250U Operation Manual - Page 57
(1.8 m). Set the zoom control to wide angle, and then try refocusing. • If the lens is dirty or fogged, the camcorder may not be able to correctly focus. • When "MF" is displayed, you can manually adjust the focus by pressing d or y, even if the focus setting screen is not displayed. • When you want - Sharp VL-WD250U | VLWD250U Operation Manual - Page 58
, depending on the subject or situation, you may want to set the shutter speed manually to create a high-quality picture. 1 Set the camcorder to CAMERA mode. 2 Press the AUTO ON/OFF button to select Manual mode. 3 Press the MENU/DISPLAY button until the menu screen appears. 4 Select T, then press - Sharp VL-WD250U | VLWD250U Operation Manual - Page 59
shutter speed setting cannot be used with Night Recording. • When you want to cancel all manual settings and return to Auto mode, press the AUTO ON/OFF button. Tips on Using the Manual Shutter Speed • Fast shutter speeds can be used with the still recording function (see page 35) to record higher - Sharp VL-WD250U | VLWD250U Operation Manual - Page 60
-up images of small objects Note: • White Balance Lock cannot be set when the camcorder is in Easy mode or the CAT'S EYE switch is set to ON. W/B button the white balance may shift. Reset the white balance. • Do not move the camcorder while "W/B LOCK" is flashing in step 4. • If "W/B LOCK" does not - Sharp VL-WD250U | VLWD250U Operation Manual - Page 61
sun, and the surrounding twilight. PARTY: When the illumination is from a spotlight or candles. 1 Set the camcorder to CAMERA mode. 2 Press the MENU/DISPLAY button until the menu screen appears. MANUAL SE T MAN. FOCUS SHUT. SPE ED E XPOSURE P I C. EFFECT SCE NE MENU FADE QK. RE TURN 3 Select - Sharp VL-WD250U | VLWD250U Operation Manual - Page 62
the subject with a more dramatic effect. Type of Digital Picture Effects B/W: To record in black-and-white. SEPIA: To record in sepia color similar to that of an old photograph. MOSAIC: To record a picture divided up into tiles. 1 Set the camcorder to CAMERA mode. 2 Press the MENU/DISPLAY button - Sharp VL-WD250U | VLWD250U Operation Manual - Page 63
is turned off.) OFF: The zoom microphone is turned off. (The built-in microphone is on.) 1 Mount the zoom microphone to the camcorder. Mounting pin 2 Set the camcorder to CAMERA mode. 2 Turn the screw in the direction of the arrow to secure the zoom microphone. Screw 3 Press the MENU/DISPLAY - Sharp VL-WD250U | VLWD250U Operation Manual - Page 64
AAddvavncaednFceaetudresFeatures PPllaayybbaackck Playback Zoom The playback zoom function allows you to magnify the playback picture up to 10 times its original size and to shift the magnified picture by using the remote control (see pages 37 and 38 for use of the remote control). ZOOM buttons To - Sharp VL-WD250U | VLWD250U Operation Manual - Page 65
Gamma Playback The gamma playback function improves the playback picture by increasing the brightness of the subject while leaving the brighter portions of the image unaffected. GAMMA/BRIGHTER button During playback, press the GAMMA/ BRIGHTER button once. • "GAMMA1" appears, and the picture becomes - Sharp VL-WD250U | VLWD250U Operation Manual - Page 66
Advanced Features Playback Playback Effects Playback effects can be used to create an interesting scene transition between a still image and the following image during playback. Type of Playback Effects OVERLAP: A still image fades out as the next image fades in, replacing the previous image. The - Sharp VL-WD250U | VLWD250U Operation Manual - Page 67
Picture Effect Playback These picture effects let you play back images with a more dramatic effect. Type of Picture Effects B/W: The picture is displayed in black-andwhite. SEPIA: The picture is displayed in sepia color similar to that of an old photograph. MOSAIC: The picture is divided up into - Sharp VL-WD250U | VLWD250U Operation Manual - Page 68
the viewfinder when adjusting the "VF BRIGHT". 5 Press e, then press the MENU/ DISPLAY button to turn off the menu screen. AUTO: The camcorder automatically switches between "NORMAL" and "BRIGHT" depending on the ambient lighting. This mode is only available in CAMERA mode. NORMAL: For use indoors - Sharp VL-WD250U | VLWD250U Operation Manual - Page 69
S-video cable for the video connection. (The yellow video plug does not need to be connected to the VCR.) To stop editing Press d on the camcorder and press the Stop button on the VCR. Notes: • Some of the transitions between edited sequences may be slightly off. • There may be picture noise - Sharp VL-WD250U | VLWD250U Operation Manual - Page 70
steps 1 and 2 above, and press the REC START/STOP button, then press the PAUSE/STILL button (g). • If "NO SIGNAL" is displayed on the camcorder screen, check that the S-video cable or audio/ video cable is properly connected. To stop recording Press d on the Operation button. To S-video output - Sharp VL-WD250U | VLWD250U Operation Manual - Page 71
DV terminal (e.g. DV camcorder) To DV terminal DV cable (commercially available) To Record from Video Equipment 1 Set the camcorder to VCR mode, and insert a Mini DV on the camcorder to OFF and then back to VCR, or disconnect the DV cable and connect it again. • If a digital video recording with - Sharp VL-WD250U | VLWD250U Operation Manual - Page 72
You can add narration to recordings made with this camcorder, while preserving the original audio and video recordings. narration. Built-in stereo microphone Note: • Audio dubbing cannot be performed via the DV terminal. Audio Recording In normal recording mode 12-bit audio recording The audio is - Sharp VL-WD250U | VLWD250U Operation Manual - Page 73
Audio Dubbing 1 Play back the recorded Mini DV cassette and locate the tape position where you wish recommended that you use Audio Dubbing only with recordings made with this camcorder. Use of recordings made with other digital video equipment may result in poor audio quality. • Audio dubbing will - Sharp VL-WD250U | VLWD250U Operation Manual - Page 74
(left channel only) Audio 2 • 12-bit recording in stereo (Audio 2 channel only) • 16-bit recording in mono (right channel only) 1 Play back a Mini DV cassette with dubbed audio. 2 Press the MENU/DISPLAY button until the menu screen appears. 3 Select V, then press r on the Operation button. Select - Sharp VL-WD250U | VLWD250U Operation Manual - Page 75
camcorder to a Personal Computer 1 Turn off the PC. 2 Connect the camcorder as shown below. • Before connecting the camcorder Setup.exe" file. 6 Follow the instructions as they appear on the PC monitor recommended to use the AC adapter/battery charger as a power source Digital Zoom, Digital Picture - Sharp VL-WD250U | VLWD250U Operation Manual - Page 76
click on the "Acroread" folder. 5 Double click on the desired language version. 6 Follow the instructions as they appear on the PC monitor until the installation is complete. 7 Restart the PC. Opening the PDF Manual 1 Insert the CD-ROM of the optional Video Capture Software VR-PK50E into the CD-ROM - Sharp VL-WD250U | VLWD250U Operation Manual - Page 77
white balance. Brightness (Lux) Situation (Lux) Position the subject in Focus manually when you the center. need to position the subject off center (see Frequent zooming produces unattractive pictures. It also increases the battery power consumption. • When image shaking is noticeable during - Sharp VL-WD250U | VLWD250U Operation Manual - Page 78
Slide the protect tab on the rear of the Mini DV cassette to the "SAVE" position. Precautions when using a Mini DV cassette • Be sure to use only Mini DV cassettes with the i mark. • This camcorder can record and play back using Mini DV cassettes with cassette memory, but it cannot record or - Sharp VL-WD250U | VLWD250U Operation Manual - Page 79
turned off. If you are not going to use your camcorder immediately, remove the battery pack (see page 8). Note: • Use only SHARP BT-L221 or BT-L441 battery packs. These are designed specifically for use with this camcorder. Storage • Store the battery pack in a fully discharged state. • Store the - Sharp VL-WD250U | VLWD250U Operation Manual - Page 80
Battery Charger • The AC adapter/battery trouble due to dew formation. When using the camcorder in a place where dew formation is likely to occur, allow the camcorder SHARP service center or your dealer for further advice. Plastic bag 1 Be sure to tightly seal the plastic bag containing the camcorder - Sharp VL-WD250U | VLWD250U Operation Manual - Page 81
SHARP service center or your dealer for further advice. Cleaning • Many plastic parts are used in the camcorder Please read the instructions accompanying the cleaning battery charger or connecting the camcorder to a TV. AC Adapter/Battery Charger (Supplied Accessory) The supplied AC adapter/battery - Sharp VL-WD250U | VLWD250U Operation Manual - Page 82
1 Remove the Mini DV cassette from the camcorder (see page 10 ), and set the CAT'S EYE switch to OFF. 2 Hold down the Lock button and set the Power switch to CAMERA. Lock button 3 Press the MENU/DISPLAY button until the menu screen appears. MANUAL - Sharp VL-WD250U | VLWD250U Operation Manual - Page 83
for service, please check the following troubleshooting table. Power Symptom Possible cause Suggested solution No power. Power source is not properly connected. Connect power source properly (pp. 8, 9). Battery pack is not charged. Charge battery pack sufficiently (p. 7). Dew in camcorder - Sharp VL-WD250U | VLWD250U Operation Manual - Page 84
tape to desired point (p. 21). Call for service (p. 72), or use a commercially available video 9). Battery pack is not charged. Charge battery pack sufficiently (p. 7). Camcorder is or DV cable is not nected video equipment. properly connected. Connect audio/video or DV cable properly - Sharp VL-WD250U | VLWD250U Operation Manual - Page 85
Camcorder Signal System: NTSC standard Recording System: 2 rotary heads, helical scanning system Cassette: Digital VCR Mini DV battery pack, lithium battery, video cassette and lens cap) AC Adapter/Battery SERVICE INFORMATION (For the U.S.) For the location of the nearest Sharp Authorized Service - Sharp VL-WD250U | VLWD250U Operation Manual - Page 86
ranura. Presionando la batería (2), deslícela en el sentido de la flecha (3) hasta que quede bloqueada en posición. Inserción de un minivideocasete DV 1 Coloque la fuente de alimentación en la videocámara, y luego deslice el control de abertura de la puerta del compartimento del videocasete y abra - Sharp VL-WD250U | VLWD250U Operation Manual - Page 87
Grabación fácil con la videocámara 1 Asegúrese de que se encuentre insertado un casete. 2 Quite la tapa del objetivo y levante el visor. 3 Mantenga pulsado el botón de bloqueo y ponga el interruptor de alimentación en CAMERA. Botón de bloqueo Reproducción de cinta 1 Pulse el botón de abertura del - Sharp VL-WD250U | VLWD250U Operation Manual - Page 88
VGuiíasdueaopleirzacaiócniroápnidea esn eespnañpolantalla en español Cuando se selecciona "ESPAÑOL" como idioma de la visualización en pantalla aparecen las siguientes visualizaciones indicadas a continuación. Modo CAMERA AU TOM. AJ UST E MAN. E NFO. MANU. VEL. OBTURA EXPOS I C I ÓN E F . IMAGE N - Sharp VL-WD250U | VLWD250U Operation Manual - Page 89
Affichages sur écran en français Les affichages sur écran suivants apparaissent lorsque "FRANÇAIS" est sélectionné pour la langue de l'affichage. Mode CAMERA AUTO REGL. MANUE L FOCUS MAN. V I T. OBTUR EXPOS I T I ON MENU I MAGE MENU SCENE F ONDU RE TOUR AUTO LUMI . 12 bits 3 0min SP Mode - Sharp VL-WD250U | VLWD250U Operation Manual - Page 90
Notes - Sharp VL-WD250U | VLWD250U Operation Manual - Page 91
- Sharp VL-WD250U | VLWD250U Operation Manual - Page 92
otherwise. In no event shall Sharp be liable, or in Service: What to do to Obtain Service: VL-WD250U Camcorder (Be sure to have this information available when you need service for your Product.) One (1) year parts and ninety (90) days labor from date of purchase except for the rechargeable battery
-
 1
1 -
 2
2 -
 3
3 -
 4
4 -
 5
5 -
 6
6 -
 7
7 -
8
-
9
-
10
-
11
-
12
-
13
-
14
-
15
-
16
-
17
-
18
-
19
-
20
-
21
-
22
-
23
-
24
-
25
-
26
-
27
-
28
-
29
-
30
-
31
-
32
-
33
-
34
-
35
-
36
-
37
-
38
-
39
-
40
-
41
-
42
-
43
-
44
-
45
-
46
-
47
-
48
-
49
-
50
-
51
-
52
-
53
-
54
-
55
-
56
-
57
-
58
-
59
-
60
-
61
-
62
-
63
-
64
-
65
-
66
-
67
-
68
-
69
-
70
-
71
-
72
-
73
-
74
-
75
-
76
-
77
-
78
-
79
-
80
-
81
-
82
-
83
-
84
-
85
-
86
-
87
-
88
-
89
-
90
-
91
-
92
 |
 |
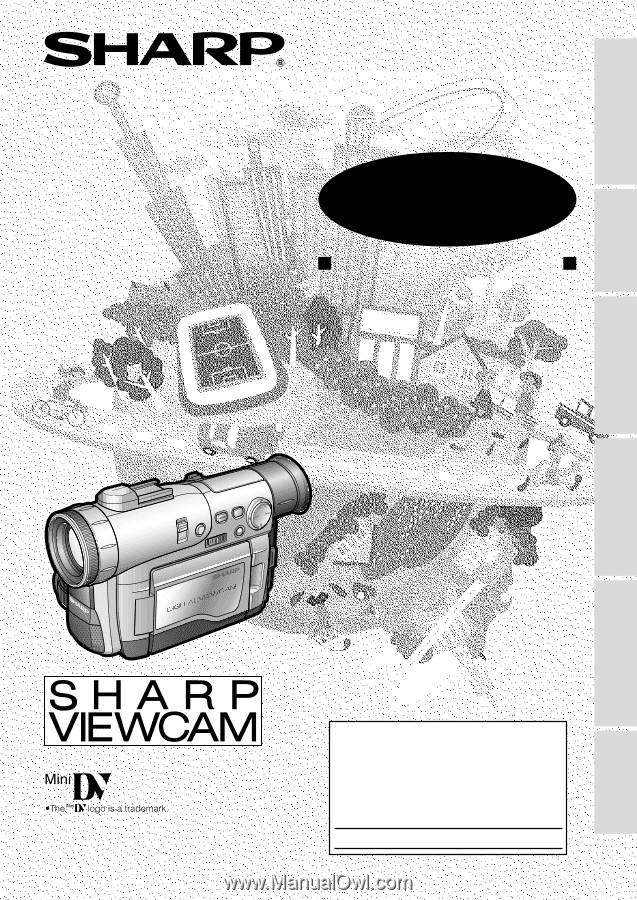
LIQUID CRYSTAL DISPLAY CAMCORDER
OPERATION MANUAL
MODEL
VL-WD250U
Important
Model No.:
Serial No.:
Please read this operation manual
carefully before using the VIEWCAM.
For assistance in reporting the theft or
loss of
this product, record on the line
below the
model number and serial number which
are located on the bottom of the unit.
Please retain this information.
• See page 69 for use of Demo mode.
Appendix
Preparation
Useful Features
Operation References
Basic Operations
Advanced Features