Singer One Instruction Manual 5
Singer One Manual
 |
View all Singer One manuals
Add to My Manuals
Save this manual to your list of manuals |
Singer One manual content summary:
- Singer One | Instruction Manual 5 - Page 1
A Instruction Manual - Singer One | Instruction Manual 5 - Page 2
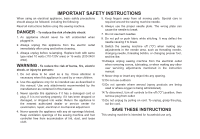
area, such as threading needle, changing needle, threading bobbin, or changing presser foot, and the like. 10.Always unplug sewing machine from the electrical outlet when removing covers, lubricating, or when making any other user servicing adjustments mentioned in the instruction manual. 11.Never - Singer One | Instruction Manual 5 - Page 3
is a registered trademark of The Singer Company Ltd or its affiliates. Copyright © 2005 All rights reserved throughout the world. Please note: This Instruction Book covers the operation of multiple models of sewing machines and the use of optional accessories. The manufacturer has made every effort - Singer One | Instruction Manual 5 - Page 4
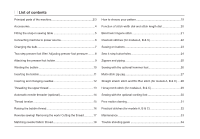
machine to power source 6 Overlock stitches (for models A, B & C 22 Changing the bulb 7 Sewing on buttons 23 Two-step presser foot lifter/ Adjusting presser foot pressure .........8 Sew 4-step buttonholes 24 Attaching the presser foot holder 9 Zippers and piping 25 Winding the bobbin - Singer One | Instruction Manual 5 - Page 5
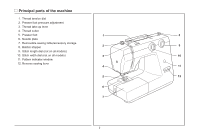
Principal parts of the machine 1. Thread tension dial 2. Presser foot pressure adjustment 3. Thread take-up lever 4. Thread cutter 5. Presser foot 1 8 6. Needle plate 7. Removable sewing table/accessory storage 8. Bobbin stopper 2 9 9. Stitch length dial (not on all models) 10. Stitch - Singer One | Instruction Manual 5 - Page 6
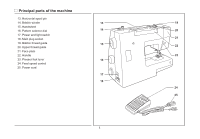
parts of the machine 13. Horizontal spool pin 14. Bobbin winder 13 19 15. Handwheel 16. Pattern selector dial 14 20 17. Power and light switch 18. Main plug socket 21 19. Bobbin thread guide 15 20. Upper thread guide 22 21. Face plate 22. Handle 23 23. Presser foot lever 16 24 - Singer One | Instruction Manual 5 - Page 7
accessories a. All purpose foot b. Zipper foot c. Buttonhole foot d. Button sewing foot e. L-screwdriver f. Seam ripper/ brush g. Oil bottle h. Pack of needles I. Bobbin (3x) j. Seam guide k. Darning plate L. Spool holder Optional accessories (These 6 accessories are not supplied with this machine - Singer One | Instruction Manual 5 - Page 8
Fitting the snap-in sewing table Keep the snap-in sewing table horizontal, and push it in the direction of the arrow. (1) The inside of the snap-in sewing table can be utilized as an accessory box. To open, lift up at the point of the arrow. (2) 5 - Singer One | Instruction Manual 5 - Page 9
machine is not in use. Foot control A The foot control pedal regulates the sewing speed. (3) Attention: Consult a qualified electrician if in doubt as to connect machine to power source. Unplug power cord when machine is not in use. The foot control must be used polarized outlet only one way. If - Singer One | Instruction Manual 5 - Page 10
bulb Disconnect the machine from the power supply by removing the plug from the main socket! - Loosen screw (A) as illustrated. (1) - Remove the face plate (B). - Unscrew the bulb and install a new one (C). (2) - Replace the face plate and tighten screw. Should there be any problem, ask your local - Singer One | Instruction Manual 5 - Page 11
Two-step presser foot lifter When sewing several layers or thick fabrics, the presser foot can be raised to a high rise position for easy positioning of the work. (A) A Adjusting presser foot pressure The presser foot pressure of the machine has been pre-set and requires no particular readjustment - Singer One | Instruction Manual 5 - Page 12
-out (c) is directly above the pin (d). (2) Raise the lever (e). Lower the presser foot holder (b) and the presser foot (f) will engage automatically. Removing the presser foot Raise the presser foot. (3) Raise the lever (e) and the foot disengages. b 1 Attaching the seam guide Attach the seam - Singer One | Instruction Manual 5 - Page 13
place on spindle (4). - Push bobbin to right (5). - Hold thread end (6). - Step on foot control pedal (7). - Cut thread (8). 1 - Press bobbin to left (9) and remove. 2 Please Note: When the bobbin winder spindle is in "bobbin winding" position, the machine will not sew and the hand wheel will - Singer One | Instruction Manual 5 - Page 14
must be fully raised. - Open the hinged cover (1). - Hold the bobbin case with one hand. Insert the bobbin so that the thread runs in a clockwise direction (arrow) (2). - Pull the thread through the slit and under the finger (3). 1 2 - Hold the bobbin case by the hinged latch (4). - Insert it - Singer One | Instruction Manual 5 - Page 15
Inserting and changing needles Change the needle regularly, especially if it is showing signs of wear and causing problems. For best sewing results always use SINGER Brand Needles. Insert the needle as illustrated as follows: A. Loosen the needle clamp screw and tighten again after inserting the new - Singer One | Instruction Manual 5 - Page 16
. Pull about 6-8 inches of thread to the rear beyond the needle eye. Trim thread to length with built in thread cutter. (9) 2 7 98 3 54 2 6 4 5 3 1 Note: If your sewing machine is equipped with the factory installed optional automatic needle threader, instructions for use can be found on - Singer One | Instruction Manual 5 - Page 17
. If your machine has this option use the following instructions: - Raise the needle to its highest position. - Press lever (A) down as far as it will go. - The threader automatically swings to the threading position (B). - Pass thread around thread guide (C). - Pass the thread in front of - Singer One | Instruction Manual 5 - Page 18
stitch sewing. Turn dial to lower number. D. Normal thread tension for zig zag and decorative sewing. Correct thread tension is when a small amount of the upper thread appears on the bottom side of fabric. Lower thread tension To test the bobbin thread tension, remove the bobbin case and 1 bobbin - Singer One | Instruction Manual 5 - Page 19
the bobbin thread Hold the upper thread with the left hand. Turn the handwheel (1) towards you (counterclockwise) lowering, then raising needle. 1 Gently pull on the upper thread to bring the bobbin thread up through the needle plate hole (2). Lay both threads to the back under the presser foot - Singer One | Instruction Manual 5 - Page 20
seam, press down the reverse sewing lever (A). Sew a few reverse stitches. Release the lever and the machine will sew forwards again. (1) Removing the work Turn the handwheel counterclockwise to bring the thread take up lever to its highest position, raise the presser foot and 1 remove work behind - Singer One | Instruction Manual 5 - Page 21
best results. Always use the same thread on top and bottom. Heavy duty thread, carpet thread. (Use heavy foot pressure-large numbers.) IMPORTANT : Match needle size to thread size and weight of fabric. NEEDLE, FABRIC SELECTION NEEDLES EXPLANATION TYPE OF FABRIC SINGER Standard sharp needles - Singer One | Instruction Manual 5 - Page 22
book covers the operation of multiple models of sewing machines. The primary difference between the various models is the type and number of stitch patterns. In addition to stitch patterns there is also a difference in the number of dials used to modify the patterns. On all models stitch patterns - Singer One | Instruction Manual 5 - Page 23
stitches are called satin stitches (2). For straight stitch sewing, generally speaking, the thicker the fabric, thread and needle, the longer the stitch should be. Stitch width dial (models A & B) 54 3 210 4321 5 1 0 0 S2 4 Stitch length dial (models A, B & C) 4 3 2 1 0.5 321 2 S1 For model - Singer One | Instruction Manual 5 - Page 24
/ lingerie stitch * The blindhem foot is an optional accessory not supplied with this machine. For hems, curtains, trousers, skirts, etc. Blind hem for stretch fabrics. (for models B, C & D) Blind hem/lingerie for firm fabrics. Set the machine as illustrated (1). Note: It takes practice to sew blind - Singer One | Instruction Manual 5 - Page 25
Overlock stitches (for models A, B & C) * The overcasting foot is an optional accessory not supplied with this machine. Seams, overcasting, visible hems. Standard overlock (A) : (for model A) For fine knits, jerseys, neck edges, ribbing. Double overlock stitch (B) : For fine knits, handknits, seams. - Singer One | Instruction Manual 5 - Page 26
Sewing on buttons Install the darning plate. (A) Change presser foot to button sewing foot. (B) Select zigzag stitch. Position the work under the foot. Place the button on the marked position, lower the foot. Adjust stitch width to "0" and sew a few securing stitches. Set the stitch width to number - Singer One | Instruction Manual 5 - Page 27
a backing for fine or stretchy fabrics. - It is advisable to use heavy thread or cord for stretch or knit fabrics. - The zig-zag should sew over the heavy thread or cord. Stitch width dial (models A & B) 4321 5 1 2 0 0 S2 4 Stitch length dial (models A, B & C) 321 Buttonhole foot S1 3 4 24 - Singer One | Instruction Manual 5 - Page 28
foot. Lower the foot and continue to sew. It is also possible to sew in a length of cord, into a bias strip to form a welt (3). Set stitch length control between "1" - "4" (according to thickness of fabric). Stitch width dial (models A & B) 4321 5 Zipper foot 0 0 S2 4 Stitch length dial (models - Singer One | Instruction Manual 5 - Page 29
foot is an optional accessory not supplied with your machine. For hems in fine or sheer fabrics. Set the stitch pattern dial to " " or " ". Change to optional hemmer foot. Neaten the edge of the fabric. At the beginning of the hem, turn under the edge twice by about 3 mm (1/8") and sew 4-5 stitches - Singer One | Instruction Manual 5 - Page 30
use a piece of backing fabric to reinforce. The stitch density can be varied by adjusting the stitch length. First sew over the center and then overlap on both sides. Depending on the type of fabric and damage, sew between 3 and 5 rows. (2) Stitch width dial (models A & B) 4321 5 All purpose foot - Singer One | Instruction Manual 5 - Page 31
stretch stitch and Ric Rac stitch (for models A, B & C) Straight stretch stitch Set the stitch pattern dial to " ". Used to add triple reinforcement to stretch and hardwearing seams. Turn the stitch length dial to "S1". The machine sews two stitches forwards and one stitch backwards. Stitch width - Singer One | Instruction Manual 5 - Page 32
". This stitch can be used for all types of jersey and woven fabrics. When using honeycomb stitch pattern for hemming sew at 1cm (1/4") from the fabric edge and trim the surplus fabric. Stitch width dial (models A & B) 4321 5 All purpose foot S2 0 0 1 432 Stitch length dial (models A, B & C) S1 - Singer One | Instruction Manual 5 - Page 33
the spring covering the cord groove and the foot (1). The cord should run in the groove. One, two or three cords can be sewn on. The stitch width is adjusted according to the number of cords and the stitch selected (2). Stitch width dial (models A & B) 4321 5 Cording foot (Optional) 0 0 S2 - Singer One | Instruction Manual 5 - Page 34
without the sewing machine internal feed system. Movement of the fabric is controlled by the operator. It is necessary to coordinate sewing speed and movement of fabric. Stitch width dial (models A & B) 4321 5 Stitch length dial (models A, B & C) 0 1 432 S1 0 S2 Darning foot (Optional) Note - Singer One | Instruction Manual 5 - Page 35
. Decorative joining seam for a fagotted effect. Rampart Stitch (c) Gathering with cord or shirring with elastic. This stitch can be used for firm, thicker fabrics. Stitch width dial (models A & B) 4321 5 All purpose foot 0 0 S2 4 Stitch length dial (models A, B & C) 321 S1 a 32 b c - Singer One | Instruction Manual 5 - Page 36
drops) with sewing machine oil. Turn the handwheel until the hook race (7) is in the left position. Replace the hook (5). Replace the hook race cover and snap back the two hook retaining arms. Insert the bobbin case and bobbin and replace the stitch plate. Important: Fabric fluff and threads must be - Singer One | Instruction Manual 5 - Page 37
stitch length 3.Loosen the thread tension 1.Select a better quality thread 2.Remove bobbin case, thread and insert correctly 3.Do not pull on the fabric while sewing, let it be taken up by the machine 1.Lubricate as described 2.Clean the hook and feed dog as described 3.Only use good quality sewing - Singer One | Instruction Manual 5 - Page 38
021VG40102(C)( ) Jun/05 SINGER 1100(8000-4)
-
 1
1 -
 2
2 -
 3
3 -
 4
4 -
 5
5 -
 6
6 -
 7
7 -
8
-
9
-
10
-
11
-
12
-
13
-
14
-
15
-
16
-
17
-
18
-
19
-
20
-
21
-
22
-
23
-
24
-
25
-
26
-
27
-
28
-
29
-
30
-
31
-
32
-
33
-
34
-
35
-
36
-
37
-
38
 |
 |

A
Instruction Manual