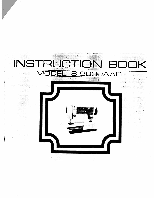
Singer S900 INSPIRATION Instruction Manual 2
Singer S900 INSPIRATION Manual
 |
View all Singer S900 INSPIRATION manuals
Add to My Manuals
Save this manual to your list of manuals |
Singer S900 INSPIRATION manual content summary:
- Singer S900 INSPIRATION | Instruction Manual 2 - Page 1
z CD H mC C F0 U) zCD C 0 0 0 cci 0 0 - Singer S900 INSPIRATION | Instruction Manual 2 - Page 2
with a hoop The adjustable cording and zipper foot Quilting guide Seam gauge or cloth guide Adjusting and changing "V" belt Cleaning and oiling the shuttle Care and maintenance of your machine How to replace the light bulb Accessories Trouble chart Sewing tips 1 Pages 18-19 20-22 23 24 25 - Singer S900 INSPIRATION | Instruction Manual 2 - Page 3
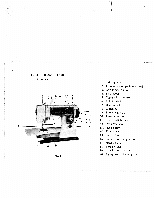
2 16- FEATURES AND PARTS (Front View) Fig. 1 -7 - 1o - 12 1. Take up lever 2. Pressure release guide (darning) 3. Arm thread guides 4. Disc cover 5. Zigzag width control 6. Bobbin winder 7. Hand wheel 8. Clutch nut 9. Stitch length dial 10. Reverse button 11. Stretch stitch lever 12. Drop feed - Singer S900 INSPIRATION | Instruction Manual 2 - Page 4
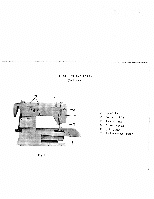
FEATURES AND PARTS (Back View> 21 21. Spool pins 22. Presser bar lifter 23. Thread Cutter 24. Extension plate 25. Light switch 26. Bobbin winder tension Fig. 2 - Singer S900 INSPIRATION | Instruction Manual 2 - Page 5
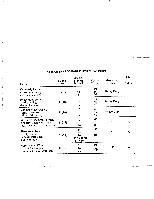
4 NEEDLE-THREAD-FABRIC-STITCHING GUIDE Fabric Needle No. Extremely heavy tarpaulin, sacking, canvas, duck, etc. , etc. 0 (11) Very sheer chiffon, batiste, lace, organdy, ninon, net, marquisett, etc. 00 (9) Machine Stitches Per Inch 6 to 8 8 to 10 10 to 12 12 to 14 14 to 16 (Plastic film) - Singer S900 INSPIRATION | Instruction Manual 2 - Page 6
of thread on one of the spool pins and lead thread though the arm thread guide (B, Fig. 4), Run end of thread through a hole in the bobbin edge thread end loosely then start machine slowly. Bobbin will stop winding when it is filled. Turn clutch away from you until sewing mechanism is again engaged - Singer S900 INSPIRATION | Instruction Manual 2 - Page 7
6 Fig. 6 SETTING THE NEEDLE See Fig. 6. Raise the needle bar to its highest point, turning wheel toward you by hand. Then loosen the needle clamp screw B and the needle can be inserted into clamp C. Place needle (flat side to right) in the needle clamp and push it upward as far as it will go into - Singer S900 INSPIRATION | Instruction Manual 2 - Page 8
17 Fig. 8 Fig. 9 PLACING BOBBiN CASE IN SHUTTLE Raise needle bar to highest position, and open front cover to the left. (See 14 Fig. 1) Hold the bobbin case latch, (D, Fig. 11) between the thumb and forefinger of the left hand, with at least three inches of thread running from the top of the - Singer S900 INSPIRATION | Instruction Manual 2 - Page 9
Place a spool of thread on the spool pin. 3. Lead the thread through the upper arm thread guides. 4. Down and between the tension discs, from right to left. 5. Draw the thread up through draw toward the back of the machine, leaving both threads three or four inches long. (Figs. 19 and 20, Page 12) - Singer S900 INSPIRATION | Instruction Manual 2 - Page 10
on the upper thread, turn dial (Fig. 13) to the right. To decrease, turn to the left. Before adjusting lower tension be sure that the machine is threaded properly. When it is necessary to change the bobbin tension, turn the small screw (Fig.15) on side of the bobbin case clockwise - Singer S900 INSPIRATION | Instruction Manual 2 - Page 11
of a seam, press the reverse button (B, Fig. 16) as far as it will go. The machine will sew backward as long as the button is pressed. STRAIGHT AND ZIGZAG SEWING Fig. 16 For all ordinary manual sewing, straight or zigzag, make is set at "straight & zigzag" stitch pattern (Marked ). sure that - Singer S900 INSPIRATION | Instruction Manual 2 - Page 12
, (B, Fig. 17) is at its lowest position and the drop feed knob is turned to " " position, (Fig. 18). Sewing Thin or Light Weight Fabrics. When lighter pressure is required to sew satisfactorily on thin silk or flimsy material, the pressure cap should be about halfway down. Release all the way by - Singer S900 INSPIRATION | Instruction Manual 2 - Page 13
lower the presser foot, You are now ready to begin sewing. By having the needle at its highest point, it is not necessary to touch the hand wheel to start the machine. You merely press the control. The speed of the machine is regulated by increasing or decreasing the amount of pressure exerted - Singer S900 INSPIRATION | Instruction Manual 2 - Page 14
13 THREE NEEDLE POSiTION A. The machine has three basic needle position-LEFT, MIDDLE and RIGHT-controlled by a needle position ever to the left of the zigzag stitch regulator as illustrated. Fig. 21 - Singer S900 INSPIRATION | Instruction Manual 2 - Page 15
be obtained depending on the other two settings. They will, however, have one thing in common.. direction.. as the diaqram indicates. Then using the straight sewing needle plate the position lever must be in the MIDDLE D. In the RIGHT position, the needle starts from the right, or just opposite from - Singer S900 INSPIRATION | Instruction Manual 2 - Page 16
chalk. Make one on scrap fabric (following directions below) to be sure machine adjustments are correct. 1. Replace presser foot with buttonhole foot which is mark for the end of the button hole, step 1, Fig. 24. Stop machine with needle in fabric at right side of stitching. Fig. 23 4. Lift the - Singer S900 INSPIRATION | Instruction Manual 2 - Page 17
. 5. When needle goes into the center of each hole, run the machine at medium speed, making six or eight stitches, stopping with the needle may place a rounded toothpick over the button, between the two holes, and sew button to fabric in regular way. Remove the toothpick and wind thread under the button - Singer S900 INSPIRATION | Instruction Manual 2 - Page 18
Set zigzag width control dial at number "0" (for straight) or any number (for zigzag stretch stitch). 4. Set stitch dial to mark "5" when you sew stretch stitch. I" J." i Fig. 29 CAUTION - It is difficult to remove this stitch from fabric. Pre-fit garment before using this stitch. • TOPSTITCHING - Singer S900 INSPIRATION | Instruction Manual 2 - Page 19
tubular and hard-to-reach areas, use your machine as a free-arm. Stitching buttonholes or sewing buttons on a cuff or neckband; topstitching a sleeve; edge finishes on sleeves, pantlegs and waistlines; darning and patching knees, elbows; and other areas of wear on - Singer S900 INSPIRATION | Instruction Manual 2 - Page 20
cc - Singer S900 INSPIRATION | Instruction Manual 2 - Page 21
20 AUTOMATIC EMBROIDERY To sew automatically the stitches shown in next pages follownthese procedure. 1. Be sure the zigzag needle plate and the zigzag presser foot machine and the zigzag stitch locking knobs(3,Fig. 36) are are on the each in its 2. off Set positions. the zigzag stitch - Singer S900 INSPIRATION | Instruction Manual 2 - Page 22
0 Ww - m 0 C') C) C') N N ww N N fr-W-+ - Singer S900 INSPIRATION | Instruction Manual 2 - Page 23
MV w M4 A4w -w U' h4 t\Z - 4- wm ---, w1w'w U 0 w 1 - Singer S900 INSPIRATION | Instruction Manual 2 - Page 24
Foot: Zigzag Foot Needle position: RIGHT STEP 1 23 Blind stitch hems provide a durable hem finish that is almost invisible and comparable to hand sewing. Prepare the garment in the same manner as for hand hemming. STEP 3 STEP 4 COMPLETED Step 1. Step 2. Step 3. Step 4. Fig. 37 (Fig. 37). If - Singer S900 INSPIRATION | Instruction Manual 2 - Page 25
5 and stitch length control (A, Fig. ib) as near 0 as possible without stopping the feeding action, a satin stitch is produced (Fig. 38). 4. With the machine set for a short stitch length, different designs can be made by turning the zigzag width control back and forth between 0 and 5 or any other - Singer S900 INSPIRATION | Instruction Manual 2 - Page 26
&M/L.MN\MHL SAMPLES OF CREATIVE EMBROIDERY 25 1. Set needle position lever in center notch. 2. 3. dobSSepateascetrikrgtasnttstieotedcdwh.e"ipn1l"egennadgagsntahdino.rnqeuRgitucehklpealetyianstpgmeooedpdvieaerlaatftziooirgwnzha"!asgcsahtislnotti"nhtcgehstiaztdsciighadlz. eafsgrioremsdti.tc"Th1" - Singer S900 INSPIRATION | Instruction Manual 2 - Page 27
sewing to desired length, then turn zigzag stitch dial to "4". Stitch desired length, then turn zigzag stitch dial back to "1". Repeat operation. Length of design is controlled by length of time that machine is allowed to stitch at each setting of zigzag stitch lever. NOTE: These instructions - Singer S900 INSPIRATION | Instruction Manual 2 - Page 28
the needle after removing the presser foot. Set the stitch width at the size you prefer and lower the presser bar lifter. Then operate the machine at a rather high speed while moving the hoop slowy with Fig. 39 both hands. Work carefully and be sure to keep fingers out of the - Singer S900 INSPIRATION | Instruction Manual 2 - Page 29
set foot so needle is centered in needle hole. Machine bastes cord in place (Fig. 40). To sew covered cord to material, reset adjus table foot so of base fabric. Fig. 40 SEWING IN ZIPPER Loosen thumb screw and slide foot so needle enters center of needle hole. Guide metal of zipper along edge of - Singer S900 INSPIRATION | Instruction Manual 2 - Page 30
Slip U shaped holder on guide under presser foot thumb screw it presses slightly on the fabric. By letting the guide ride on the previous stitch ing line, successive rows will . 44 Fig. 42 SEAM GAUGE OR CLOTH GUIDE Use the seam gauge as a guide for straight seams and even rows of top stitching - Singer S900 INSPIRATION | Instruction Manual 2 - Page 31
30 ADJUSTING AND CHANGING "V" BELT Fg. 46 (1) To adjust "V" belt, loosen screws (A, Fig. 46,) and move bracket B up to loosen belt and down to tighten. To remove "V' belt: (2) (A Remove top cover. (B) Loosen c'utch (C, (C) Loosen screws "A" and move bracket "B" to its highest position. (D) Slip belt - Singer S900 INSPIRATION | Instruction Manual 2 - Page 32
48) The stitch forming mechanism occasionally becomes clogged with loose threads and lint, This will interfere with the efficient operation of the machine. Cleaning and removal of the lint will safeguard the performance. To remove the shuttle assembly, proceed as follows: 1. Turn the balance wheel - Singer S900 INSPIRATION | Instruction Manual 2 - Page 33
bobbin case. CARE AND MAINTENANCE OF YOUR MACHINE How to Oil Your Machine your machine should be oiled occasionally to keep it operating smoothly, how often depends on the amount of sewing you do. . . . Before oiling the upper part of the sewing unit at points indicated by arrows in Fig - Singer S900 INSPIRATION | Instruction Manual 2 - Page 34
33 To oil mechanism under bed of machine, tip the head back on its hinges and oil all moving parts indicated by arrows Figures 50 and 51 Fig. 50 Fig.5] HOW TO REPLACE - Singer S900 INSPIRATION | Instruction Manual 2 - Page 35
1. Plastic Oiler (sealed and filled). 2. Package of Needles (3 Straight and 1 Twin Needle. 3. Large Screw Driver. 4. Small Screw Driver. 5. Quilter Guide. 6. Cloth Guide with Thumb Surew 7. Button Sewing Foot. 8. Buttonhole Foot. 9. Zipper Foot. 10. Felt Washers(2) (for spool pins). 11. Bobbins(3). - Singer S900 INSPIRATION | Instruction Manual 2 - Page 36
Trouble If Machine Binds 35 TROUBLE CHART Probable Cause Thread or lint in raceway Correction 1-With take up lever in highest position, open front cover and removebobbin case. BOBBIN LINT CLEANER - Singer S900 INSPIRATION | Instruction Manual 2 - Page 37
36 Trouble Skipping Stitches Irregular Sititches Uneven Stitches Probable Cause Bent needle Needle See instruction, page No. 6. See needle and thread chart, page No. 4. Tighten upper tension. See threading instruction, page No. 5 Rewind bobbin. Avoid pulling or holding material, just guide it. - Singer S900 INSPIRATION | Instruction Manual 2 - Page 38
too sharp Bent or blunt needle Material Puckering Tensions too tight Dull needle Sewing Stretch Stitch Stitch length too long Machine noisy Material will not feed Correction Refer to threadino instructions, see page No. 5, and rethread macnine. Loosen tension on upper thread by turn - Singer S900 INSPIRATION | Instruction Manual 2 - Page 39
38 SEWING TIPS and When a dainty hair line finish is particularly desirable for the inside seams yokes, seam allowance that would ordinarily show through is eliminated of - Singer S900 INSPIRATION | Instruction Manual 2 - Page 40
Trim both raw edges close to stitching. Fig. 55 Fig. 56 SEWING ON SHEER MATERIALS Most fabrics need to be guided only in front of the presser foot as shown at left. Many flimsy sheers, crepes, knits, tricots, etc., require support while being stitched. For such fabric use the straight stitch throat - Singer S900 INSPIRATION | Instruction Manual 2 - Page 41
the needle swings to the left, and allowing the needle to just pass over the edge of the fabric on the right (Fig. 57). PATCHING Machine baste patch into place under hole or worn area which has been cut away. Then zigzag stitch the patch into place by overcasting around edge
-
 1
1 -
 2
2 -
 3
3 -
 4
4 -
 5
5 -
 6
6 -
 7
7 -
8
-
9
-
10
-
11
-
12
-
13
-
14
-
15
-
16
-
17
-
18
-
19
-
20
-
21
-
22
-
23
-
24
-
25
-
26
-
27
-
28
-
29
-
30
-
31
-
32
-
33
-
34
-
35
-
36
-
37
-
38
-
39
-
40
-
41
 |
 |
C
m
F
U)
CD
C
0
0
z
CD
H
C
0
0
z
cci
0
0