Singer S900 INSPIRATION Instruction Manual 2 - Page 8
forefinger
 |
View all Singer S900 INSPIRATION manuals
Add to My Manuals
Save this manual to your list of manuals |
Page 8 highlights
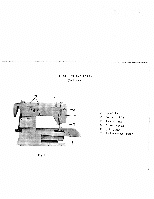
17 Fig. 8 Fig. 9 PLACING BOBBiN CASE IN SHUTTLE Raise needle bar to highest position, and open front cover to the left. (See 14 Fig. 1) Hold the bobbin case latch, (D, Fig. 11) between the thumb and forefinger of the left hand, with at least three inches of thread running from the top of the bobbin case to the right, Insert and center the bobbin case on the stud of the shuttle body, (C). Be sure the bobbin case finger, (E), is opposite the shuttle race notch (A). Press the bobbin case (B) into the shuttle as far as possible until latch catches on the center post of the shuttle. THEN release the bobbin case latch, (D). Press bobbin case again after latch has been released to make sure the bobbin case is locked securely in place. Close the front cover. Fig. 10 Fig. 1 1
-
 1
1 -
2
-
 3
3 -
 4
4 -
 5
5 -
 6
6 -
 7
7 -
 8
8 -
 9
9 -
 10
10 -
 11
11 -
 12
12 -
 13
13 -
14
-
15
-
16
-
17
-
18
-
19
-
20
-
21
-
22
-
23
-
24
-
25
-
26
-
27
-
28
-
29
-
30
-
31
-
32
-
33
-
34
-
35
-
36
-
37
-
38
-
39
-
40
-
41
 |
 |
