Sony BDV-N790W Operating Instructions - Page 19
Connecting the antenna (aerial), Step 3: Preparing for Network Connection, aerial
 |
View all Sony BDV-N790W manuals
Add to My Manuals
Save this manual to your list of manuals |
Page 19 highlights
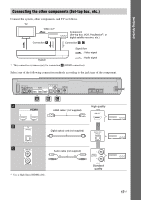
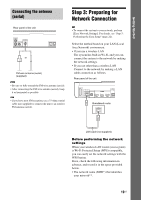
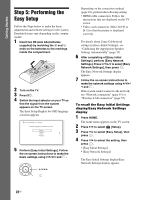
Getting Started Connecting the antenna (aerial) Step 3: Preparing for Network Connection Rear panel of the unit AUDIO L R ANTENNA COAXIAL 75 A.CAL MIC AUDIO IN ECM-AC3 FM or FRONT R FRONT L FM wire antenna (aerial) (supplied) • Be sure to fully extend the FM wire antenna (aerial). • After connecting the FM wire antenna (aerial), keep it as horizontal as possible. • If you have poor FM reception, use a 75-ohm coaxial cable (not supplied) to connect the unit to an outdoor FM antenna (aerial). • To connect the system to your network, perform [Easy Network Settings]. For details, see "Step 5: Performing the Easy Setup" (page 22). Select the method based on your LAN (Local Area Network) environment. • If you use a wireless LAN The system has built-in Wi-Fi, and you can connect the system to the network by making the network settings. • If you use other than a wireless LAN Connect to the network by making a LAN cable connection as follows. Rear panel of the unit USB 1 VIDEO OUT TV OPTICAL LAN (100) ARC IN 1 IN 2 OUT DIGITAL IN Broadband router LAN LAN cable (not supplied) Before performing the network settings When your wireless LAN router (access point) is Wi-Fi Protected Setup (WPS)-compatible, you can easily set the network settings with the WPS button. If not, check the following information in advance, and record it in the space provided below. • The network name (SSID*) that identifies your network**. 19US
-
 1
1 -
2
-
3
-
4
-
5
-
6
-
7
-
8
-
9
-
10
-
11
-
12
-
13
-
 14
14 -
 15
15 -
 16
16 -
 17
17 -
 18
18 -
 19
19 -
 20
20 -
 21
21 -
 22
22 -
 23
23 -
 24
24 -
25
-
26
-
27
-
28
-
29
-
30
-
31
-
32
-
33
-
34
-
35
-
36
-
37
-
38
-
39
-
40
-
41
-
42
-
43
-
44
-
45
-
46
-
47
-
48
-
49
-
50
-
51
-
52
-
53
-
54
-
55
-
56
-
57
-
58
-
59
-
60
-
61
-
62
-
63
-
64
 |
 |
