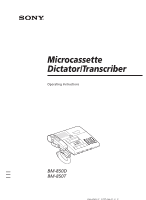
Sony BM850T2 Operating Instructions - Page 6
Power Connection, Setting Up the Unit - bm 850
 |
UPC - 027242674110
View all Sony BM850T2 manuals
Add to My Manuals
Save this manual to your list of manuals |
Page 6 highlights
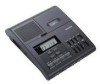
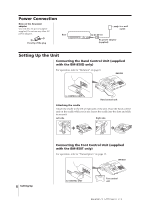
Power Connection Note on the AC power adaptor Use only the AC power adaptor supplied. Do not use any other AC power adaptor. Rear Porarity of the plug to a wall outlet to DC IN 9 V AC power adaptor (supplied) Setting Up the Unit Connecting the Hand Control Unit (supplied with the BM-850D only) For operation, refer to "Dictation" on page 8. BM-850 to CONTROL UNIT Hand control unit Attaching the cradle Attach the cradle to the left or right side of the unit. Place the hand control unit on the cradle while not in use. Insert the cradle into the slots and slide to secure it. Left side Right side 6 Setting Up Connecting the Foot Control Unit (supplied with the BM-850T only) For operation, refer to "Transcription" on page 12. BM-850 to CONTROL UNIT Foot control unit
-
 1
1 -
 2
2 -
 3
3 -
 4
4 -
 5
5 -
 6
6 -
 7
7 -
 8
8 -
 9
9 -
 10
10 -
 11
11 -
 12
12 -
13
-
14
-
15
-
16
-
17
-
18
-
19
-
20
-
21
-
22
-
23
-
24
 |
 |
