Sony CMT-LS1 Operating Instructions - Page 7
Getting Started, To hang the unit on the wall, of the unit.
 |
View all Sony CMT-LS1 manuals
Add to My Manuals
Save this manual to your list of manuals |
Page 7 highlights
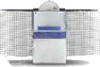
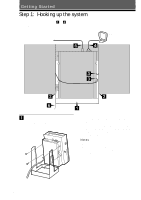
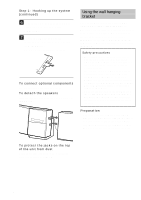
Getting Started To hang the unit on the wall 1 Attach the wall hanging adapter to the unit with the supplied screws (M4 × 14). 4 Attach the speaker with the R cord to the right side as viewed from the front of the unit. 2 Fix the wall hanging bracket to the wall using screws (not supplied). 5 Connect the R cord to the SPEAKER jack, pass the R cord through the groove between the wall hanging adapter and the bracket as shown below. Note Be sure to secure the bracket in a level position. 3 Attach the wall hanging adapter to the wall hanging bracket which you have fixed to the wall. continued 7
-
 1
1 -
 2
2 -
 3
3 -
 4
4 -
 5
5 -
 6
6 -
 7
7 -
 8
8 -
 9
9 -
 10
10 -
 11
11 -
 12
12 -
13
-
14
-
15
-
16
-
17
-
18
-
19
-
20
-
21
-
22
-
23
-
24
-
25
-
26
-
27
-
28
-
29
-
30
-
31
-
32
 |
 |

7
Getting Started
To hang the unit on the wall
1
Attach the wall hanging adapter to the
unit with the supplied screws (M4
×
14).
2
Fix the wall hanging bracket to the wall
using screws (not supplied).
Note
Be sure to secure the bracket in a level
position.
3
Attach the wall hanging adapter to the
wall hanging bracket which you have
fixed to the wall.
4
Attach the speaker with the R cord to
the right side as viewed from the front
of the unit.
5
Connect the R cord to the SPEAKER
jack, pass the R cord through the groove
between the wall hanging adapter and
the bracket as shown below.
continued