Sony CX20 Operating Instructions
Sony CX20 - VPL XGA LCD Projector Manual
 |
View all Sony CX20 manuals
Add to My Manuals
Save this manual to your list of manuals |
Sony CX20 manual content summary:
- Sony CX20 | Operating Instructions - Page 1
2-636-561-11 (2) Data Projector Operating Instructions VPL-CX20 VPL-CS20 © 2005 Sony Corporation - Sony CX20 | Operating Instructions - Page 2
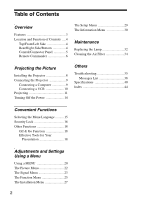
Maintenance Replacing the Lamp 32 Cleaning the Air Filter 34 Projecting the Picture Installing the Projector 8 Connecting the Projector 9 Connecting a Computer 9 Connecting a VCR 10 Projecting 11 Turning Off the Power 14 Others Troubleshooting 35 Messages List 38 Specifications 40 Index - Sony CX20 | Operating Instructions - Page 3
High brightness Adopting Sony's unique new optical system that incorporates newly developed LCD panels provides a high-efficiency optical system. It allows the 165 W UHP lamp to give a light output of 2000 ANSI lumen. High picture quality VPL-CX20: Three super-high-aperture 0.63-inch XGA panels with - Sony CX20 | Operating Instructions - Page 4
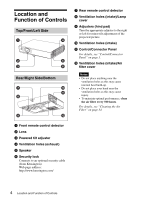
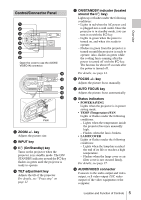
Location and Function of Controls Top/Front/Left Side Rear/Right Side/Bottom g Rear remote control detector h Ventilation holes (intake)/Lamp cover i Adjusters (hind pad) Turn the appropriate adjuster to the right or left for minor tilt adjustment of the projected picture. j Ventilation holes ( - Sony CX20 | Operating Instructions - Page 5
focus manually. g AUTO FOCUS key Adjusts the picture focus automatically. h Status indicators • POWER SAVING Lights when the projector is in projector becomes unusually high. - Flashes when the fan is broken. • LAMP/COVER Lights or flashes under the following conditions: - Lights when the lamp - Sony CX20 | Operating Instructions - Page 6
the center of the key when you use this key as the ENTER key. Remote Commander The keys that have the same names as those on the control panel function distortion correction) key Adjusts the tilt of the projector, or the trapezoidal distortion of the image manually. Each time you press this key, the - Sony CX20 | Operating Instructions - Page 7
control detector is, the wider the angle within which the commander can control the projector becomes. 2 Install the lithium battery. Face the + side up. 3 Put the lithium battery holder back into the Remote Commander. Notes on the lithium battery • A button type lithium battery (CR2025) is used - Sony CX20 | Operating Instructions - Page 8
B Projecting the Picture Installing the Projector The distance between the lens and the screen varies depending on the size of the screen. Use the following table as a guide. Screen Distance between the screen and the center of the lens Screen size (inches) Minimum Distance Maximum Distance Unit: - Sony CX20 | Operating Instructions - Page 9
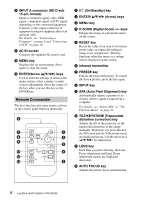
how to connect the projector to a computer. For more information, refer to the computer's instruction manual. White to audio output projector.) Notes • The projector accepts VGA, SVGA, XGA, SXGA, and SXGA+ signals. However, we recommend that you set the output mode of your computer to XGA (VPL-CX20 - Sony CX20 | Operating Instructions - Page 10
SVGA (VPL-CS20) mode for the external monitor. • If you set your computer, such as plug adaptor. Connecting a VCR This section describes how to connect the projector to a VCR. For more information, refer to the instruction manuals of the equipment you are connecting. to S video output to video - Sony CX20 | Operating Instructions - Page 11
the Picture ON/STANDBY indicator to video GBR/ component output Rear remote control detector White to audio output (L) Red to audio output (R) then connect all equipment. The ON/STANDBY indicator lights in red and the projector goes into standby mode. 2 Press the ?/1 key. The ON/STANDBY - Sony CX20 | Operating Instructions - Page 12
this case, adjust it manually in step 8 on page 13. 3 Turn on the equipment connected to the projector. 4 Press the projector varies depending on the type of computer. 6 Adjust the upper or lower position of the picture. To adjust using the Remote Commander Press the TILT/KEYSTONE key on the Remote - Sony CX20 | Operating Instructions - Page 13
adjust the focus automatically Press the AUTO FOCUS key on the left side of the projector or on the Remote Commander. To adjust the focus manually To adjust the focus using the Remote Commander: Press the LENS key on the Remote Commander to display the Lens Focus menu and adjust the focus using the - Sony CX20 | Operating Instructions - Page 14
the ?/1 key, or if you do not press any key for five seconds. 2 Press the ?/1 key again. The powered tilt adjuster is retracted into the projector. The ON/STANDBY indicator flashes in green and the fan continues to run to reduce the internal heat. Also, the ON/STANDBY indicator flashes quickly - Sony CX20 | Operating Instructions - Page 15
, proceed as follows: 2 Press the ?/1 key to turn on the projector. 3 Press the MENU key. The menu appears. The menu currently selected Setup menu, then press the B or ENTER key. The selected menu appears. Front remote control detector 5 Press the v or V key to select "Language," then press - Sony CX20 | Operating Instructions - Page 16
you do not input the correct password, you will not be able to project the picture. Note You will not be able to use the projector if you forget your password and the password administrator is not available. Be please aware that using the security lock can prevent valid usage in - Sony CX20 | Operating Instructions - Page 17
the setting for security lock is completed. Picture Signal Function Installation Setup Smart APA: Auto Input Search: Auto Focus: Test Pattern If you call the customer service center because you have forgotten the password, you will need to be able to verify the projector's serial number and your - Sony CX20 | Operating Instructions - Page 18
the projector. Moving the projector with the powered tilt adjuster extended may damage the adjuster. • Turn off the projector according input. 1 Project a normal image, and press the D ZOOM + key on the Remote Commander. The digital zoom icon appears in the center of the image. Digital zoom icon - Sony CX20 | Operating Instructions - Page 19
RESET key returns the image back to its original size immediately. To freeze the image projected (Freeze function) Press the FREEZE key on the remote commander. "Freeze" appears when the key is pressed. This function works when a signal from a computer is input. To restore the original screen, press - Sony CX20 | Operating Instructions - Page 20
and Settings Using a Menu Using a MENU The projector is equipped with an on-screen menu for making menu 1 Press the MENU key. The menu appears. Picture Signal Function Installation Setup Tilt V Keystone: Background: Lamp Mode: Lens Control: IR Receiver: Illumination: High Altitude Mode: Auto - Sony CX20 | Operating Instructions - Page 21
that you want to reset, and press the RESET key on the Remote Commander. "Complete!" appears on the screen and the setting of the of the Signal menu Storage of the settings The settings are automatically stored in the projector memory when the ENTER key is pressed. If no signal is input If there is - Sony CX20 | Operating Instructions - Page 22
adjusting the picture or volume. Picture Signal Function Picture Mode: Adjust Picture Volume: Installation Setup Information Sel: Standard 30 Set: Exit: Picture Signal Function Installation Adjust Picture Contrast: Brightness: Sharpness: Gamma Mode: Color Temp.: Setup Information Sel - Sony CX20 | Operating Instructions - Page 23
Exit: Picture Signal Function Adjust Signal Dot Phase: H Size: Shift: Installation Setup Information Sel: Set: 12 1344 H: 235 V: 34 Back: Exit element to that of the LCD. The picture will be clear but the picture size will be smaller. Note Note that if the projector is used for profit or - Sony CX20 | Operating Instructions - Page 24
is input, the projector automatically detects the the Signal menu. This projector has 20 types of user memories for Input-A into will be registered in the projector. If more than 20 user memory items are registered, the Mac-2 SGI-1 Macintosh 19" Macintosh 21" Sony News PC-9821 1280 × 1024 WS Sunmicro - Sony CX20 | Operating Instructions - Page 25
APA functions when you press the APA key on the Remote Commander. When set to "On," the projector detects input signals in Off the following order: Input-A/ set to "On," the projector goes into power saving Off mode if no signal is input for 10 minutes. Although the lamp goes out, the cooling fan - Sony CX20 | Operating Instructions - Page 26
setting Locks all the control panel keys on the side panel of Off the projector so that the projector can be operated only with the Remote Commander. To lock the control panel keys, set to "On." When it and "Shift" items on the Signal menu when you adjust the picture manually. 26 The Function Menu - Sony CX20 | Operating Instructions - Page 27
Installation Menu The Installation menu is used for changing the settings of the projector. Picture Signal Function Installation Setup Tilt V Keystone: Background: Lamp " for automatic correction, or "Manual" for manual correction using the v/V/b/B keys on the Remote Commander. When the bottom of - Sony CX20 | Operating Instructions - Page 28
Note The auto V Keystone adjustment may not correct the trapezoidal distortion perfectly, depending on the room temperature or the screen angle. 28 The Installation Menu - Sony CX20 | Operating Instructions - Page 29
, select the item according to the input signal. Auto Color System Selects the color system of the input signal. If you select "Auto," the projector detects the color system of the input signal automatically. If the picture is distorted or colorless, select the color system according to the input - Sony CX20 | Operating Instructions - Page 30
input signal. The displayed value is approximate. Displays the vertical frequency of the input signal. The displayed value is approximate. Indicates how long the lamp has been turned on. Note These are only displayed on the screen. You cannot alter the display, and these is no setting to be altered - Sony CX20 | Operating Instructions - Page 31
- - - - Component - - z*1 - Wide Mode z z*3 z : Adjustable/can be set - : Not adjustable/cannot be set *1: Except preset memory No. 3, 4 *2: VPL-CX20: Lower than SVGA VPL-CS20: Lower than VGA *3: Except preset memory No. 7, 8, 10, 11 Video GBR - - z*1 - z*3 Computer z z - - - z z z Computer - Sony CX20 | Operating Instructions - Page 32
on conditions of use. Use an LMP-C162 Projector Lamp as the replacement lamp. Use of any other lamps than the LMP-C162 may cause damage to the projector. Caution The lamp remains not after the projector is turned off with the ?/1 key. If you touch the lamp, you may burn your finger. When you replace - Sony CX20 | Operating Instructions - Page 33
. Note Be sure to attach the lamp cover securely as it was. If not, the projector cannot be turned on. 7 Turn the projector back over. 8 Connect the power cord. The ON/STANDBY indicator around the ?/1 key lights in red. 9 Press the following keys on the Remote Commander in the following order for - Sony CX20 | Operating Instructions - Page 34
, remove the air filter and wash it. 1 Turn the power off and unplug the power cord. 2 Place a protective sheet (cloth) beneath the projector and turn the projector over. 3 Remove the air filter cover. 5 Wash the air filter with a mild detergent solution and dry it in a shaded place. 6 Attach the - Sony CX20 | Operating Instructions - Page 35
Troubleshooting If the projector appears to be operating erratically, try to diagnose and correct the problem using the following instructions. If the problem persists, consult with qualified Sony LAMP/COVER The electrical system has broken down. and TEMP/FAN indicators c Consult with qualified Sony - Sony CX20 | Operating Instructions - Page 36
connector and the numbers of pixels on the LCD panel. c Change the desktop pattern on the lamp with a new one (see page 32). The picture is not clear. • The picture is out of focus. c Adjust the focus (see page 13). • Condensation has accumulated on the lens. c Leave the projector Troubleshooting - Sony CX20 | Operating Instructions - Page 37
holes. • The projector is being used at a high altitude. c Ensure that "High Altitude Mode" on the Installation menu is set to "On." Both the LAMP/COVER The electrical system has broken down. and TEMP/FAN indicators c Consult with qualified Sony personnel. light up. Others Troubleshooting 37 - Sony CX20 | Operating Instructions - Page 38
frequency is out of the acceptable range of the projector. c Input a signal that is within the range of the frequency. • The resolution setting of the output signal of the computer is too high. c Set the output setting to XGA (VPL-CX20) and SVGA (VPLCS20) (see page 9). Please check Input-A Signal - Sony CX20 | Operating Instructions - Page 39
and Remedy Lens control is locked! Do you wish to unlock? Yes V No v "Lens Control" on the Installation menu is set to "Off." c To enable the the LENS (FOCUS, ZOOM) key on the Remote Commander, and the FOCUS and ZOOM keys on the projector, set "Lens Control" to "On." Others Troubleshooting 39 - Sony CX20 | Operating Instructions - Page 40
Specifications Optical characteristics Projection system 3 LCD panels, 1 lens, projection system LCD panel VPL-CX20: 0.63-inch XGA panel, approximately 2,360,000 pixels (786,432 pixels × 3) VPL-CS20 ) 2000 lm (When the Lamp Mode is set to "High signals of the projector. Applicable video - Sony CX20 | Operating Instructions - Page 41
× 2 1/8 × 8 3/8 inches) (w/h/d) (without projecting parts) Mass Approx. 1.9 kg (4 lb 3 oz) Power Instructions (CD-ROM) (1) Quick Reference Manual (1) Safety Regulations (1) Security Label (1) Design and specifications are subject to change without notice. Optional accessories Projector Lamp - Sony CX20 | Operating Instructions - Page 42
Hz 46.875 SVGA VESA 85 Hz 53.674 Macintosh 16" 49.724 XGA VESA 60 Hz 48.363 XGA VESA 70 Hz 56.476 XGA VESA 75 Hz 60.023 XGA VESA 85 Hz 68.677 59.940 50.000 59.940 50.000 - - - - - - - 800 832 848 800 832 800 864 832 840 832 1024 1056 1040 1056 1048 1152 1344 1328 1312 1376 42 Specifications - Sony CX20 | Operating Instructions - Page 43
1050 fH (kHz) fV (Hz) Sync SXGA VESA 70 Hz 63.995 SXGA VESA 75 Hz 67.500 SXGA the smart APA function and the APA key of the remote commander do not active. Make adjustments for the input projector in your country/region. Otherwise, use a proper power cord meeting the following specifications - Sony CX20 | Operating Instructions - Page 44
32 Lamp Timer 30 Language 29 selecting the menu language 15 Lens Control 27 Location and function of controls control/connector panel 5 rear/right side/bottom 4 Remote Commander 6 top/front/left side 4 M Menu clearing the menu display 21 Function menu 25 Information Menu 30 Installation - Sony CX20 | Operating Instructions - Page 45
S Scan Converter 23 Screen size 8, 40 Security Lock 26 Sharpness 22 Shift 23 Smart APA 25 Specifications 40 Standby Mode 25 Status 29 Supplied accessories 41 T Test Pattern 25 Tilt 27 Troubleshooting 35 V V Keystone 27 Volume 22 W Wide Mode 23 Index 45 Others - Sony CX20 | Operating Instructions - Page 46
Sony Corporation
-
 1
1 -
 2
2 -
 3
3 -
 4
4 -
 5
5 -
 6
6 -
 7
7 -
8
-
9
-
10
-
11
-
12
-
13
-
14
-
15
-
16
-
17
-
18
-
19
-
20
-
21
-
22
-
23
-
24
-
25
-
26
-
27
-
28
-
29
-
30
-
31
-
32
-
33
-
34
-
35
-
36
-
37
-
38
-
39
-
40
-
41
-
42
-
43
-
44
-
45
-
46
 |
 |
2-636-561-
11
(2)
Data Projector
Operating Instructions
© 2005 Sony Corporation
VPL-CX20
VPL-CS20