Sony CX20 Operating Instructions - Page 5
Control/Connector Panel, INPUT key, On/Standby key, TILT adjustment key, ON/STANDBY indicator located - projector
 |
View all Sony CX20 manuals
Add to My Manuals
Save this manual to your list of manuals |
Page 5 highlights
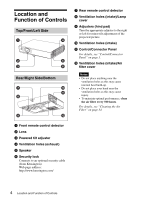
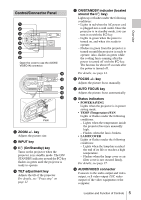
Overview Control/Connector Panel Open the cover to use the AUDIO/ VIDEO IN connector. Push a ZOOM +/- key Adjusts the picture size. b INPUT key c ?/1 (On/Standby) key Turns on the projector when the projector is in standby mode. The ON/ STANDBY indicator around the ?/1 key flashes in green until the projector is ready to operate. d TILT adjustment key Adjusts the tilt of the projector. For details, see "Projecting" on page 11. e ON/STANDBY indicator (located around the ?/1 key) Lights up or flashes under the following conditions: - Lights in red when the AC power cord is plugged into a wall outlet. Once the projector is in standby mode, you can turn it on with the ?/1 key. - Lights in green when the power is turned on, and when it is ready to operate. - Flashes in green from the projector is turned on until the projector is ready to operate. Also, flashes in green while the cooling fan is running after the power is turned off with the ?/1 key. The fan runs for about 45 seconds after the power is turned off. For details, see page 14. f FOCUS +/- key Adjusts the picture focus manually. g AUTO FOCUS key Adjusts the picture focus automatically. h Status indicators • POWER SAVING Lights when the projector is in power saving mode. • TEMP (Temperature)/FAN Lights or flashes under the following conditions: - Lights when the temperature inside the projector becomes unusually high. - Flashes when the fan is broken. • LAMP/COVER Lights or flashes under the following conditions: - Lights when the lamp has reached the end of its life or reaches a high temperature. - Flashes when the lamp cover or air filter cover is not secured firmly. For details, see page 37. i AUDIO/VIDEO connector Connects to the audio output and video output, or S video output (Y/C video output) of the video equipment or the computer. Location and Function of Controls 5
-
 1
1 -
 2
2 -
 3
3 -
 4
4 -
 5
5 -
 6
6 -
 7
7 -
 8
8 -
 9
9 -
 10
10 -
 11
11 -
12
-
13
-
14
-
15
-
16
-
17
-
18
-
19
-
20
-
21
-
22
-
23
-
24
-
25
-
26
-
27
-
28
-
29
-
30
-
31
-
32
-
33
-
34
-
35
-
36
-
37
-
38
-
39
-
40
-
41
-
42
-
43
-
44
-
45
-
46
 |
 |
