Sony DCR-PC115 Operating Instructions - Page 88
Adding an audio sound on a recorded tape, Monitoring the new recorded sound, Audio dubbing
 |
View all Sony DCR-PC115 manuals
Add to My Manuals
Save this manual to your list of manuals |
Page 88 highlights
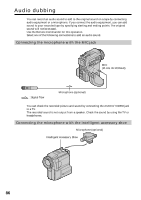
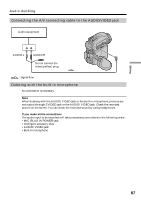
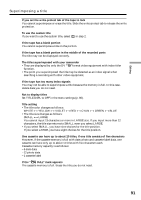
Audio dubbing Adding an audio sound on a recorded tape Choose a connection mentioned before, and connect audio equipment or microphone to your camcorder. Then follow the procedure below. (1) Insert the recorded tape into your camcorder. (2) Set the POWER switch to VCR on your camcorder. (3) Locate the recording start point by pressing N. Then press X at the point where you want to start recording to set your camcorder to the playback pause mode. (4) Press AUDIO DUB on the Remote Commander. The green X indicator appears on the screen. (5) Press X and start playing back the audio you want to record at the same time. The new sound is recorded in stereo 2 (ST2) during playback. During recording new sound, the red appears on the screen. (6) Press x at the point where you want to stop recording. AUDIO DUB Monitoring the new recorded sound To play back the sound Adjust the balance between the original sound (ST1) and the new sound (ST2) by selecting AUDIO MIX in in the menu settings (p. 96). VCR SET H i F i SOUND AUD I O M I X A / VcD V OU T ST1 ST2 RETURN [ MENU ] : END Five minutes after when you disconnect the power source or remove the battery pack, the setting of AUDIO MIX returns to the original sound (ST1) only. The default setting is original sound only. 88
-
 1
1 -
2
-
3
-
4
-
5
-
6
-
7
-
8
-
9
-
10
-
11
-
12
-
13
-
14
-
15
-
16
-
17
-
18
-
19
-
20
-
21
-
22
-
23
-
24
-
25
-
26
-
27
-
28
-
29
-
30
-
31
-
32
-
33
-
34
-
35
-
36
-
37
-
38
-
39
-
40
-
41
-
42
-
43
-
44
-
45
-
46
-
47
-
48
-
49
-
50
-
51
-
52
-
53
-
54
-
55
-
56
-
57
-
58
-
59
-
60
-
61
-
62
-
63
-
64
-
65
-
66
-
67
-
68
-
69
-
70
-
71
-
72
-
73
-
74
-
75
-
76
-
77
-
78
-
79
-
80
-
81
-
82
-
 83
83 -
 84
84 -
 85
85 -
 86
86 -
 87
87 -
 88
88 -
 89
89 -
 90
90 -
 91
91 -
 92
92 -
 93
93 -
94
-
95
-
96
-
97
-
98
-
99
-
100
-
101
-
102
-
103
-
104
-
105
-
106
-
107
-
108
-
109
-
110
-
111
-
112
-
113
-
114
-
115
-
116
-
117
-
118
-
119
-
120
-
121
-
122
-
123
-
124
-
125
-
126
-
127
-
128
-
129
-
130
-
131
-
132
-
133
-
134
-
135
-
136
-
137
-
138
-
139
-
140
-
141
-
142
-
143
-
144
-
145
-
146
-
147
-
148
-
149
-
150
-
151
-
152
-
153
-
154
-
155
-
156
-
157
-
158
-
159
-
160
-
161
-
162
-
163
-
164
-
165
-
166
-
167
-
168
-
169
-
170
-
171
-
172
-
173
-
174
-
175
-
176
-
177
-
178
-
179
-
180
-
181
-
182
-
183
-
184
-
185
-
186
-
187
-
188
 |
 |
