Sony DCR-TRV22 Operating Instructions (primary manual) - Page 213
Identifying parts and controls
 |
View all Sony DCR-TRV22 manuals
Add to My Manuals
Save this manual to your list of manuals |
Page 213 highlights
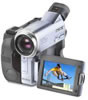
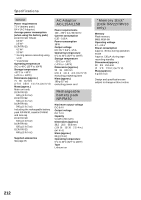
- Quick Reference - Identifying parts and controls Camcorder 7 1 8 9 2 q; 3 qa 4 5 qs 6 1 Lens cap (p. 25) 2 LCD/Touch panel screen (p. 23, 28, 29) 3 RESET button (p. 193) If you press RESET, all the settings including the date and time return to the default. 4 BACK LIGHT button (p. 33) 5 Speaker 6 DSPL/BATT INFO button (p. 20, 40) 7 CHG (charge) lamp (p. 17) 8 Eyecup (p. 206) 9 Viewfinder (p. 31) 0 START/STOP button (p. 9, 25, 125) qa Battery pack mounting surface (p. 16) qs Hooks for shoulder strap Attaching the supplied lens cap 1 Align the lens cap to the groove. 2 Push the lens cap against the lens until it snaps. When recording, open the lens cap as shown. Quick Reference Note Position the lens cap so as not to cover the microphone and the remote sensor. 213
-
 1
1 -
2
-
3
-
4
-
5
-
6
-
7
-
8
-
9
-
10
-
11
-
12
-
13
-
14
-
15
-
16
-
17
-
18
-
19
-
20
-
21
-
22
-
23
-
24
-
25
-
26
-
27
-
28
-
29
-
30
-
31
-
32
-
33
-
34
-
35
-
36
-
37
-
38
-
39
-
40
-
41
-
42
-
43
-
44
-
45
-
46
-
47
-
48
-
49
-
50
-
51
-
52
-
53
-
54
-
55
-
56
-
57
-
58
-
59
-
60
-
61
-
62
-
63
-
64
-
65
-
66
-
67
-
68
-
69
-
70
-
71
-
72
-
73
-
74
-
75
-
76
-
77
-
78
-
79
-
80
-
81
-
82
-
83
-
84
-
85
-
86
-
87
-
88
-
89
-
90
-
91
-
92
-
93
-
94
-
95
-
96
-
97
-
98
-
99
-
100
-
101
-
102
-
103
-
104
-
105
-
106
-
107
-
108
-
109
-
110
-
111
-
112
-
113
-
114
-
115
-
116
-
117
-
118
-
119
-
120
-
121
-
122
-
123
-
124
-
125
-
126
-
127
-
128
-
129
-
130
-
131
-
132
-
133
-
134
-
135
-
136
-
137
-
138
-
139
-
140
-
141
-
142
-
143
-
144
-
145
-
146
-
147
-
148
-
149
-
150
-
151
-
152
-
153
-
154
-
155
-
156
-
157
-
158
-
159
-
160
-
161
-
162
-
163
-
164
-
165
-
166
-
167
-
168
-
169
-
170
-
171
-
172
-
173
-
174
-
175
-
176
-
177
-
178
-
179
-
180
-
181
-
182
-
183
-
184
-
185
-
186
-
187
-
188
-
189
-
190
-
191
-
192
-
193
-
194
-
195
-
196
-
197
-
198
-
199
-
200
-
201
-
202
-
203
-
204
-
205
-
206
-
207
-
 208
208 -
 209
209 -
 210
210 -
 211
211 -
 212
212 -
 213
213 -
 214
214 -
 215
215 -
 216
216 -
 217
217 -
 218
218 -
219
-
220
 |
 |
