Sony DCR-TRV740 PIXELA ImageMixer 1.0 Manual - Page 22
Capture environment, Capture window - camcorder
 |
View all Sony DCR-TRV740 manuals
Add to My Manuals
Save this manual to your list of manuals |
Page 22 highlights
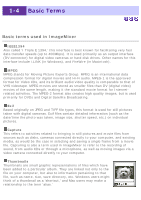
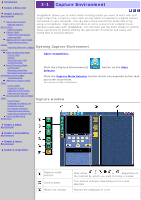
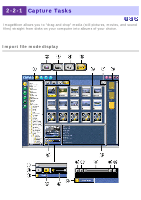
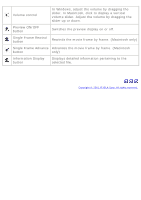
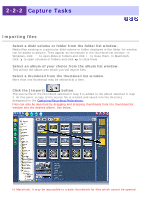
Introduction Chapter 1 Before Use 2-1 Capture Environment Chapter 2 Capture Environment Capture Environment Opening Capture Environment Capture window Capture Tasks Import file mode display Importing files Digital Camera Import Mode Digital camera import display Importing files from a digital camera Audio CD Recording Mode Control panel Caution Recording music files Troubleshooting Sound Recording Mode Control panel Recording sound files Recording sound files while previewing movie images Troubleshooting USB Device Capture Mode (Win) Control panel Connection status Capturing movie scenes Capturing still pictures DV Camcorder Capture Mode (Win) Control panel Changing the display size Connection status DV cassette indication Capturing movie scenes Capturing still picture files Capturing/Recording Preferences ImageMixer allows you to select which existing media you want to work with and import files from a memory card, such as one which is inserted in a digital camera connected to your computer. You can also record sound from audio CDs or by using a microphone. Capturing still shots or entire scenes from a digital movie camera is also easy with ImageMixer. You can then use the main screen to confirm these operations by double clicking the appropriate thumbnail and easily add media files to existing albums. Opening Capture Environment 1. Open ImageMixer. 2. Click the [Capture Environment] Selector. button on the Main 3. Click the Capture Mode Selector button which corresponds to the task you wish to perform. The selected mode is displayed. Capture window Chapter 3 Album Environment Chapter 4 Movie Editing Environment Chapter 5 Layout Environment Chapter 6 Image Editor Capture mode selector Control panel Album list window Click either or , depending on the method by which you wish to bring in media. This section changes depending on the mode selected. Albums are displayed in a list.
-
 1
1 -
2
-
3
-
4
-
5
-
6
-
7
-
8
-
9
-
10
-
11
-
12
-
13
-
14
-
15
-
16
-
 17
17 -
 18
18 -
 19
19 -
 20
20 -
 21
21 -
 22
22 -
 23
23 -
 24
24 -
 25
25 -
 26
26 -
 27
27 -
28
-
29
-
30
-
31
-
32
-
33
-
34
-
35
-
36
-
37
-
38
-
39
-
40
-
41
-
42
-
43
-
44
-
45
-
46
-
47
-
48
-
49
-
50
-
51
-
52
-
53
-
54
-
55
-
56
-
57
-
58
-
59
-
60
-
61
-
62
-
63
-
64
-
65
-
66
-
67
-
68
-
69
-
70
-
71
-
72
-
73
-
74
-
75
-
76
-
77
-
78
-
79
-
80
-
81
-
82
-
83
-
84
-
85
-
86
-
87
-
88
-
89
-
90
-
91
-
92
-
93
-
94
-
95
-
96
-
97
-
98
-
99
-
100
-
101
-
102
-
103
-
104
-
105
-
106
-
107
-
108
-
109
-
110
-
111
-
112
-
113
-
114
-
115
-
116
-
117
-
118
-
119
-
120
-
121
-
122
-
123
-
124
-
125
-
126
-
127
-
128
-
129
-
130
-
131
-
132
-
133
-
134
-
135
-
136
-
137
-
138
-
139
-
140
-
141
-
142
-
143
-
144
-
145
-
146
-
147
-
148
-
149
-
150
-
151
-
152
-
153
-
154
-
155
-
156
-
157
-
158
-
159
-
160
-
161
-
162
-
163
-
164
-
165
-
166
-
167
-
168
-
169
-
170
-
171
-
172
-
173
-
174
-
175
-
176
-
177
-
178
-
179
-
180
-
181
-
182
-
183
-
184
-
185
-
186
-
187
-
188
-
189
-
190
-
191
-
192
-
193
-
194
-
195
-
196
-
197
-
198
-
199
-
200
-
201
-
202
-
203
-
204
-
205
-
206
-
207
 |
 |