Sony DCR-TRV740 PIXELA ImageMixer 1.0 Manual - Page 27
Importing files, Click the [Import]
 |
View all Sony DCR-TRV740 manuals
Add to My Manuals
Save this manual to your list of manuals |
Page 27 highlights
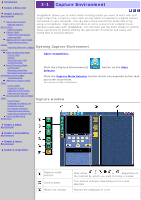
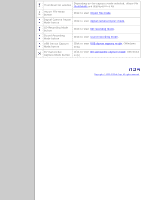
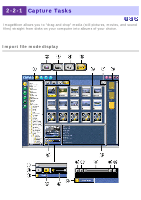
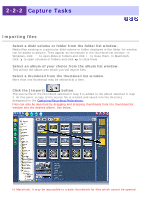
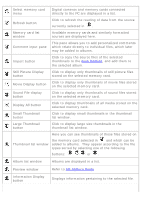
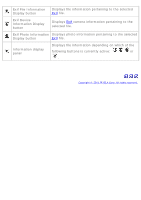
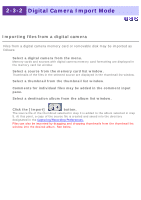
2-2-2 Capture Tasks Importing files 1. Select a disk/volume or folder from the folder list window. Media files existing in a particular disk/volume or folder displayed in the folder list window can be added to albums. They appear as thumbnails in the thumbnail list window. In Windows, click to open disks or folders and click to close them. In Macintosh, click to open volumes or folders and click to close them. 2. Select an album of your choice from the album list window. This will be the album into which you will import files. 3. Select a thumbnail from the thumbnail list window. More than one thumbnail may be selected at a time. 4. Click the [Import] button. The source file of the thumbnail selected in step 3 is added to the album selected in step 2. At this point, a copy of the source file is created and saved into the directory designated in the Capturing/Recording Preferences. Files can also be imported by dragging and dropping thumbnails from the thumbnail list window into the desired album. See below. In Macintosh, it may be impossible to create thumbnails for files which cannot be opened
-
 1
1 -
2
-
3
-
4
-
5
-
6
-
7
-
8
-
9
-
10
-
11
-
12
-
13
-
14
-
15
-
16
-
17
-
18
-
19
-
20
-
21
-
 22
22 -
 23
23 -
 24
24 -
 25
25 -
 26
26 -
 27
27 -
 28
28 -
 29
29 -
 30
30 -
 31
31 -
 32
32 -
33
-
34
-
35
-
36
-
37
-
38
-
39
-
40
-
41
-
42
-
43
-
44
-
45
-
46
-
47
-
48
-
49
-
50
-
51
-
52
-
53
-
54
-
55
-
56
-
57
-
58
-
59
-
60
-
61
-
62
-
63
-
64
-
65
-
66
-
67
-
68
-
69
-
70
-
71
-
72
-
73
-
74
-
75
-
76
-
77
-
78
-
79
-
80
-
81
-
82
-
83
-
84
-
85
-
86
-
87
-
88
-
89
-
90
-
91
-
92
-
93
-
94
-
95
-
96
-
97
-
98
-
99
-
100
-
101
-
102
-
103
-
104
-
105
-
106
-
107
-
108
-
109
-
110
-
111
-
112
-
113
-
114
-
115
-
116
-
117
-
118
-
119
-
120
-
121
-
122
-
123
-
124
-
125
-
126
-
127
-
128
-
129
-
130
-
131
-
132
-
133
-
134
-
135
-
136
-
137
-
138
-
139
-
140
-
141
-
142
-
143
-
144
-
145
-
146
-
147
-
148
-
149
-
150
-
151
-
152
-
153
-
154
-
155
-
156
-
157
-
158
-
159
-
160
-
161
-
162
-
163
-
164
-
165
-
166
-
167
-
168
-
169
-
170
-
171
-
172
-
173
-
174
-
175
-
176
-
177
-
178
-
179
-
180
-
181
-
182
-
183
-
184
-
185
-
186
-
187
-
188
-
189
-
190
-
191
-
192
-
193
-
194
-
195
-
196
-
197
-
198
-
199
-
200
-
201
-
202
-
203
-
204
-
205
-
206
-
207
 |
 |