Sony DCR-TRV740 PIXELA ImageMixer 1.0 Manual - Page 92
Exporting pictures, Still Picture Format Settings dialog box, File Menu, Context Menu
 |
View all Sony DCR-TRV740 manuals
Add to My Manuals
Save this manual to your list of manuals |
Page 92 highlights
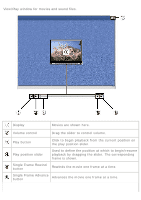
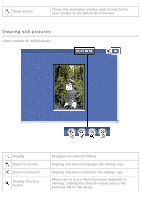
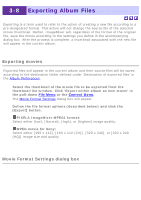
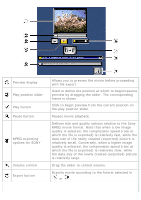
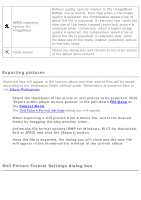
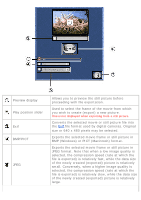
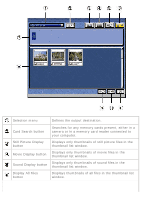
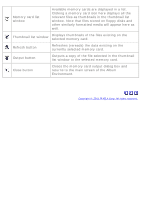
MPEG exporting options for ImageMixer Close button Defines quality options relative to the ImageMixer MPEG1 movie format. Note that when a low image quality is selected, the compression speed (rate at which the file is exported) is relatively fast, while the data size of the newly created (exported) picture is relatively small. Conversely, when a higher image quality is selected, the compression speed (rate at which the file is exported) is relatively slow, while the data size of the newly created (exported) picture is relatively large. Closes the dialog box and returns to the main screen of the Album Environment. Exporting pictures Exported files will appear in the current album and their source files will be saved according to the destination folder defined under 'Destination of exported files' in the Album Preferences. 1. Select the thumbnail of the movie or still picture to be exported. Click 'Export within album as new picture' in the pull-down File Menu or the Context Menu. The Still Picture Format Settings dialog box will appear. 2. When exporting a still picture from a movie file, select the desired frame by dragging the play position slider. 3. Define the file format options (BMP for Windows, PICT for Macintosh, Exif or JPEG) and click the [Export] button. 4. Once the file is exported, the dialog box will close and the new file will appear in the thumbnail list window of the current album Still Picture Format Settings dialog box
-
 1
1 -
2
-
3
-
4
-
5
-
6
-
7
-
8
-
9
-
10
-
11
-
12
-
13
-
14
-
15
-
16
-
17
-
18
-
19
-
20
-
21
-
22
-
23
-
24
-
25
-
26
-
27
-
28
-
29
-
30
-
31
-
32
-
33
-
34
-
35
-
36
-
37
-
38
-
39
-
40
-
41
-
42
-
43
-
44
-
45
-
46
-
47
-
48
-
49
-
50
-
51
-
52
-
53
-
54
-
55
-
56
-
57
-
58
-
59
-
60
-
61
-
62
-
63
-
64
-
65
-
66
-
67
-
68
-
69
-
70
-
71
-
72
-
73
-
74
-
75
-
76
-
77
-
78
-
79
-
80
-
81
-
82
-
83
-
84
-
85
-
86
-
 87
87 -
 88
88 -
 89
89 -
 90
90 -
 91
91 -
 92
92 -
 93
93 -
 94
94 -
 95
95 -
 96
96 -
 97
97 -
98
-
99
-
100
-
101
-
102
-
103
-
104
-
105
-
106
-
107
-
108
-
109
-
110
-
111
-
112
-
113
-
114
-
115
-
116
-
117
-
118
-
119
-
120
-
121
-
122
-
123
-
124
-
125
-
126
-
127
-
128
-
129
-
130
-
131
-
132
-
133
-
134
-
135
-
136
-
137
-
138
-
139
-
140
-
141
-
142
-
143
-
144
-
145
-
146
-
147
-
148
-
149
-
150
-
151
-
152
-
153
-
154
-
155
-
156
-
157
-
158
-
159
-
160
-
161
-
162
-
163
-
164
-
165
-
166
-
167
-
168
-
169
-
170
-
171
-
172
-
173
-
174
-
175
-
176
-
177
-
178
-
179
-
180
-
181
-
182
-
183
-
184
-
185
-
186
-
187
-
188
-
189
-
190
-
191
-
192
-
193
-
194
-
195
-
196
-
197
-
198
-
199
-
200
-
201
-
202
-
203
-
204
-
205
-
206
-
207
 |
 |