Sony DCR-TRV740 PIXELA ImageMixer 1.0 Manual - Page 70
Delete album, Create album with selected thumbnails, Add thumbnail
 |
View all Sony DCR-TRV740 manuals
Add to My Manuals
Save this manual to your list of manuals |
Page 70 highlights
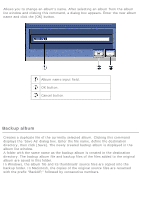
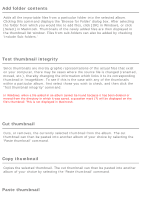
Delete album Deletes the selected album. Clicking this command displays a confirmation dialog box. Clicking the button deletes the selected album. Only the album itself, and not the source files associated with it, is deleted. Create album with selected thumbnails Creates a new album with the selected source files (according to the currently selected thumbnails) as its initial contents. In Windows, clicking this menu item displays the 'Save As' dialog box. Enter the album file name, define the destination directory, and then click [Save]. The newly created album is added to the album list window. In Macintosh, clicking this menu item creates an album with the selected thumbnail files and adds it to the album list window. Add thumbnail Adds thumbnails into the selected album. Clicking this command displays the 'Open' dialog box. Select the directory in which the file you want to add is saved. Selecting and opening files adds them to the album selected in the album list window. Thumbnails of the newly added files are then displayed in the thumbnail list window. Unlike adding thumbnails via the import file mode, this command does not create a copy of the thumbnail's source file. When a thumbnail is added, its name is the same as that of its source file. Because ImageMixer manages thumbnail names and source file names separately, they do not always have to be the same. Thumbnail names can be changed in the 'title' field of the Thumbnail/Detailed file information view. File names can be changed by the 'rename file' command in the file menu. In Macintosh, it may be impossible to create thumbnails for files which cannot be opened by QuickTime Player. Also, since Macintosh recognizes files by their contents rather than file extensions, some files may be added as certain file type which is not in accordance with their file extension.
-
 1
1 -
2
-
3
-
4
-
5
-
6
-
7
-
8
-
9
-
10
-
11
-
12
-
13
-
14
-
15
-
16
-
17
-
18
-
19
-
20
-
21
-
22
-
23
-
24
-
25
-
26
-
27
-
28
-
29
-
30
-
31
-
32
-
33
-
34
-
35
-
36
-
37
-
38
-
39
-
40
-
41
-
42
-
43
-
44
-
45
-
46
-
47
-
48
-
49
-
50
-
51
-
52
-
53
-
54
-
55
-
56
-
57
-
58
-
59
-
60
-
61
-
62
-
63
-
64
-
 65
65 -
 66
66 -
 67
67 -
 68
68 -
 69
69 -
 70
70 -
 71
71 -
 72
72 -
 73
73 -
 74
74 -
 75
75 -
76
-
77
-
78
-
79
-
80
-
81
-
82
-
83
-
84
-
85
-
86
-
87
-
88
-
89
-
90
-
91
-
92
-
93
-
94
-
95
-
96
-
97
-
98
-
99
-
100
-
101
-
102
-
103
-
104
-
105
-
106
-
107
-
108
-
109
-
110
-
111
-
112
-
113
-
114
-
115
-
116
-
117
-
118
-
119
-
120
-
121
-
122
-
123
-
124
-
125
-
126
-
127
-
128
-
129
-
130
-
131
-
132
-
133
-
134
-
135
-
136
-
137
-
138
-
139
-
140
-
141
-
142
-
143
-
144
-
145
-
146
-
147
-
148
-
149
-
150
-
151
-
152
-
153
-
154
-
155
-
156
-
157
-
158
-
159
-
160
-
161
-
162
-
163
-
164
-
165
-
166
-
167
-
168
-
169
-
170
-
171
-
172
-
173
-
174
-
175
-
176
-
177
-
178
-
179
-
180
-
181
-
182
-
183
-
184
-
185
-
186
-
187
-
188
-
189
-
190
-
191
-
192
-
193
-
194
-
195
-
196
-
197
-
198
-
199
-
200
-
201
-
202
-
203
-
204
-
205
-
206
-
207
 |
 |