Sony DSC-S40 Operating Instructions (Camera)
Sony DSC-S40 - Cyber-shot Digital Still Camera Manual
 |
View all Sony DSC-S40 manuals
Add to My Manuals
Save this manual to your list of manuals |
Sony DSC-S40 manual content summary:
- Sony DSC-S40 | Operating Instructions (Camera) - Page 1
be found at our Customer Support Website. Printed on 100% recycled paper using VOC (Volatile Organic Compound)-free vegetable oil based ink. Printed in China Digital Still Camera User's Guide/ Troubleshooting Operating Instructions Before operating the unit, please read this manual and "Read This - Sony DSC-S40 | Operating Instructions (Camera) - Page 2
this product, you may call: Sony Customer Information Services Center 1-800-222-SONY (7669) The number below is for the FCC related matters only. Regulatory Information Declaration of Conformity Trade Name: SONY Model No.: DSC-S40 Responsible Party: Sony Electronics Inc. Address: 16450 W. Bernardo - Sony DSC-S40 | Operating Instructions (Camera) - Page 3
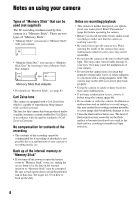
installed and used in accordance with the instructions, may cause harmful interference to radio the equipment in order to comply with the limits for a digital device pursuant to Subpart B of Part 15 of FCC Rules. the picture and sound of this camera. Notice If static electricity or electromagnetism - Sony DSC-S40 | Operating Instructions (Camera) - Page 4
for if recording or playback is not possible due to a malfunction of your camera or recording media, etc. Back up of the internal memory or "Memory Stick" • If you turn off the power or open the battery cover or "Memory Stick" cover, etc. during the access lamp is lit, the data in the internal - Sony DSC-S40 | Operating Instructions (Camera) - Page 5
tiny black points and/or bright points (white, red, blue, or green in color) that constantly appear on the LCD screen and the LCD finder. These points are this manual The photographs used as examples of pictures in this manual are reproduced images, and are not actual images shot using this camera. - Sony DSC-S40 | Operating Instructions (Camera) - Page 6
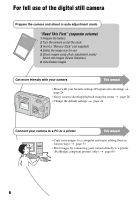
digital still camera Prepare the camera and shoot in auto adjustment mode "Read This First" (separate volume) 1 Prepare the battery 2 Turn the camera on/set the clock 3 Insert a "Memory Stick page 41 1 2 1 2 Connect your camera to a PC or a printer This manual • Copy your images to a computer and - Sony DSC-S40 | Operating Instructions (Camera) - Page 7
Stick" (Recording with the internal memory 22 Battery life and number of images that can be recorded/viewed 23 Using the mode switch 24 Using the menu Using menu items 26 Menu items 27 Shooting menu 28 (Camera) (EV) 9 (Focus) WB (White Bal) ISO (P.Quality) Mode (REC Mode) M (Interval) (Flash - Sony DSC-S40 | Operating Instructions (Camera) - Page 8
(Resize) (Rotate) (Divide) (Setup) Trimming Using the Setup screen Using Setup items 41 Camera 1 42 1 AF Mode Digital Zoom Date/Time Red Eye Reduction AF Illuminator Auto Review Camera 2 45 2 Enlarged Icon Internal Memory Tool 46 Format Memory Stick Tool 47 Format Create REC. Folder Change REC - Sony DSC-S40 | Operating Instructions (Camera) - Page 9
with your camera (using a "Memory Stick 59 Using the supplied software 60 Using your Macintosh computer 62 Printing still images How to print still images 64 Printing images directly using a PictBridge compliant printer 65 Printing at a shop 68 Troubleshooting Troubleshooting 70 Warning - Sony DSC-S40 | Operating Instructions (Camera) - Page 10
shake. t See "Hints for preventing blur" (below). Hints for preventing blur Hold the camera steadily, keeping your arms at your side. Also, you can stabilize the camera by leaning against a tree or a building beside you. Using a tripod, and using the flash in dark places are also recommended. 10 - Sony DSC-S40 | Operating Instructions (Camera) - Page 11
is automatically set to the proper value in the auto adjustment mode. However, you can adjust it manually using the functions below. [EV]: Allows you to adjust the exposure that has been determined by the camera. t page 28 [Metering Mode]: Allows you to change the part of the subject to be measured - Sony DSC-S40 | Operating Instructions (Camera) - Page 12
adjust color tones manually with [White Bal] (page 30). Reddish Quality On "image quality" and "image size" A digital image is made memory, and the image is displayed in fine detail. "Image size" is shown by the number of pixels. Although you cannot see the differences on the screen of the camera - Sony DSC-S40 | Operating Instructions (Camera) - Page 13
Enjoying the camera Selecting the image size for use (t step 4 in "Read This First") the image quality (compression ratio) in combination (page 30) You can select the compression ratio when digital images are saved. When you select a high compression ratio, the image lacks the fineness of detail, - Sony DSC-S40 | Operating Instructions (Camera) - Page 14
may damage the camera. D Speaker (bottom) E POWER lamp (t step 2 in "Read This First") F Microphone G Lens H Finder window I (USB) jack (54) J (USB) jack cover K "Memory Stick" cover (t step 3 in "Read This First") L Self-timer lamp (t step 5 in "Read This First")/AF illuminator (44) M Flash (t step - Sony DSC-S40 | Operating Instructions (Camera) - Page 15
Enjoying the camera N AC Adaptor cord cover To use the AC-LS5K AC Adaptor (not supplied) 1 2 3 5 4 • Do not pinch the cord when you close the cover. O Access lamp (t step 4 in "Read This First" 15 - Sony DSC-S40 | Operating Instructions (Camera) - Page 16
the screen Battery remaining (t step 1 in "Read This First") AE/AF lock (t step 5 in "Read This First") Recording mode (24, 31) White balance (30) Standby/Recording a movie (t step 5 in "Read This First") Camera mode (Scene Selection) (t step 5 in "Read This First") Camera mode (Program) (24) Flash - Sony DSC-S40 | Operating Instructions (Camera) - Page 17
the internal memory. Remaining internal memory capacity (21) Remaining "Memory Stick" capacity ( camera activates the NR slow shutter function to reduce noise. 125 Shutter speed F3.5 Aperture value +2.0EV EV level value (28) DPOF (not displayed on the screen on the previous page) Menu/Guide - Sony DSC-S40 | Operating Instructions (Camera) - Page 18
M N - 1.3 Step 12/16 B Display 101-0012 C Display 101 101 Indication Battery remaining (t step 1 in "Read This First") Image size (t step 4 in "Read memory. Playback folder (34) • This does not appear when using the internal memory. Remaining internal memory capacity (21) Remaining "Memory Stick - Sony DSC-S40 | Operating Instructions (Camera) - Page 19
Enjoying the camera Display 8/8 12/12 C:32:00 00:00:12 D Display +2.0EV Indication cable (67) EV level value (28) ISO number (30) Metering mode (t step 5 in "Read This First") Flash White balance (30) 500 F3.5 Shutter speed Aperture value Playback image (t step 6 in "Read This First") E Display - Sony DSC-S40 | Operating Instructions (Camera) - Page 20
on VGA 96 Image information is displayed during playback. S AF • When you set the LCD screen to Off, the digital zoom does not function (page 42) and [AF Mode] is set to [Single] (page 42). When you select (flash)/ (self-timer)/ (metering), the image is displayed for about two seconds. 20 - Sony DSC-S40 | Operating Instructions (Camera) - Page 21
:18 1:31:09 24:18:25 • Movies with the size set to [640(Fine)] can be only recorded on a "Memory Stick PRO". • For image size and image quality, see page 12. • When images recorded using earlier Sony models are played back on this camera, the display may differ from the actual image size. 21 - Sony DSC-S40 | Operating Instructions (Camera) - Page 22
data on a hard disc of your computer Perform the procedure on pages 53 to 57 without a "Memory Stick" inserted in the camera. • You cannot move image data on a "Memory Stick" to the internal memory. • By connecting the camera and a computer with a USB cable, you can copy data stored in the internal - Sony DSC-S40 | Operating Instructions (Camera) - Page 23
"Memory Stick" as necessary. Note that the actual numbers may be less than those indicated depending on the conditions of use. • The number of images that can be recorded/ viewed and the battery life are decreased under the following conditions: - The surrounding temperature is low - The flash is - Sony DSC-S40 | Operating Instructions (Camera) - Page 24
Using the mode switch Set the mode switch to the desired function. Mode switch Control button : Shooting movies t step 5 in "Read This First" : Playback/Edit t step 6 in "Read This First" Still image shooting modes : Auto: Auto adjustment mode Allows easy shooting with the settings adjusted - Sony DSC-S40 | Operating Instructions (Camera) - Page 25
This First" For shooting an image appropriately according to the scene condition, a combination of functions is determined by the camera. ( : you can select the desired setting) Flash AF range finder White Balance Burst/Multi Burst Flash Level / / / Center AF - - SL Auto - - - 25 - Sony DSC-S40 | Operating Instructions (Camera) - Page 26
. Items available vary depending on the mode switch position and the menu. (Camera) position in the 2 Press MENU to display the menu. 3 Select the • If the desired item is invisible, keep pressing b/B until it appears on the screen. • Press z after selecting an item when the mode switch is set to - Sony DSC-S40 | Operating Instructions (Camera) - Page 27
items are displayed on the screen. Mode switch position: Auto ( : available) Scene Program Selection Menu for shooting (page 28) (EV) - 9 (Focus) - WB (White Bal) - ISO - (P.Quality) - Mode (REC Mode) M (Interval) - (Flash Level) - PFX (P.Effect) - (Saturation) - (Contrast - Sony DSC-S40 | Operating Instructions (Camera) - Page 28
The exposure is determined automatically by the camera. Toward -: Darkens an image. • For details on the exposure t page 11 • The compensation value can be set in 1/3EV increments. • If a subject is being shot in extremely bright or dark conditions, or the flash is used, the exposure adjustment may - Sony DSC-S40 | Operating Instructions (Camera) - Page 29
works even with a certain amount of vibration. • When you use [Digital screen), or when using [Center AF], the camera may not focus on a subject at the edge of the frame. In a case like this, do as follows. 1 Recompose the shot flashing and remains on, return to the fully composed shot, and press the - Sony DSC-S40 | Operating Instructions (Camera) - Page 30
Balance automatically. • For details on [WB] t page 12 • Under fluorescent lights that flicker, the white balance function may not work correctly even though you select WB(Fluorescent). • Some settings cannot be selected depending on the Scene mode t page 25 ISO Selects a luminous sensitivity - Sony DSC-S40 | Operating Instructions (Camera) - Page 31
on the Scene mode (page 25). On the [Burst] • The flash is set to (No flash). • When recording with the self timer, a series of a maximum of five images is recorded. • When the battery level is low, or when the internal memory or "Memory Stick" is full, the [Burst] stops. • You may not be able - Sony DSC-S40 | Operating Instructions (Camera) - Page 32
26 The maximum number of continuous shots Quality Size Fine (Units: images) screen depending on the Scene mode t page 25 (Flash Level) Adjusts the amount of flash light. + ( +) Toward +: Makes the flash level higher. Normal - ( -) Toward -: Makes the flash level lower. • To change flash - Sony DSC-S40 | Operating Instructions (Camera) - Page 33
t page 26 Using the menu PFX (P.Effect) Allows you to shoot an image with special effects. B&W( ) Records the image in monochrome (black and white). Sepia ( ) Records the image in sepia (like an old photograph). Off No effect. • This setting is not maintained when the power is turned - Sony DSC-S40 | Operating Instructions (Camera) - Page 34
Of Files: 9 Created: 2005 1 1 1:05:34AM OK Cancel BACK/NEXT 2 Select [OK] with v , then press z. z On the [Folder] The camera stores images in a specified folder of a "Memory Stick" (page 47). You can change the folder or create a new one. • To create a new folder t [Create REC. Folder] (page - Sony DSC-S40 | Operating Instructions (Camera) - Page 35
To protect images in index mode 1 Press (index) to display the index screen. 2 Press MENU to display the menu. 3 Select [-] (Protect) with Press MENU. 8 Select [OK] with B, then press z. The - indicator turns white. The selected images are protected. • To protect all images in the folder, select - Sony DSC-S40 | Operating Instructions (Camera) - Page 36
For details on the operation t page 26 To cancel the protection In single-image mode Press z in step 3 or 4 of "To protect images in single-image mode." In index mode 1 Select the image for which you want to remove protection in step 5 of "To protect images in index mode." 2 Press z to turn the - - Sony DSC-S40 | Operating Instructions (Camera) - Page 37
the operation t page 26 Using the menu Image Folder All Plays back all images in the selected folder. Plays back all images stored on the "Memory Stick". Repeat On Off Plays back images in a continuous loop. After all the images have been played back, the slide show ends. Start Cancel See the - Sony DSC-S40 | Operating Instructions (Camera) - Page 38
images shot with other cameras. • When viewing images on a computer, the image rotation information may not be reflected depending on the software. (Divide) Cuts movies, or deletes unnecessary portions of movies. This is the recommended function to use when the internal memory or "Memory Stick - Sony DSC-S40 | Operating Instructions (Camera) - Page 39
For details on the operation t page 26 Using the menu Example: Cutting a movie numbered 101_0002 This section describes an example of dividing a movie numbered 101_0002 and deleting it in the following file configuration. 101_0001 101_0003 1 2 3 101_0002 1 Cutting scene A. 1 A 2 B 3 - Sony DSC-S40 | Operating Instructions (Camera) - Page 40
image is retained. • The quality of trimmed images may deteriorate. • You cannot trim to an image size of 3:2. • You cannot trim images displayed with Quick Review. 40 - Sony DSC-S40 | Operating Instructions (Camera) - Page 41
2 Clock Set: OK Cancel 1 Setup 2 1 File Number: USB Connect: 2 Clock Set: OK Cancel 1 To turn off the (Setup) screen, press MENU. To return to the menu from the Setup screen, press b on the control button repeatedly. To cancel the (Setup) setting Select [Cancel] if it appears, then press z on - Sony DSC-S40 | Operating Instructions (Camera) - Page 42
mode shortens the time needed for focusing. • Battery consumption is faster than in [Single] mode. • When shooting using the finder with the LCD screen off, the camera operates in the [Single] mode. Digital Zoom Selects the digital zoom mode. The camera enlarges the image using optical zoom (up - Sony DSC-S40 | Operating Instructions (Camera) - Page 43
when using the digital zoom. The or indicator flashes, and AF operates the lower-right corner of the screen during playback only. Day&Time flash pre-strobes twice or more before shooting. Does not use Red Eye Reduction. • Because it takes about a second until the shutter clicks, hold the camera - Sony DSC-S40 | Operating Instructions (Camera) - Page 44
emits red light allowing the camera to focus easily when the frame does not appear. The or indicator flashes, and AF operates with priority on subjects problems with safety, do not look directly into the AF illuminator emitter at close range. Auto Review Displays the recorded image on the screen - Sony DSC-S40 | Operating Instructions (Camera) - Page 45
Camera 2 2 For details on the operation t page 41 The default settings are marked with . Enlarged Icon Enlarges the setting indicator temporarily when you press (Flash mode), (Metering mode). On Enlarges the indicators. Off Does not enlarge the indicators. (Self-timer), or Using the Setup - Sony DSC-S40 | Operating Instructions (Camera) - Page 46
t page 41 This item does not appear when a "Memory Stick" is inserted in the camera. The default settings are marked with . Format Formats the internal memory. • Note that formatting irrevocably erases all data in the internal memory, including even protected images. OK See the following - Sony DSC-S40 | Operating Instructions (Camera) - Page 47
details on the operation t page 41 Using the Setup screen This item appears only when a "Memory Stick" is inserted in the camera. The default settings are marked with . Format Formats the "Memory Stick". A commercially available "Memory Stick" is already formatted, and can be used immediately - Sony DSC-S40 | Operating Instructions (Camera) - Page 48
folder selection screen appears. batteries may run out, causing copying to fail or possibly corrupting the data. • You cannot copy individual images. • The original images in the internal memory are retained even after copying. To delete the contents of the internal memory, remove the "Memory Stick - Sony DSC-S40 | Operating Instructions (Camera) - Page 49
page 41 The default settings are marked with . Beep Selects the sound produced when you operate the camera. Shutter Turns on the shutter sound when you press the shutter button. On Turns on the beep/ • Make sure that the power is not disconnected during resetting. Using the Setup screen 49 - Sony DSC-S40 | Operating Instructions (Camera) - Page 50
even if the recording folder or the "Memory Stick" is changed. (When the replaced "Memory Stick" contains a file with a number higher than when connecting the camera to a computer or a PictBridge compliant printer using the USB cable. PictBridge Connects the camera to a PictBridge compliant - Sony DSC-S40 | Operating Instructions (Camera) - Page 51
). Using your computer Copying images to your computer (page 53) Preparation Viewing images on your computer Installing the USB driver. • Installation of the USB driver is not needed when using Windows XP. Enjoying images using "PicturePackage" (page 60) Viewing images saved on your computer - Sony DSC-S40 | Operating Instructions (Camera) - Page 52
Software: Macromedia Flash Player 6.0 or later, Windows Media Player 7.0 or later, DirectX 9.0b or later Sound card: 16-bit stereo sound card with speakers Memory to a single computer at the same time, some devices, including your camera, may not operate, depending on the types of USB devices you are - Sony DSC-S40 | Operating Instructions (Camera) - Page 53
" slot Follow Stages 1 through 5 on pages 53 to 57 to copy images. • Screens when copying images on a "Memory Stick" to a computer are used as examples. Stage 1: Installing the USB Driver • A driver is software that enable equipment connected to the computer to operate properly. • When using Windows - Sony DSC-S40 | Operating Instructions (Camera) - Page 54
may be corrupted if the batteries shut off too soon. 3 Set the mode switch to , then turn on the camera and the computer. 54 • With Windows XP, the AutoPlay wizard appears on the desktop. "USB Mode Normal" appears on the screen of the camera. USB Mode Normal Memory Stick Switch on MENU Access - Sony DSC-S40 | Operating Instructions (Camera) - Page 55
then click [Next]. 1 Using your computer 1 2 The "Scanner and Camera Wizard" screen appears. 2 Click [Next]. The images saved on the "Memory Stick" of the camera appear. • If no "Memory Stick" is inserted, images in the internal memory appear. 2 Image copying starts. When the copying is completed - Sony DSC-S40 | Operating Instructions (Camera) - Page 56
button next to [Nothing. I'm finished working with these pictures] to select it, then click [Next]. 1 Double-click [My Computer] t [Removable Disk] t [DCIM]. 1 2 The "Completing the Scanner and Camera Wizard" screen appears. 6 Click [Finish]. The wizard screen closes. • To continue copying other - Sony DSC-S40 | Operating Instructions (Camera) - Page 57
file name, you may not be able to play back that image with your camera (page 59). Stage 5: Viewing images on your computer This section describes the procedure cable • Removing a "Memory Stick" • Inserting a "Memory Stick" after copying images from the internal memory • Turning off the camera 57 - Sony DSC-S40 | Operating Instructions (Camera) - Page 58
here 2 Click (Sony DSC) t [Stop]. 3 Confirm the device on the confirmation window, then click [OK]. 4 Click [OK]. • Step 4 is unnecessary for Windows XP. 5 Disconnect the USB cable, remove the "Memory Stick", or turn off the camera. When you copy images from a "Memory Stick" after copying images - Sony DSC-S40 | Operating Instructions (Camera) - Page 59
folder, first create a folder with your camera (page 47) and then copy the image file. 2 Copy the image file to the "Memory Stick" folder in the following order. 1Right-click the image file, then click [Copy]. 2Double-click [Removable Disk] or [Sony MemoryStick] in [My Computer]. 3Right-click the - Sony DSC-S40 | Operating Instructions (Camera) - Page 60
screen. Installing the software You can install the "PicturePackage" and "ImageMixer VCD2" software using the following procedure. • If you have not yet installed the USB driver (page 53), do not connect the camera click [Next]. 4 Follow the instructions on the screen to complete the installation. • - Sony DSC-S40 | Operating Instructions (Camera) - Page 61
on the desktop. For information on the use of the software Click [?] at the upper-right corner of each screen to show the on-line help. Technical support for "PicturePackage"/"ImageMixer VCD2" is provided by the Pixela User Support Center. For more information, refer to the information included on - Sony DSC-S40 | Operating Instructions (Camera) - Page 62
or later) CPU: iMac, eMac, iBook, PowerBook, Power Mac G3/G4 series Memory: 128 MB or more (256 MB or more is recommended.) Hard Disk: Disk installed. (QuickTime 5 or later is recommended.) Notes on connecting your camera to a computer • Operations are not guaranteed for all the recommended computer - Sony DSC-S40 | Operating Instructions (Camera) - Page 63
, then remove the USB cable, remove the "Memory Stick", or turn off the camera. • If you are using Mac OS X v10.0, perform the procedure above after you have turned your computer off. Creating a video CD using "ImageMixer VCD2" 6 After the user information screen appears, enter the desired name and - Sony DSC-S40 | Operating Instructions (Camera) - Page 64
instructions supplied with the printer. Printing using a computer You can copy images to a computer using the supplied "PicturePackage" software and print the images. Printing at a shop (page 68) You can take a "Memory Stick" containing images shot with your camera to a photo printing service - Sony DSC-S40 | Operating Instructions (Camera) - Page 65
shot using your camera by connecting the camera directly to a PictBridge compliant printer. Stage 1: Preparing the camera Prepare the camera printer. • You cannot print movies. • If the indicator flashes on the screen of the camera for about five seconds (error notification), check the connected - Sony DSC-S40 | Operating Instructions (Camera) - Page 66
connection is made, the indicator appears Print All In This Folder DPOF image Select This image Cancel The camera is set to playback mode, then an image and the print menu appear on the screen. 66 Stage 3: Printing Regardless of what the mode switch is set to, the print menu appears when - Sony DSC-S40 | Operating Instructions (Camera) - Page 67
while the (Do not disconnect the USB cable) indicator appears on the screen. Printing 2/3 Exit indicator To print images on the index screen Perform "Stage 1: Preparing the camera" (page 65) and "Stage 2: Connecting the camera to the printer" (page 66), then proceed with the following. When you - Sony DSC-S40 | Operating Instructions (Camera) - Page 68
Printing at a shop You can take a "Memory Stick" containing images shot with your camera to a photo printing service shop. As long as the shop supports photo printing services conforming to the DPOF, you can make a (Print order) mark on images in advance so that you do not need to reselect them - Sony DSC-S40 | Operating Instructions (Camera) - Page 69
Marking in index mode 1 Display the index screen. (t step 6 in "Read This First") 2 Press MENU to display the menu. 3 Select DPOF with b/B, then press z. 4 Select Repeat step 5 to mark other images. 7 Press MENU. 8 Select [OK] with B, then press z. The mark turns white. Printing still images 69 - Sony DSC-S40 | Operating Instructions (Camera) - Page 70
Troubleshooting Troubleshooting If you experience trouble with your camera, try the following solutions. 1 Check the items on pages 71 to 79. If a code such as "C/E:ss:ss" appears on the screen, see page 80. 2 Remove the batteries, and insert the batteries again after about one minute, and turn on - Sony DSC-S40 | Operating Instructions (Camera) - Page 71
2 in "Read This First"). • The batteries are discharged. Install new batteries or charged Nickel-Metal Hydride batteries (t step 1 in "Read This First"). Shooting still images/movies The screen does not turn on even when the power is turned on. • Turn on the screen (page 20). 71 Troubleshooting - Sony DSC-S40 | Operating Instructions (Camera) - Page 72
Memory Stick PRO" (pages 21, 83). The subject is not visible on the screen Digital Zoom] to [Smart] (page 42). • This function cannot be used when: - The image size is set to [4M] or [3:2]. - Shooting in [Multi Burst] mode. - Shooting movies. The flash does not work. • The flash is set to (No flash - Sony DSC-S40 | Operating Instructions (Camera) - Page 73
the flash (t step 5 in "Read This First"). • Light the room and shoot the subject. The image seen through the finder does not indicate the actual recordable range. • The parallax phenomenon is occurring when the subject is close. To confirm the recordable range, use the screen. 73 Troubleshooting - Sony DSC-S40 | Operating Instructions (Camera) - Page 74
you set protection on an image (page 35), or set the write-protect switch on the "Memory Stick" to the LOCK position (page 83) to prevent accidental erasure. The resizing function does not work. • You cannot resize movies and Multi Burst images. You cannot display a DPOF (Print order) mark. • You - Sony DSC-S40 | Operating Instructions (Camera) - Page 75
Sony DSC], then click [Uninstall] t [OK]. The device is deleted. 4 Install the USB driver (page 53). You cannot copy images. • Connect the camera and your computer correctly using the supplied USB cable (page 54). • Follow the designated copy procedure for your OS (pages 55, 62). 75 Troubleshooting - Sony DSC-S40 | Operating Instructions (Camera) - Page 76
help at the upper-right corner of each screen. • Consult the computer or software manufacturer. The image and sound are interrupted by noise when you view a movie on a computer. • You are playing back the movie directly from the internal memory or the "Memory Stick". Copy the movie to the hard disk - Sony DSC-S40 | Operating Instructions (Camera) - Page 77
computer cannot play back the data in the internal memory. • There is a "Memory Stick" inserted in the camera. Remove it (t step 3 in "Read This First"). Cannot record images using the internal memory. • There is a "Memory Stick" inserted in the camera. Remove it (t step 3 in "Read This First"). The - Sony DSC-S40 | Operating Instructions (Camera) - Page 78
(t step 1 in "Read This First"). The power is on, but the camera does not work. • The built-in microcomputer is not working properly. Remove the batteries, and then, after one minute, insert the batteries and turn on the camera. Cannot identify an indicator on the screen. • See page 16. 78 - Sony DSC-S40 | Operating Instructions (Camera) - Page 79
batteries are discharged. Install new batteries or charged Nickel-Metal Hydride batteries (t step 1 in "Read This First") or use the AC Adaptor (not supplied). The Clock Set screen appears when you turn on the camera. • Set the date and time again (t step 2 in "Read This First"). 79 Troubleshooting - Sony DSC-S40 | Operating Instructions (Camera) - Page 80
a few times, contact your Sony dealer or local authorized Sony service facility. C:32:ss • There is trouble with your camera's hardware. Turn the power off and on again. C:13: ss • The camera cannot read or write data. Turn off and on the power or re-insert the "Memory Stick" several times. • Format - Sony DSC-S40 | Operating Instructions (Camera) - Page 81
light. Use the flash, mount the camera on a tripod, or otherwise secure the camera in place. 640(Fine) is not available • 640(Fine) size movies can be recorded only using a "Memory Stick PRO". Insert a "Memory Stick PRO" or set the image size to a size other than [640(Fine)]. 81 Troubleshooting - Sony DSC-S40 | Operating Instructions (Camera) - Page 82
set to [PictBridge], however the camera is connected to a non-PictBridge compliant device. Check the device. • The connection is not established. Disconnect and connect the USB cable again. If an error message is indicated on the printer, refer to the operating instructions supplied with the printer - Sony DSC-S40 | Operating Instructions (Camera) - Page 83
Memory Stick MagicGate Memory Stick Duo*1 Memory Stick PRO Memory Stick PRO Duo*1 Recording/ Playback a a*2*3 a a*2*3 a*2 a*2 a*2*3*4 a*2*3*4 *1When using a "Memory Stick Duo" with this camera, be sure to insert it into a Memory Stick Duo Adaptor. *2"MagicGate Memory Stick" and "Memory Stick - Sony DSC-S40 | Operating Instructions (Camera) - Page 84
Notes on using a "Memory Stick Duo" (not supplied) • To use a "Memory Stick Duo" with the camera, be sure to insert the "Memory Stick Duo" into a Memory Stick Duo Adaptor. If you insert a "Memory Stick Duo" into a "Memory Stick" compliant device without a Memory Stick Duo Adaptor, you might not be - Sony DSC-S40 | Operating Instructions (Camera) - Page 85
is called the "memory effect."* If this problem occurs, charging the batteries only after using up the existing charge will correct it. * The "memory effect" - the situation in which the capacity of the battery is temporarily lowered. • To use up the batteries completely, put the camera in the slide - Sony DSC-S40 | Operating Instructions (Camera) - Page 86
camera. This may cause the camera to malfunction, and in some cases this malfunction cannot be repaired. x On cleaning Cleaning the LCD screen Wipe the screen clear images. x On the internal rechargeable battery This camera has an internal rechargeable battery for maintaining the date and time and - Sony DSC-S40 | Operating Instructions (Camera) - Page 87
Selection (7 modes) White balance Automatic, Daylight, Cloudy, Fluorescent, Incandescent File format (DCF compliant) Still images: Exif Ver. 2.2 JPEG compliant, DPOF compatible Movies: MPEG1 compliant (Monaural) Recording media Internal memory 32 MB "Memory Stick" Flash Recommended distance - Sony DSC-S40 | Operating Instructions (Camera) - Page 88
Auto Focus 10 Auto power-off function t step 2 in "Read This First" Auto Review 44 B Battery Install/Remove t step 1 in "Read This First" Remaining indicator t step 1 in Recommended environment 52, 62 Software 60 Viewing image stored on a computer with your camera 59 Windows 51 Connecting - Sony DSC-S40 | Operating Instructions (Camera) - Page 89
battery 86 Interval 32 ISO 11, 30 J JPG 58 L Landscape mode t step 5 in "Read This First" Language 49 t step 2 in "Read This First" LCD screen .......... see "Screen" M M AF 42 Macintosh computer 62 Recommended environment 62 "Memory Stick digital 35 PTP 50 Q Quick Review t step 5 in " - Sony DSC-S40 | Operating Instructions (Camera) - Page 90
Read This First" Setup 33, 40, 41 Camera 1 42 Camera 2 45 Internal Memory Tool ...46 Memory Stick Tool .......47 Setup 1 49 Setup 2 Troubleshooting 70 Twilight mode t step 5 in "Read This First" Twilight portrait mode t step 5 in "Read This First" U Underexposure 11 USB Connect 50 USB Driver - Sony DSC-S40 | Operating Instructions (Camera) - Page 91
Sony Corporation. • "Memory Stick", , "Memory Stick PRO", Duo", , "Memory Stick Duo", , "Memory Stick PRO , "MagicGate", and Corporation. are trademarks of Sony • PicturePackage is a trademark of Sony • Macromedia and Flash are trademarks or registered used in this manual are, in general
-
 1
1 -
 2
2 -
 3
3 -
 4
4 -
 5
5 -
 6
6 -
 7
7 -
8
-
9
-
10
-
11
-
12
-
13
-
14
-
15
-
16
-
17
-
18
-
19
-
20
-
21
-
22
-
23
-
24
-
25
-
26
-
27
-
28
-
29
-
30
-
31
-
32
-
33
-
34
-
35
-
36
-
37
-
38
-
39
-
40
-
41
-
42
-
43
-
44
-
45
-
46
-
47
-
48
-
49
-
50
-
51
-
52
-
53
-
54
-
55
-
56
-
57
-
58
-
59
-
60
-
61
-
62
-
63
-
64
-
65
-
66
-
67
-
68
-
69
-
70
-
71
-
72
-
73
-
74
-
75
-
76
-
77
-
78
-
79
-
80
-
81
-
82
-
83
-
84
-
85
-
86
-
87
-
88
-
89
-
90
-
91
 |
 |
Additional information on this product and answers
to frequently asked questions can be found at our
Customer Support Website.
2-590-506-
11
(1)
© 2005 Sony Corporation
Printed in China
Printed on 100% recycled paper using
VOC (Volatile Organic Compound)-free
vegetable oil based ink.
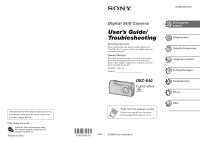
Digital Still Camera
User’s Guide/
Troubleshooting
Operating Instructions
Before operating the unit, please read this manual and
“Read This First” (separate volume) thoroughly, and retain
it for future reference.
Owner’s Record
The model and serial numbers are located on the bottom.
Record the serial number in the space provided below.
Refer to these numbers whenever you call upon your Sony
dealer regarding this product.
Model No.
DSC-S40
Serial No. ___________________________
DSC-S40
“Read This First” (separate volume)
Explains the set-up and basic operations
for shooting/playback with your camera.
Enjoying the
camera
Using the menu
Using the Setup screen
Using your computer
Printing still images
Troubleshooting
Others
Index