Sony DSC-S40 Operating Instructions (Camera) - Page 40
Setup, Trimming, Return
 |
View all Sony DSC-S40 manuals
Add to My Manuals
Save this manual to your list of manuals |
Page 40 highlights
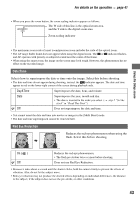
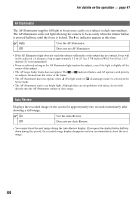
For details on the operation t page 26 5 Press z at the desired cutting point. Divide Dividing Point STD 640 00:00:02 O K Cancel Exit • When you want to adjust the cutting point, select [c/C] (frame rewind/forward) and adjust the cutting point using b/B. • If you want to change the cutting point, select [Cancel]. The playback of the movie starts again. 6 Select [OK] with v/V, and press z. 7 Select [OK] with v , then press z. The movie is cut. • The cut movies are assigned new numbers, and then recorded as the newest files in the selected recording folder. • You cannot cut the following kinds of images. - Still image - Movies not long enough to cut (shorter than about two seconds) - Protected movies (page 35) (Setup) See page 41. Trimming Records an enlarged image (t step 6 in "Read This First") as a new file. Trimming See the following procedure. Return Cancels trimming. 1 Press MENU during playback zoom to display the menu. 2 Select [Trimming] with B on the control button, then press z. 3 Select the image size with v/V, then press z. The image is recorded, and the original image is displayed again. • The trimmed image is recorded as the newest file in the selected recording folder, and the original image is retained. • The quality of trimmed images may deteriorate. • You cannot trim to an image size of 3:2. • You cannot trim images displayed with Quick Review. 40
-
 1
1 -
2
-
3
-
4
-
5
-
6
-
7
-
8
-
9
-
10
-
11
-
12
-
13
-
14
-
15
-
16
-
17
-
18
-
19
-
20
-
21
-
22
-
23
-
24
-
25
-
26
-
27
-
28
-
29
-
30
-
31
-
32
-
33
-
34
-
 35
35 -
 36
36 -
 37
37 -
 38
38 -
 39
39 -
 40
40 -
 41
41 -
 42
42 -
 43
43 -
 44
44 -
 45
45 -
46
-
47
-
48
-
49
-
50
-
51
-
52
-
53
-
54
-
55
-
56
-
57
-
58
-
59
-
60
-
61
-
62
-
63
-
64
-
65
-
66
-
67
-
68
-
69
-
70
-
71
-
72
-
73
-
74
-
75
-
76
-
77
-
78
-
79
-
80
-
81
-
82
-
83
-
84
-
85
-
86
-
87
-
88
-
89
-
90
-
91
 |
 |