Sony FWD-32LX1 Mounting Bracket Instruction Manual - Page 6
Solid Structure Installation - 32
 |
View all Sony FWD-32LX1 manuals
Add to My Manuals
Save this manual to your list of manuals |
Page 6 highlights
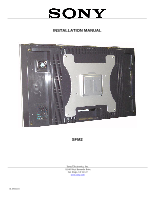
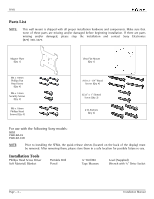
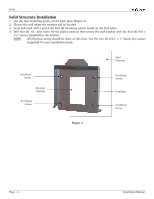
SFM2 Solid Structure Installation 1. Use the four mounting points on the back plate (Figure 2). 2. Choose the wall where the monitor will be located. 3. Level and mark with a pencil the four (4) mounting points found on the back plate. 4. Drill four (4) 1/4" pilot holes for the plastic anchors then secure the wall bracket with the four (4) #10 x 1¼" screws (supplied) to the anchors. NOTE: All electrical wiring should be done at this time. Use the two (2) 6/32" x 1" handy box screws (supplied) for your installation needs. #10 Wood Screws Electrical Opening #10 Wood Screws Solid Structure #10 Wood Screws Frontplate #10 Wood Screws Figure 2 Page - 6 - Installation Manual
-
 1
1 -
 2
2 -
 3
3 -
 4
4 -
 5
5 -
 6
6 -
 7
7 -
 8
8 -
 9
9 -
 10
10 -
 11
11 -
 12
12
 |
 |

SFM2
Page - 6 -
Installation Manual
Solid Structure Installation
1. Use the four mounting points on the back plate (Figure 2).
2. Choose the wall where the monitor will be located.
3. Level and mark with a pencil the four (4) mounting points found on the back plate.
4. Drill four (4) 1/4" pilot holes for the plastic anchors then secure the wall bracket with the four (4) #10 x
1¼" screws (supplied) to the anchors.
NOTE
:
All electrical wiring should be done at this time. Use the two (2) 6/32" x 1" handy box screws
(supplied) for your installation needs.
Figure 2
#10 Wood
Screws
#10 Wood
Screws
#10 Wood
Screws
#10 Wood
Screws
Electrical
Opening
Frontplate
Solid
Structure