Sony ICD-BM1DR9 Operating Instructions - Page 10
Step 3: Inserting a “Memory Stick” into the IC Recorder, terminal side facing inside the recorder.
 |
View all Sony ICD-BM1DR9 manuals
Add to My Manuals
Save this manual to your list of manuals |
Page 10 highlights
Step 3: Inserting a "Memory Stick" into the IC Recorder Notes • Make sure to insert or remove the "Memory Stick" while the unit is turned off. • Never remove the "Memory Stick" while the unit is accessing the "Memory Stick". (The OPR indicator flashes in orange.) 1 Slide and open the "Memory Stick" slot cover. 2 Insert a "Memory Stick" into the "Memory Stick" slot with the terminal side facing inside the recorder. Insert it firmly until it clicks into place. Note Do not insert a "Memory Stick" in a different direction. It may cause malfunction of the unit. 3 Close the "Memory Stick" slot cover. 10GB
-
 1
1 -
2
-
3
-
4
-
 5
5 -
 6
6 -
 7
7 -
 8
8 -
 9
9 -
 10
10 -
 11
11 -
 12
12 -
 13
13 -
 14
14 -
 15
15 -
16
-
17
-
18
-
19
-
20
-
21
-
22
-
23
-
24
-
25
-
26
-
27
-
28
-
29
-
30
-
31
-
32
-
33
-
34
-
35
-
36
-
37
-
38
-
39
-
40
-
41
-
42
-
43
-
44
-
45
-
46
-
47
-
48
-
49
-
50
-
51
-
52
-
53
-
54
-
55
-
56
-
57
-
58
-
59
-
60
-
61
-
62
-
63
-
64
-
65
-
66
-
67
-
68
 |
 |

10
GB
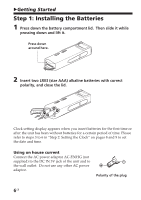
Step 3:
Inserting a “Memory Stick” into
the IC Recorder
Notes
• Make sure to insert or remove the “Memory Stick” while the unit is turned off.
• Never remove the “Memory Stick” while the unit is accessing the “Memory
Stick”. (The OPR indicator flashes in orange.)
1
Slide and open the “Memory Stick” slot cover.
2
Insert a “Memory Stick” into the “Memory Stick” slot with the
terminal side facing inside the recorder.
Insert it firmly until it
clicks into place.
Note
Do not insert a “Memory Stick” in a
different direction. It may cause
malfunction of the unit.
3
Close the “Memory Stick” slot cover.