Sony ICD-PX820 Operating Instructions - Page 42
To change the alarm setting, When the set date and time, comes, When you select DATE - windows 10
 |
UPC - 027242780828
View all Sony ICD-PX820 manuals
Add to My Manuals
Save this manual to your list of manuals |
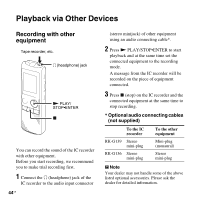
Page 42 highlights
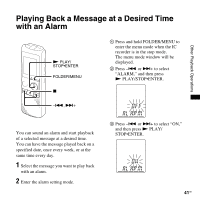
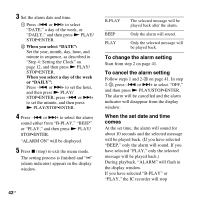
3 Set the alarm date and time. 1 Press -. or >+ to select "DATE," a day of the week, or "DAILY," and then press N PLAY/ STOP•ENTER. 2 When you select "DATE": Set the year, month, day, hour, and minute in sequence, as described in "Step 4: Setting the Clock" on page 12, and then press N PLAY/ STOP•ENTER. When you select a day of the week or "DAILY": Press -. or >+ to set the hour, and then press N PLAY/ STOP•ENTER, press -. or >+ to set the minute, and then press N PLAY/STOP•ENTER. 4 Press -. or >+ to select the alarm sound either from "B-PLAY," "BEEP" or "PLAY," and then press N PLAY/ STOP•ENTER. "ALARM ON" will be displayed. 5 Press x (stop) to exit the menu mode. The setting process is finished and "," (alarm indicator) appears in the display window. B-PLAY The selected message will be played back after the alarm. BEEP Only the alarm will sound. PLAY Only the selected message will be played back. To change the alarm setting Start from step 2 on page 41. To cancel the alarm setting Follow steps 1 and 2-3 on page 41. In step 2-3, press -. or >+ to select "OFF," and then press N PLAY/STOP•ENTER. The alarm will be cancelled and the alarm indicator will disappear from the display window. When the set date and time comes At the set time, the alarm will sound for about 10 seconds and the selected message will be played back. (If you have selected "BEEP," only the alarm will sound. If you have selected "PLAY," only the selected message will be played back.) During playback, "ALARM" will flash in the display window. If you have selected "B-PLAY" or "PLAY," the IC recorder will stop 42 GB
-
 1
1 -
2
-
3
-
4
-
5
-
6
-
7
-
8
-
9
-
10
-
11
-
12
-
13
-
14
-
15
-
16
-
17
-
18
-
19
-
20
-
21
-
22
-
23
-
24
-
25
-
26
-
27
-
28
-
29
-
30
-
31
-
32
-
33
-
34
-
35
-
36
-
 37
37 -
 38
38 -
 39
39 -
 40
40 -
 41
41 -
 42
42 -
 43
43 -
 44
44 -
 45
45 -
 46
46 -
 47
47 -
48
-
49
-
50
-
51
-
52
-
53
-
54
-
55
-
56
-
57
-
58
-
59
-
60
-
61
-
62
-
63
-
64
-
65
-
66
-
67
-
68
-
69
-
70
-
71
-
72
-
73
-
74
-
75
-
76
-
77
-
78
-
79
-
80
-
81
-
82
-
83
-
84
-
85
-
86
-
87
-
88
-
89
-
90
-
91
-
92
-
93
-
94
-
95
-
96
 |
 |