Sony KP-61V85 Operating Instructions - Page 47
Video Label, Direct Play, Flash Focus, Video Label Options, VIDEO 1, VIDEO 2/3, VHS, 8mm, Beta, LD - convergence
 |
View all Sony KP-61V85 manuals
Add to My Manuals
Save this manual to your list of manuals |
Page 47 highlights
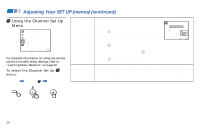
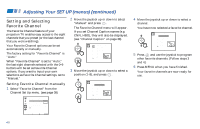
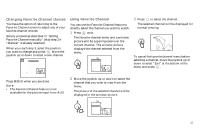
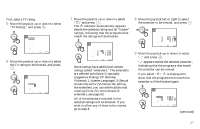
Video Label Easy recognition of connected equipment (e.g. SAT, VHS, etc.) This feature allows you to label each input mode so that you can easily identify the connected equipment (e.g. you can label VIDEO 1 IN as VHS). With the Video Label window open: 1 Move the joystick up or down to select the input mode you want to label and press . 2 Move the joystick up or down to select the label and press . Video Label VIDEO1: VIDEO2: VIDEO3: VIDEO4: VIDEO5: VIDEO1 VIDEO2 VIDEO3 VIDEO4 VIDEO5 Move Select Exit MENU Video Label Options: VIDEO 1: VIDEO 1, VHS, 8mm, Beta, LD, SAT, DVD, AV RECEIVER, DTV, Skip VIDEO 2/3: VIDEO 2/VIDEO 3, VHS, 8mm, Beta, LD, SAT, DVD, DTV, Skip VIDEO 4/5: VIDEO 4/VIDEO 5, SAT, DVD, DTV, Skip If you select "Skip," your projection TV will skip this connection when you scan through video sources using the TV/VIDEO button. Video Label VIDEO1: Video1 VIDEO2: VHS VIDEO3: 8mm VIDEO4: Beta VIDEO5: LD SAT DVD AV RECEIVER DTV Skip Move Select Exit MENU Direct Play Easy operation of a connected VCR This feature allows you to switch the input mode from the TV to a Sony VCR (MDP or DVD) and start playing by only pressing the ( (playback) button on the remote control. You have to set the VTR1/2/3/DVD/ MDP switch on the remote control (e.g., you connect your VCR to the VIDEO 3 IN jacks and set the VTR1/2/ 3/DVD/MDP switch to VTR 3). With the Direct Play window open: 1 Move the joystick up or down to select the input to which your video equipment is connected, and press . 2 Move the joystick up or down to select the position of the VTR 1/2/3/DVD/MDP switch, and press . Direct Play VIDEO1: Off VIDEO2: Off VIDEO3: Off VIDEO4: Off VIDEO5: Off 1 2 3 DVD/MDP Move Select Exit MENU Direct Play VIDEO1: VIDEO2: VIDEO3: VIDEO4: VIDEO5: Off VTR1 VTR2 VTR3 DVD/MDP 1 2 3 DVD/MDP Move Select Exit MENU Flash Focus Automatic convergence adjustment Select Yes and press to start Flash Focus adjustment. When the adjustment is completed, the cross pattern on the screen becomes white. (for details, see page 24) Select No to cancel Flash Focus. 43
-
 1
1 -
2
-
3
-
4
-
5
-
6
-
7
-
8
-
9
-
10
-
11
-
12
-
13
-
14
-
15
-
16
-
17
-
18
-
19
-
20
-
21
-
22
-
23
-
24
-
25
-
26
-
27
-
28
-
29
-
30
-
31
-
32
-
33
-
34
-
35
-
36
-
37
-
38
-
39
-
40
-
41
-
 42
42 -
 43
43 -
 44
44 -
 45
45 -
 46
46 -
 47
47 -
 48
48 -
 49
49 -
 50
50 -
 51
51 -
 52
52 -
53
-
54
-
55
-
56
-
57
-
58
-
59
-
60
-
61
-
62
-
63
-
64
-
65
-
66
 |
 |
