Sony MHS-CM1/D Instruction Manual - Page 16
Useful functions for shooting, Using the zoom, Macro Shooting close-up, Using the video light - digital
 |
UPC - 027242762992
View all Sony MHS-CM1/D manuals
Add to My Manuals
Save this manual to your list of manuals |
Page 16 highlights
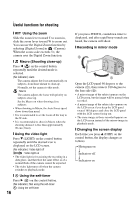
Useful functions for shooting [ W/T Using the zoom Slide the zoom lever toward T to zoom in, slide the zoom lever toward W to zoom out. You can use the Digital Zoom function by selecting [Digital Zoom] in (Camera). When the zoom scale exceeds 5×, the camera uses the Digital Zoom function. [ Macro (Shooting close-up) Press b ( ) on the control button repeatedly until the desired mode is selected. (No indicator): Auto The camera adjusts the focus automatically on subjects, from those distant to close-up. Normally, set the camera to this mode. : Macro The camera adjusts the focus with priority on subjects close-up. Set the Macro on when shooting close subjects. • When shooting in Macro, the Auto Focus speed slows down than usual. • It is recommended to set the zoom all the way to the W side. • It is recommended to shoot in Macro when the shooting distance is less than approximately 90 cm (3 feet). [ Using the video light Press V (LIGHT) on the control button repeatedly until the desired icon is displayed on the LCD screen. (No indicator): Video light off : Video light on • The video light is for assisting the recording in a dark place, and therefore the same effect as of a normal flash of the camera cannot be expected. • The video light turns off when the camera switches to playback mode. [ Using the self-timer Press B ( ) on the control button. (No indicator): Not using the self-timer : Using the self-timer 16 If you press PHOTO, countdown timer is displayed, and after rapid beep sounds are heard, the camera will shoot. [ Recording in mirror mode 2 1 Open the LCD panel 90 degrees to the camera (1), then rotate it 180 degrees to the lens side (2). • A mirror-image of the subject appears on the LCD screen, but the image will be normal when recorded. • A mirror-image of the subject also appears on the LCD screen if you keep the LCD panel rotated 180 degrees and close the LCD panel with the LCD screen facing out. • The same image as those recorded appears on the LCD screen instead of the mirror-image in playback mode. [ Changing the screen display Each time you press v (DISP) on the control button, the display changes as follows. Histogram on r Indicators off r Indicators on
-
 1
1 -
2
-
3
-
4
-
5
-
6
-
7
-
8
-
9
-
10
-
 11
11 -
 12
12 -
 13
13 -
 14
14 -
 15
15 -
 16
16 -
 17
17 -
 18
18 -
 19
19 -
 20
20 -
 21
21 -
22
-
23
-
24
-
25
-
26
-
27
-
28
-
29
-
30
-
31
-
32
-
33
-
34
-
35
-
36
-
37
-
38
-
39
-
40
 |
 |
